This blog reports on the progress of the UAVCAN for Hobbyists (UC4H) project.
UC4H Display: User Configurability
10. Apr. 2019
The UC4H Display has a new cool feature: It can be now freely configured by the user to show the data the user wants to see.
The UC4H Display supports up to four different screens, which can be stepped through with a button. The data items to be shown on each screen can be configured via a simple ASCII text file, which can easily be edited by the user, and then uploaded to the display. The file is parsed internally during upload and the result stored into the internal data structures.
This video briefly demonstrates this functionality:
Release Day
6. Apr. 2019
Firmwares:
UC4H Notify v0.11:
• Support of OLed displays with SH1106 controller
UC4H PowerBrick v0.13:
• Adds new „simple brick“ mode, which allows one to use standard power sensors such as the 3DR powerbrick or MAUCH Hall sensors
• Support of the BatteryInfo message of the standard UAVCAN message set, makes it possible to use native ArduPilot
UC4H Airspeed v0.13:
• Firmware for the UC4H Airspeed PCB version v0.4
• Supports the DLHR and RSC differential pressure sensors
Hardwares:
UC4H Cube Carrier v0.3:
• Initial release of the Carrier PCB for the Pixhawk Cube
• Includes a version to be used together with the SoloLink IMX6 board, for ultimate 3DR Solo brain transplants
• For additional info see The ALL-UC4H Copter, Cube Carrier (Part 1) and The ALL-UC4H Copter, Cube Carrier (Part 2)
UC4H GpsMagBaroLed Carrier v0.3:
• Initial release of the Carrier PCB for the Gps-Magnetometer-Barometer-IndicatorLED node
• For additional info see The ALL-UC4H Copter, GPS-Mag-Baro-LED Nodes
Firmwares and Eagle files as usual in the github repository: https://github.com/olliw42/uavcan4hobbyists
ArduPilot & UAVCAN 2019: The ALL-UC4H Copter
23. Mar. 2019
With the introduction of the UC4H Cube Carrier board the UC4H project has reached a milestone in that it now allows us to build a complete copter which is based on only CANbus as communication backbone and uses only UC4H components. I thus started a video series showing its many features and functions:
The ALL-UC4H Copter Video Series
Solo Black Cube vs AUAV-X2 Vibrations
20. Mar. 2019
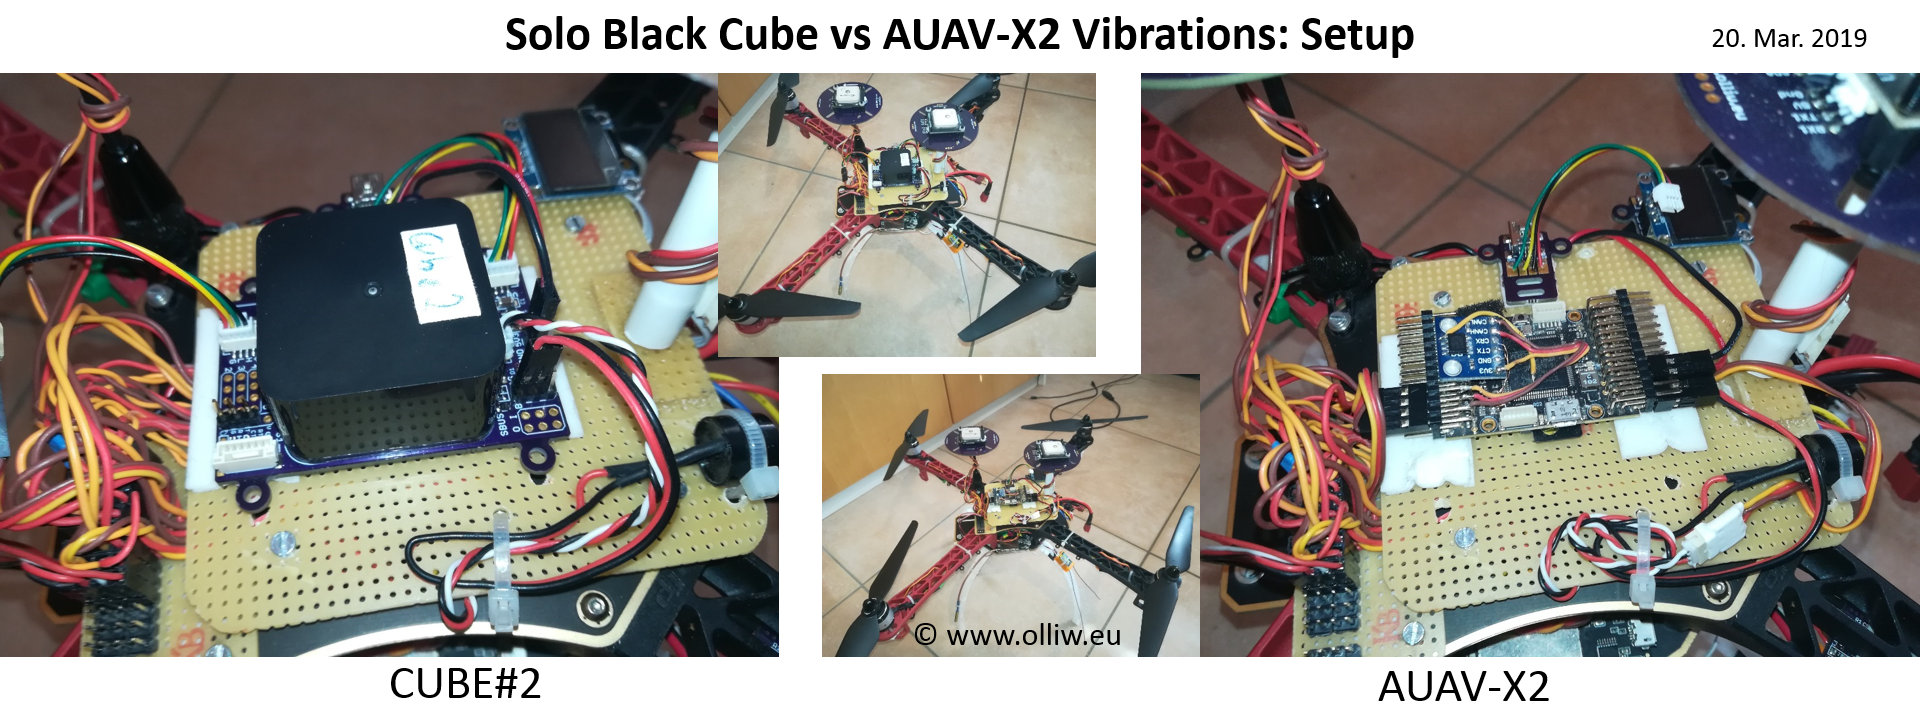
In the 16th March blog post I’ve reported a much higher vibration level when I’m using my Cube#2 (a Solo black cube) as compared to when I’m using my AUAV-X2 flight controller.
In order to be sure I’m not fooling myself, I’ve done a set of test flights whereby ensuring comparable situations. For that, I’ve took my copter apart and redid the wiring and assembly platform, so that both flight controllers are drop-ins and see exactly the same environment. In both cases the flight controller is hard-sticked with tape to the assembly platform. I’ve also painstaikingly ensured that the loaded parameters are identical (except of course of the board specific ones). In each flight the battery was freshly charged. Also the weather was kind of perfect for this: Essentially no winds, except of the last flight there some wind came up. So, the test conditions should be as comparable as they possibly can be. For this test I did six flights in this sequence: Cube#2 mounted, flight, AUAV-X2 mounted, flight, Cube#2 mounted, flight, AUAV-X2 mounted, flight, Cube#2 mounted, hover, AUAV-X2 mounted, hover.
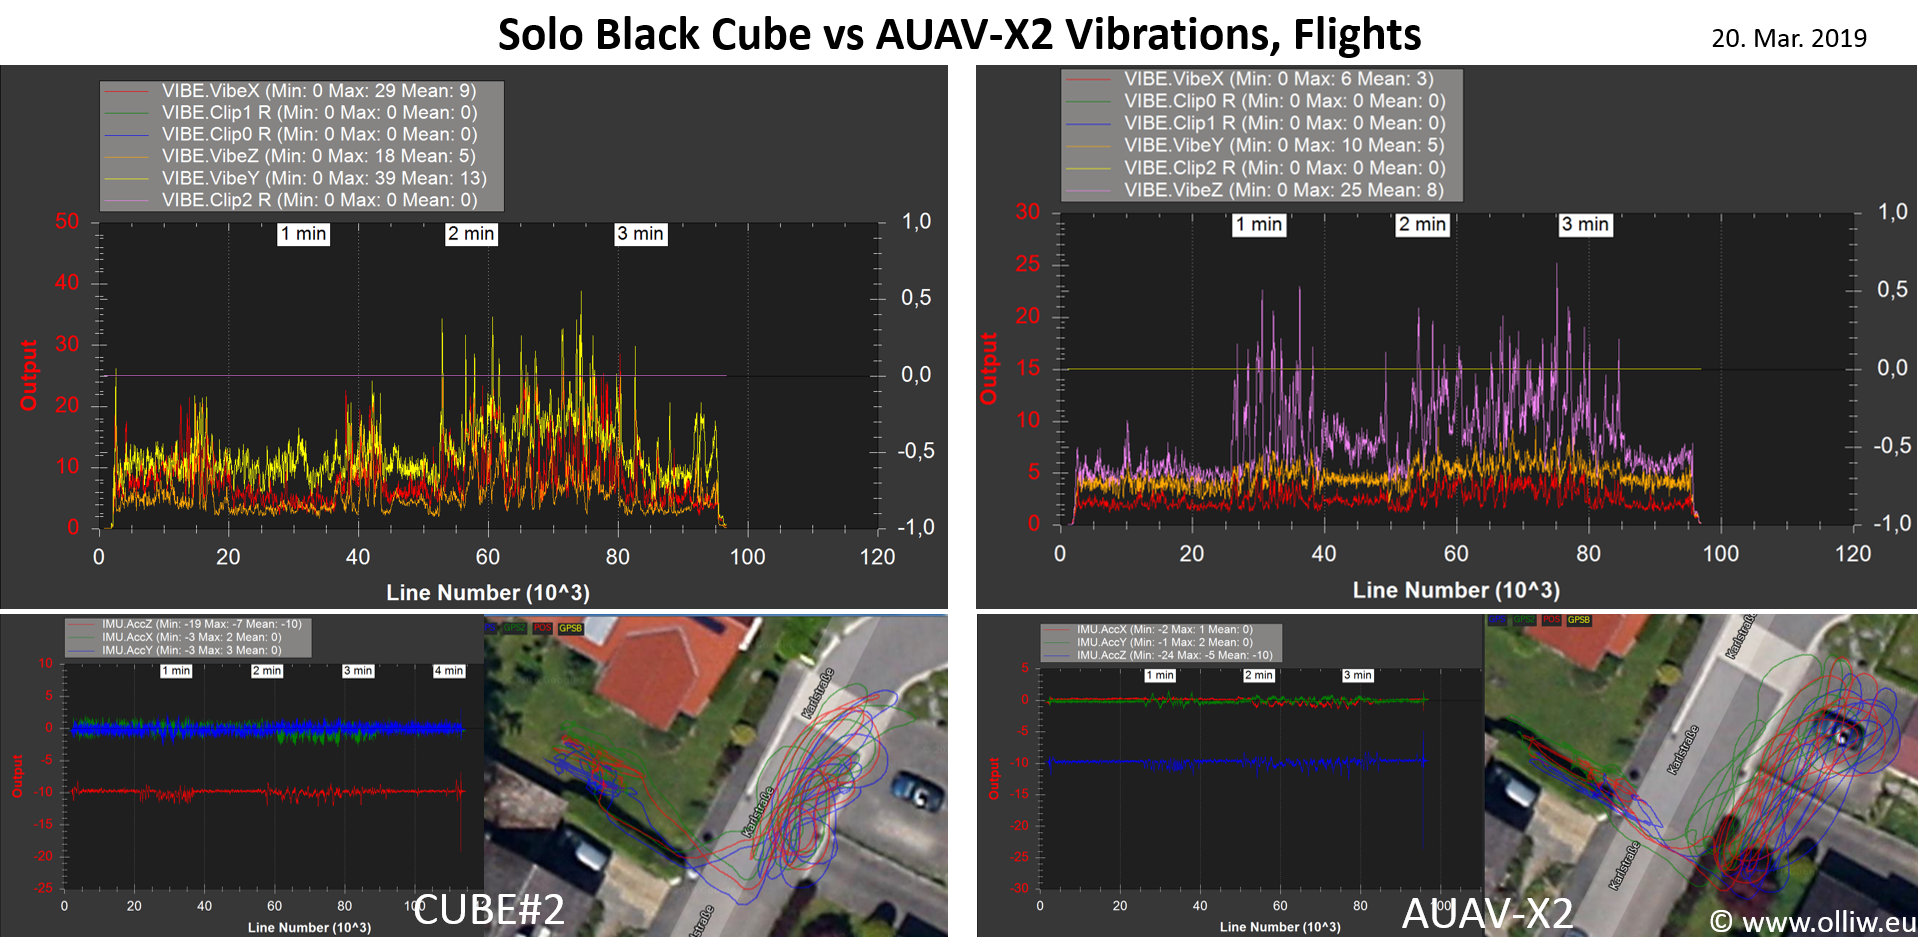
The results are unambiguous: With the cube the vibrations are much worse than with the AUAV-X2. This can in fact be noticed right away by just looking at the copter in flight: While with the AUAV-X2 it stands smoothly in the air, it flies quite twitchy with the cube. Initially I actually thought that something is wrong with the BetaCopter code or with the copter itself. However, that’s not the case, it’s really the cube; the above tests provide unambiguous evidence.
I can’t hide that I’m disappointed about the cube. Sure, I can’t say if it’s this cube or The Cube. I also can’t say if with my copter and mounting style it’s just a lucky punch with the AUAV-X2, and with the Cube I hit the one single unfortunate spot. Many arguments can be thrown in. My point is that I’m really not much interested in spending much time in researching of how to mount the cube to behave equally well. I was kind of expecting: Just stick it to the copter, and it will do well. This obviously was way too naive 🙂

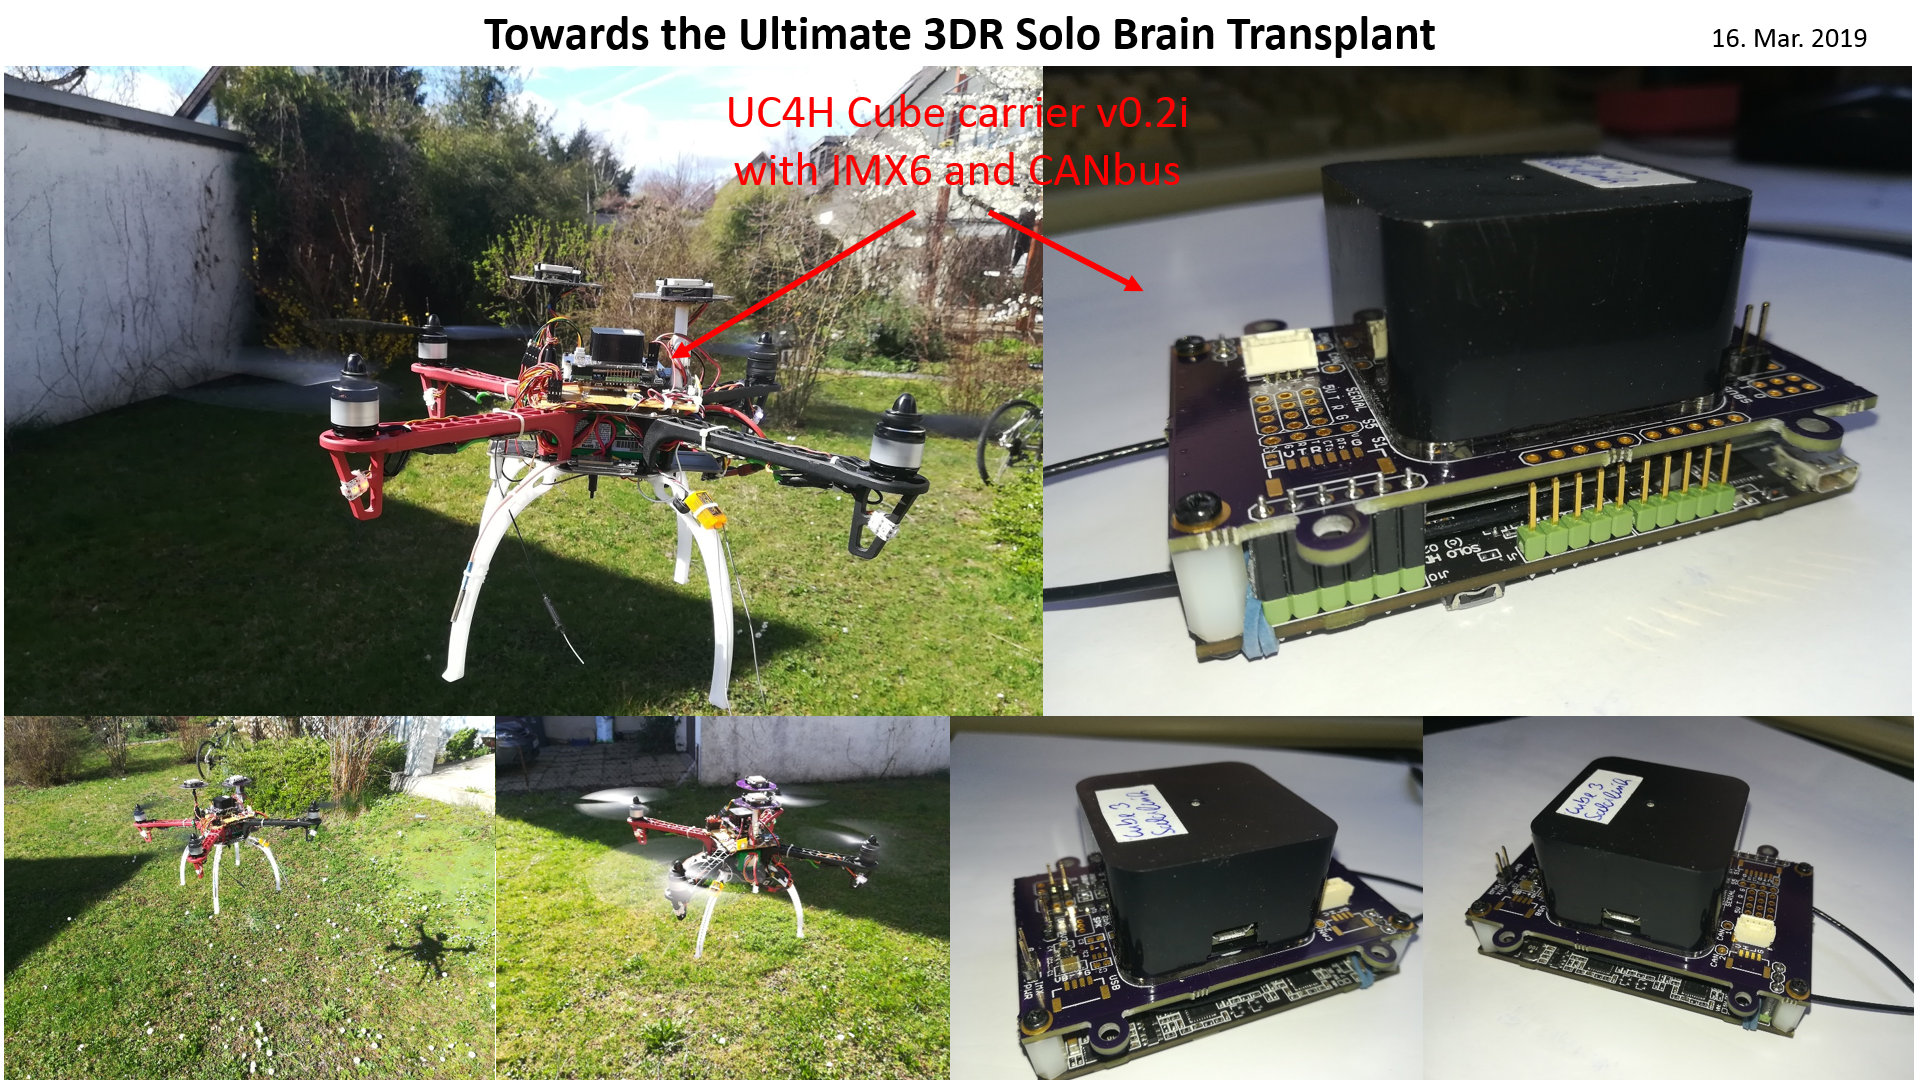
Towards the Ultimate 3DR Solo Brain Transplant
16. Mar. 2019
I’ve also designed a variant of the UC4H Cube carrier which snugly fits onto the IMX6 of the Sololink. So, this too had to be tested. And indeed, I just could complete a first test flight, which – not unexpectedly – was perfectly successful.
I call this the Ultimate 3DR Solo Brain Transplant, since it’s so much cleaner and more compact than re-purposing the Solo motherboard or using one of the available Cube carriers with the IMX6 somehow connected to it.
The final step would be to attach the T-STorM32 gimbal to the copter and demonstrate smart shots. Not sure I’ll do that this weekend however. It’s really quite windy currently, and I have some other plans too. But this demonstration will come, that’s for sure!
I’d like to grab this opportunity to sincerely thank Mike Kelly, for all his background testing efforts with UC4H and sharing his Solo knowledge with me. Thx, sir!
UC4H FC IV: First successful flight!
16. Mar. 2019
MILESTONE reached by UC4H project
This is really a MILESTONE for the UC4H project: I did the first flight with the UC4H Cube carrier, and it was fully successful.
So, why I’m so excited about this? Well, it accomplishes a vision I had for a long while: A copter which only uses dedicated CANbus components. „Dedicated“ here means that each CANbus component is really made with CANbus in mind, and not just a kind of add-on. The flight controller is the perfect example of this. In my opinion the currently available Pixhawk-type flight controllers are NOT made for CANbus (see e.g. here). The UC4H Cube carrier however is, and you’ll see that by two examples in the below. Furthermore, „only“ obviously means that CANbus is the sole communication backbone; no I2C, no SPI, no UART, no ADC, no PWM.
Let me show some pictures. First, the copter. It’s the flamewheel test frame I’m using for a long while now, and which you can see in many posts below too. The AUAV-X2 I’ve replaced however by the UC4H Cube carrier, carrying a Solo black cube. Since it’s a test frame it’s a quite messy build, sure. Yet, you may notice how clean the connections to the flight controller are. No spider-web of wires going to it.
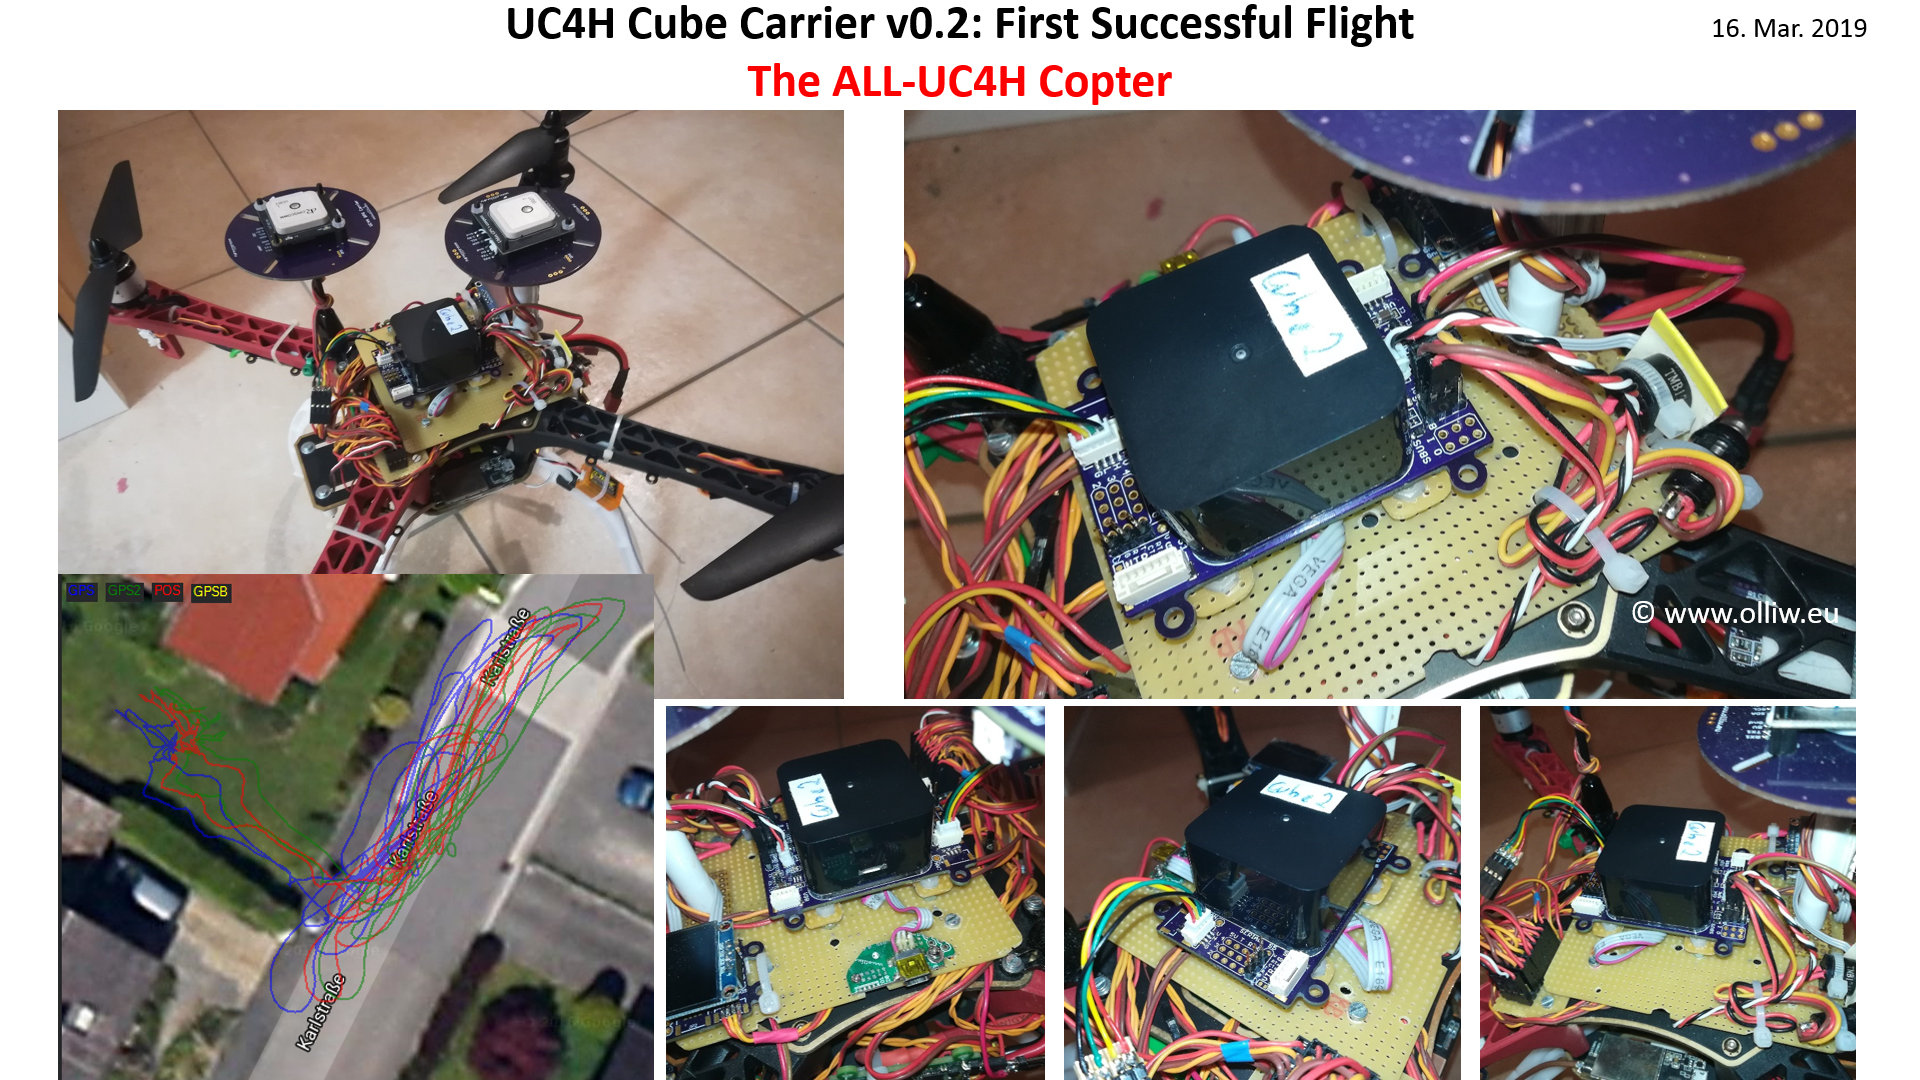
The cube was loaded with BetaCopter-3.6.7-v020u. I think you really have no clue about what a rich set of features a full UC4H copter and BetaCopter gives to you. I could produce a long list, which however wouldn’t tell you much, since – as said – you have no clue 😉 . I just like to give one example: ESC telemetry. It reports live data such as RPM, voltage, current for each ESC/motor. The data are stored in flash and available via Mavlink, and it is also fed into a ESC BattMonitor, which you can use like a normal BattMonitor. Well, you know this and can get this all with a BLHeli ESC too. However, here it is all via ultra-reliable CANbus and not failure-prone DSHOT (DSHOT is great on racers, but really not for UAVs). Some data plots:
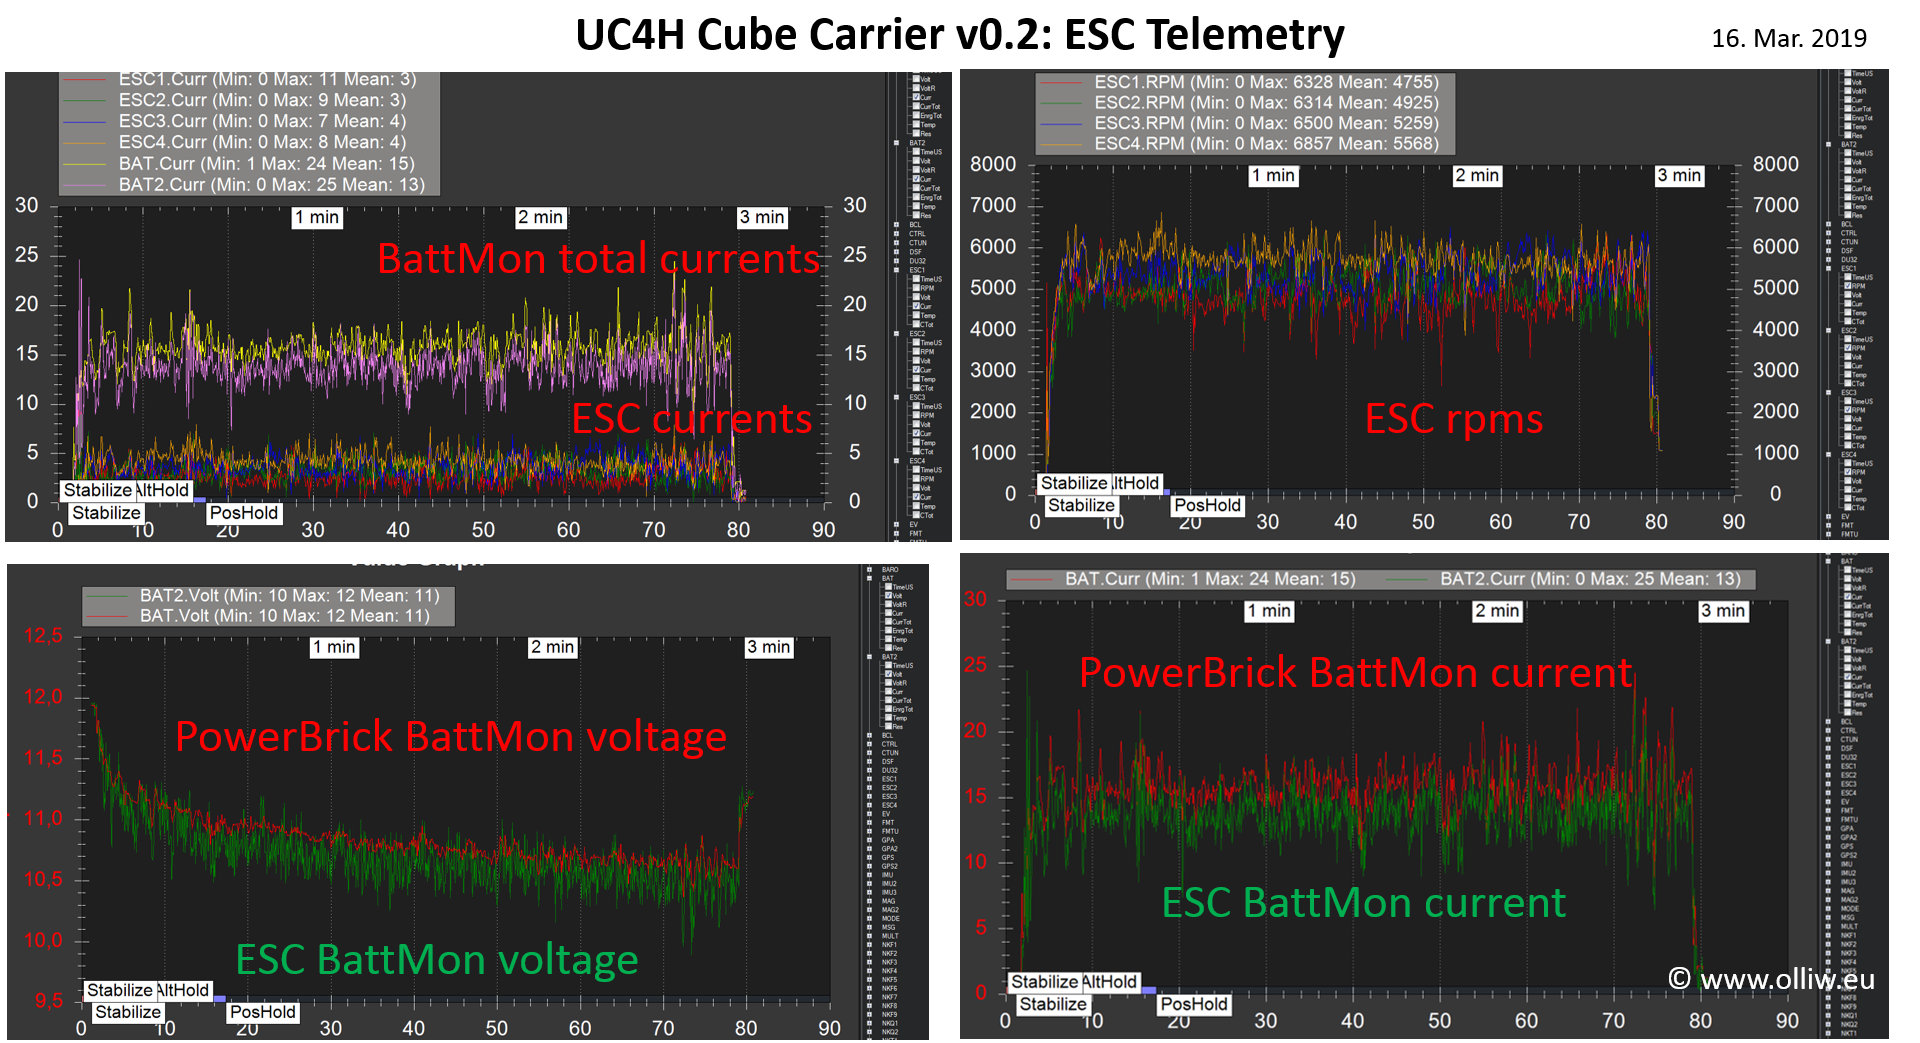
Another feature I always wanted to have is recording of the CANbus 5V voltage. For a simple reason: In a CANbus system the CANbus voltage is as critical as the 5V supply voltage for the flight controller and I2C/SPI/UART/ADC/etc sensors or the voltage on the servo rail. Not surprisingly, both voltages are thus recorded by ArduPilot. But not the CANbus 5V. The UC4H Cube carrier overcomes this, by a „trick“: On a UC4H copter there is no servo rail anymore, hence I simply could use the servo sensor voltage pin to measure the CANbus 5V voltage. Et voila:

Have you spotted the two examples of „dedicated“ I’ve promised? Yeah, no spider-web wiring and CANbus voltage recording 🙂 . There would be really so much more to say.
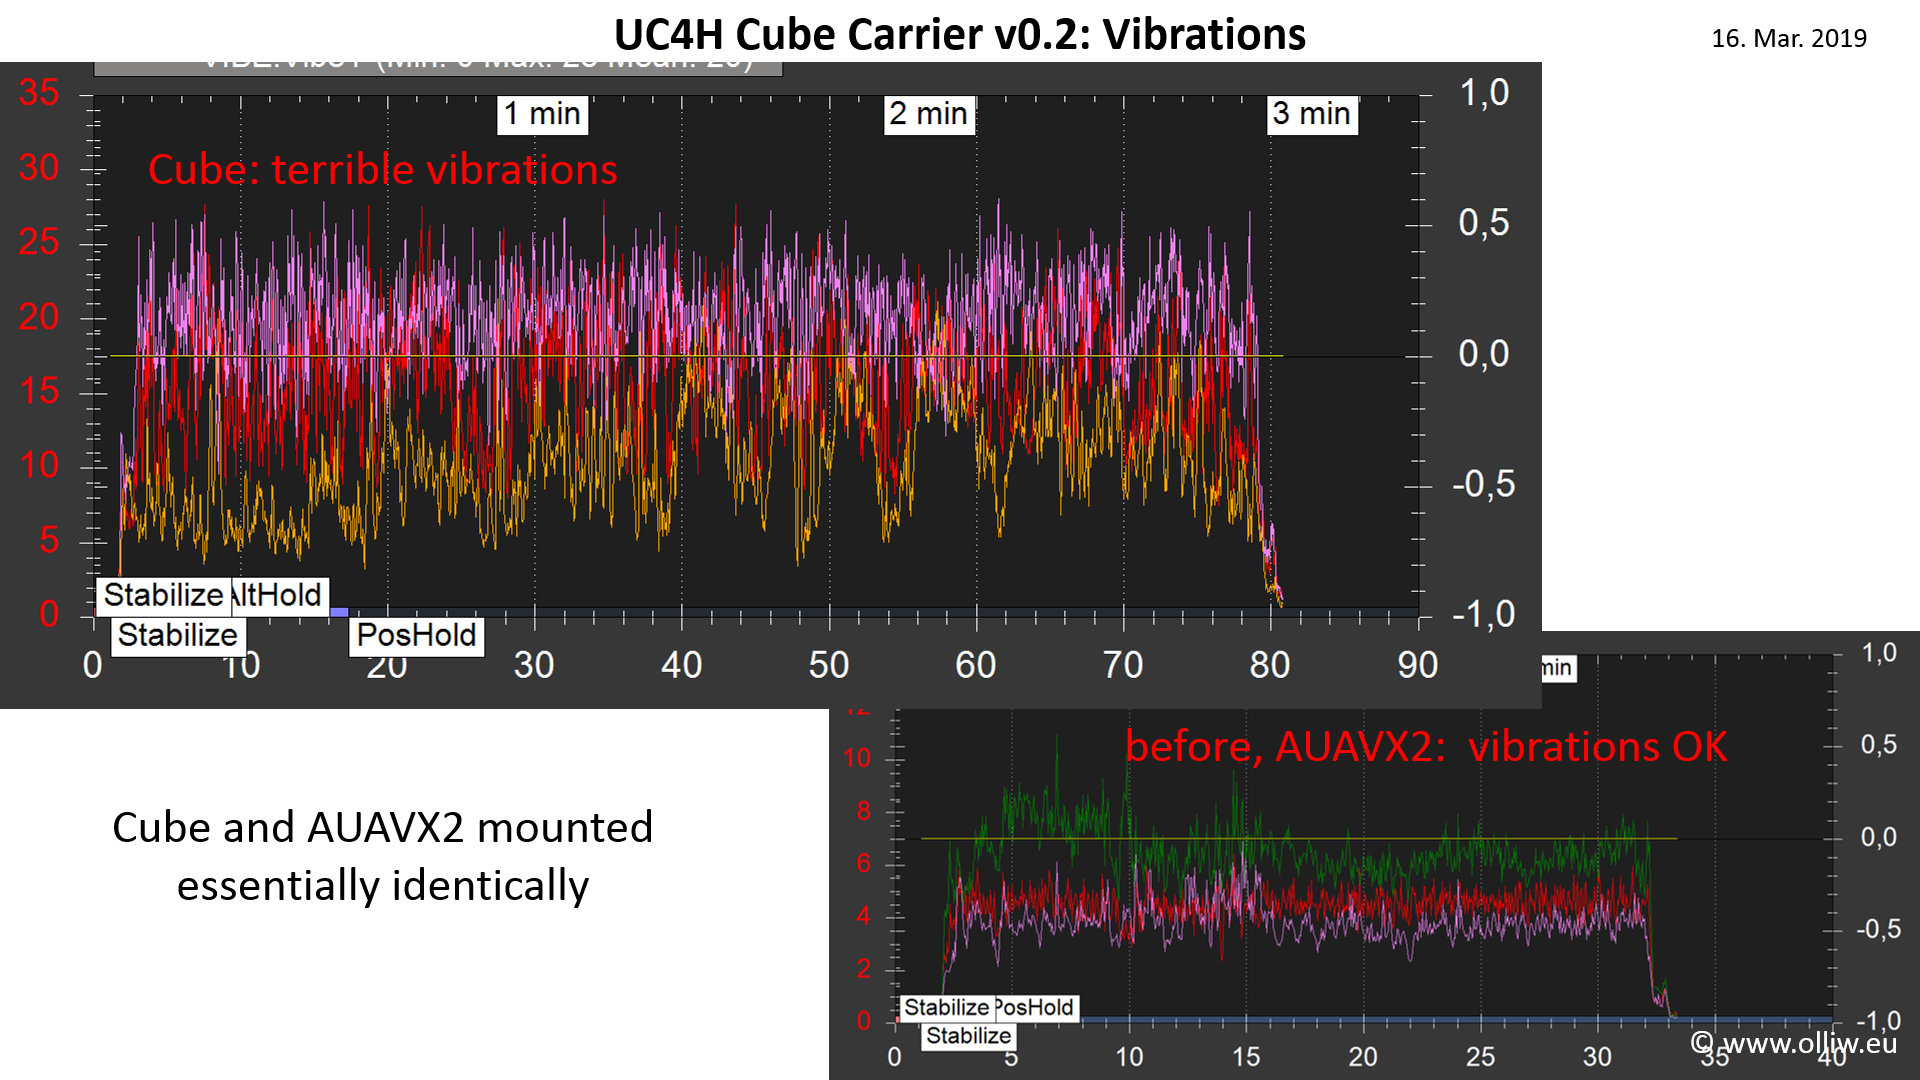
Finally, a word about the cube. I’m not impressed. I’ve never spend much effort into mounting the AUAV-X2 flight controller, I just sticked it with double-sided tape to the copter. As strange as this may be, it really worked not too bad, sufficiently well to not change it (this is just a test frame, right). The cube carrier I’ve mounted essentially exactly the same way, but now the reported vibrations are huge. I really would have thought that the cube’s internal vibration damping would at least not yield much worse results. But the data are as they are. I surely have to investigate this further, but the bottom line is: The cube’s internal vibration damping isn’t always a holy grail.
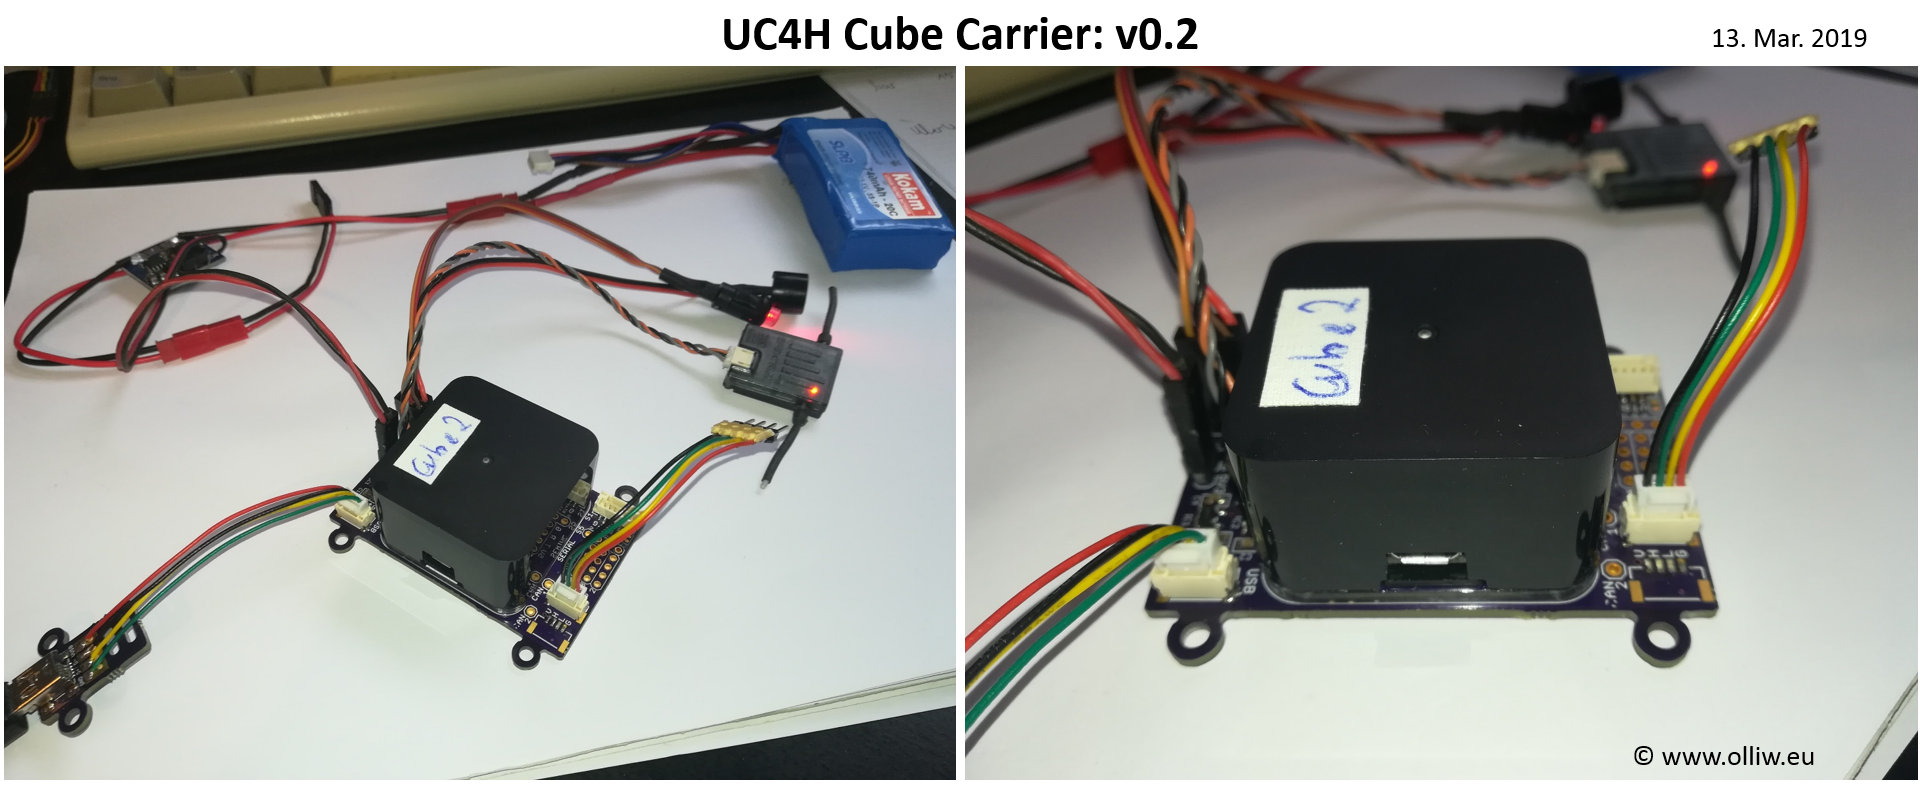
UC4H FC III: The UC4H Cube Carrier v0.2
13. Mar. 2019
I’ve got the v0.2 Cube Carrier PCBs, and they are working perfectly. Very nice. However, they are not perfect 🙁 . I’ve put top-entry JST-GH connectors on it, but have failed to realize that they have reversed pin numbering compared to the side-entry JST-GH I was using so far … grrr. So, there will have to be a v0.3. This gives me opportunity to add some minor changes, but nevertheless: grrr.
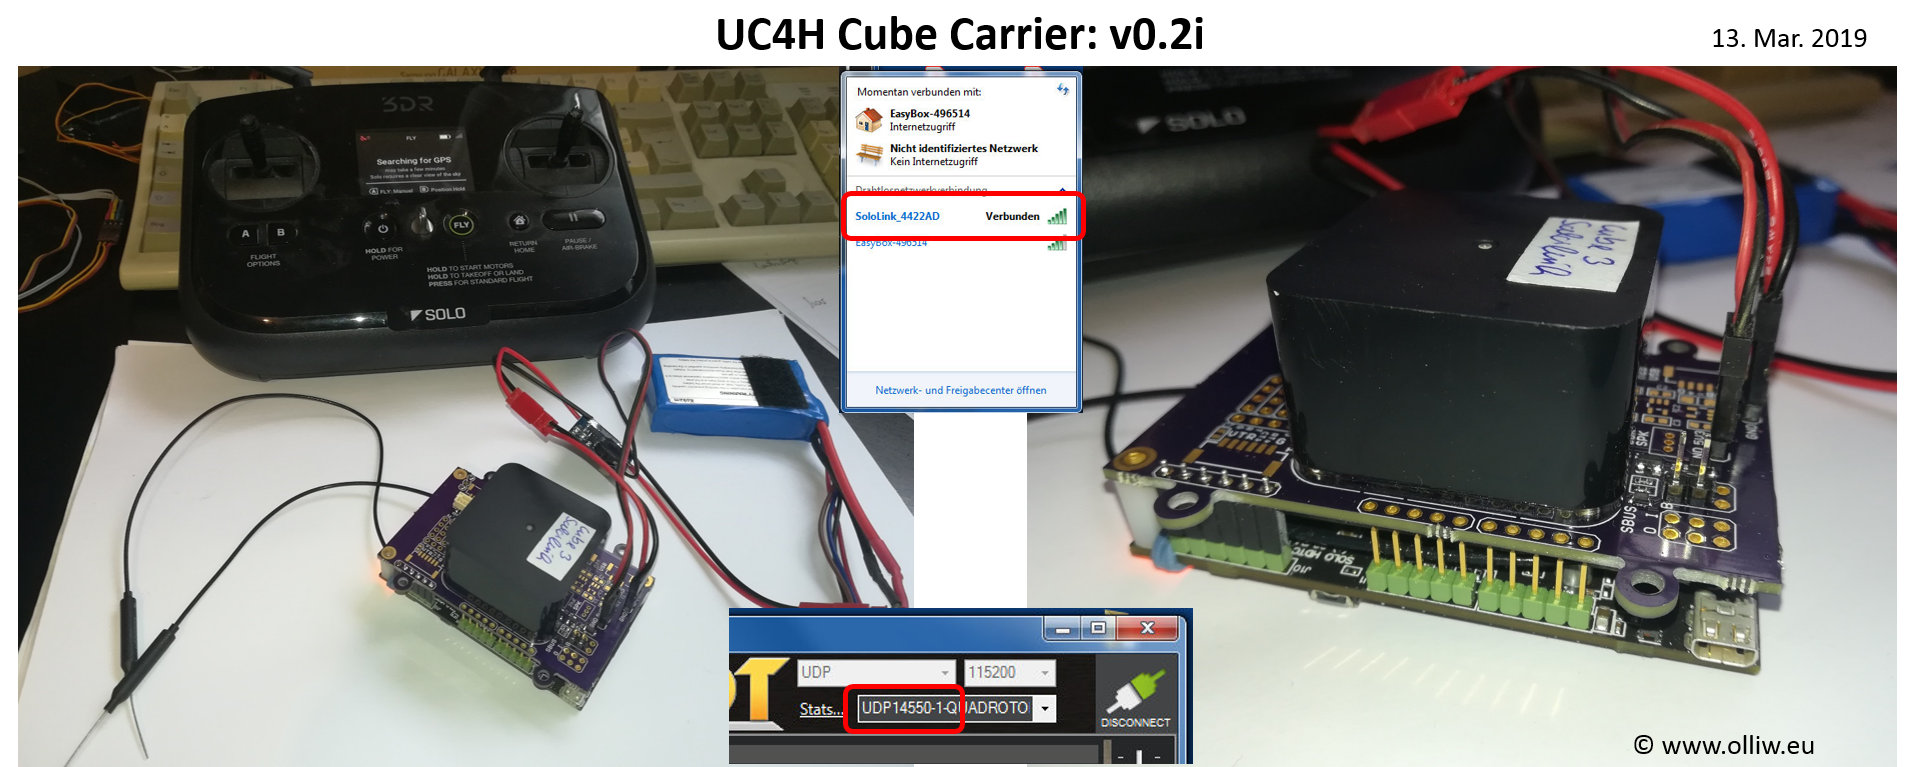
For some of you the following pictures will reveal the purpose of the v0.2i version of the board 🙂
UC4H FC II: The UC4H Cube Carrier Board
1. Mar. 2019
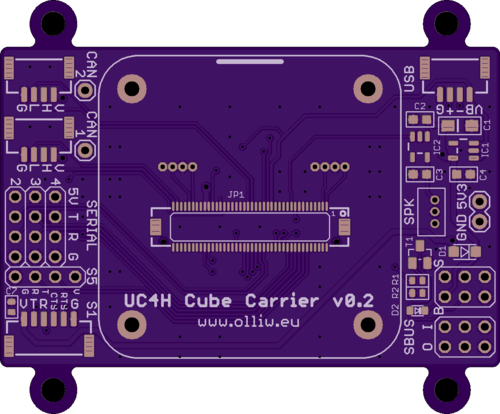
The cube carrier board shown in the last post was for testing purposes only. However, all tests worked out great, so I believe I have it all right. I thus went ahead with the real beef, and designed the UC4H Cube Carrier board, v0.2, and the result is shown below. It should arrive me in few weeks. I’m really eager to get it into air.
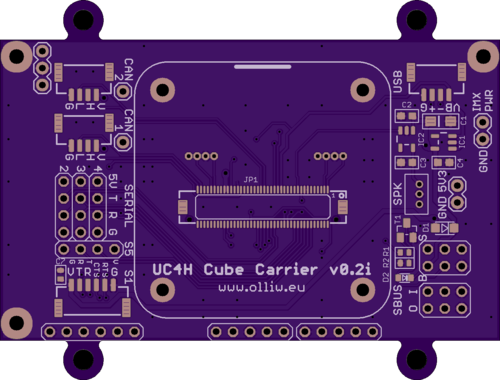
I also did a special version v0.2i of it; I leave it to you to figure out what this could be good for LOL.
UC4H FC: First Baby Steps
27. Feb. 2019
without words 🙂
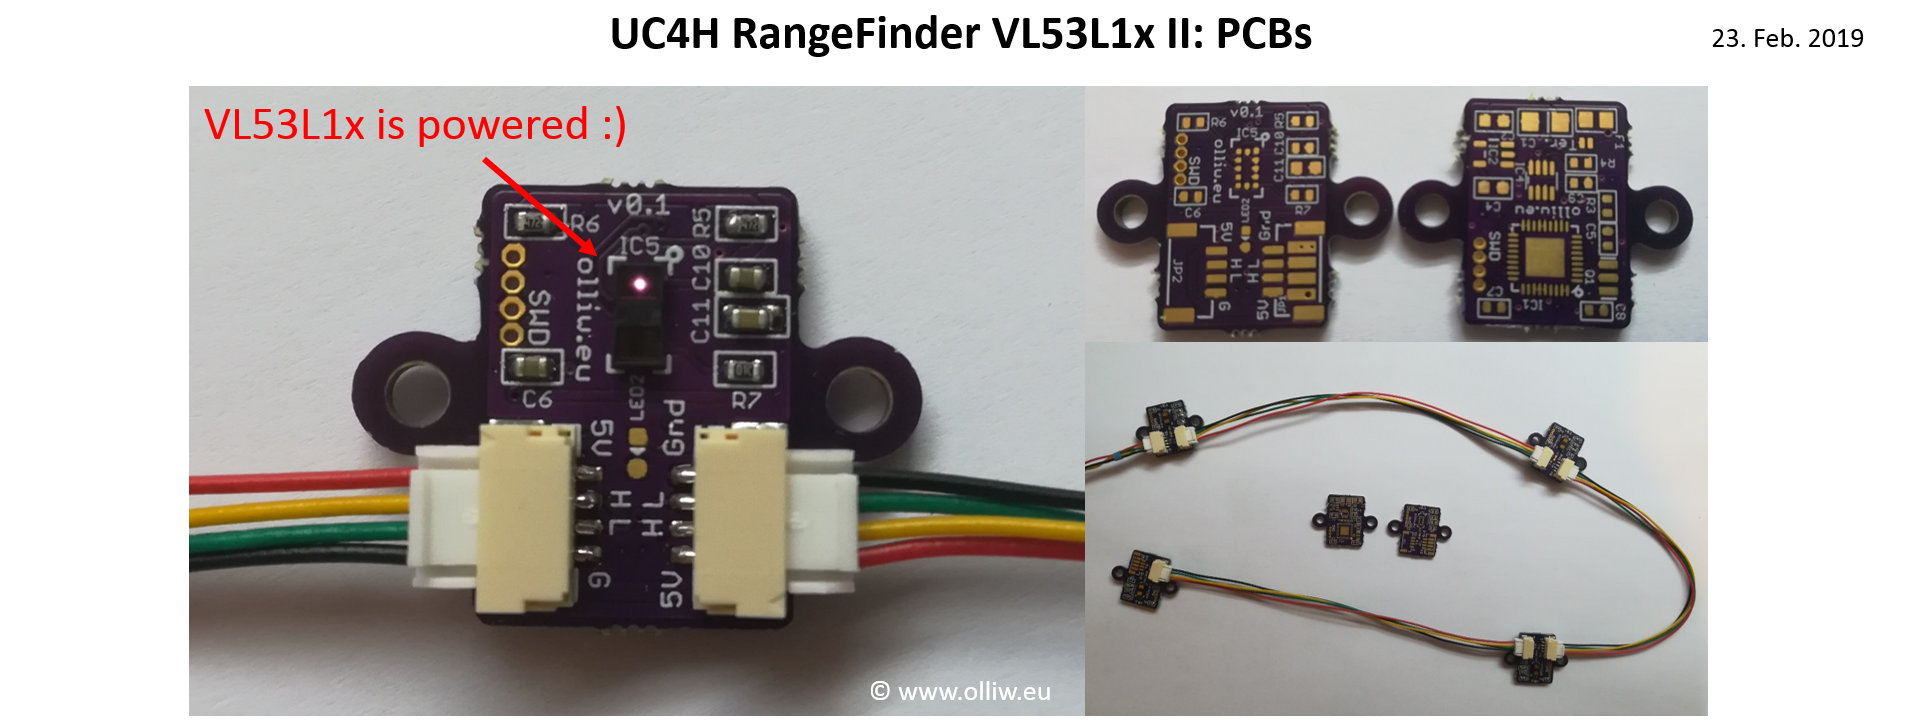
UC4H RangeFinder VL53L1x II: PCBs, Bench Tests, First In-Door Hover
23. Feb. 2019
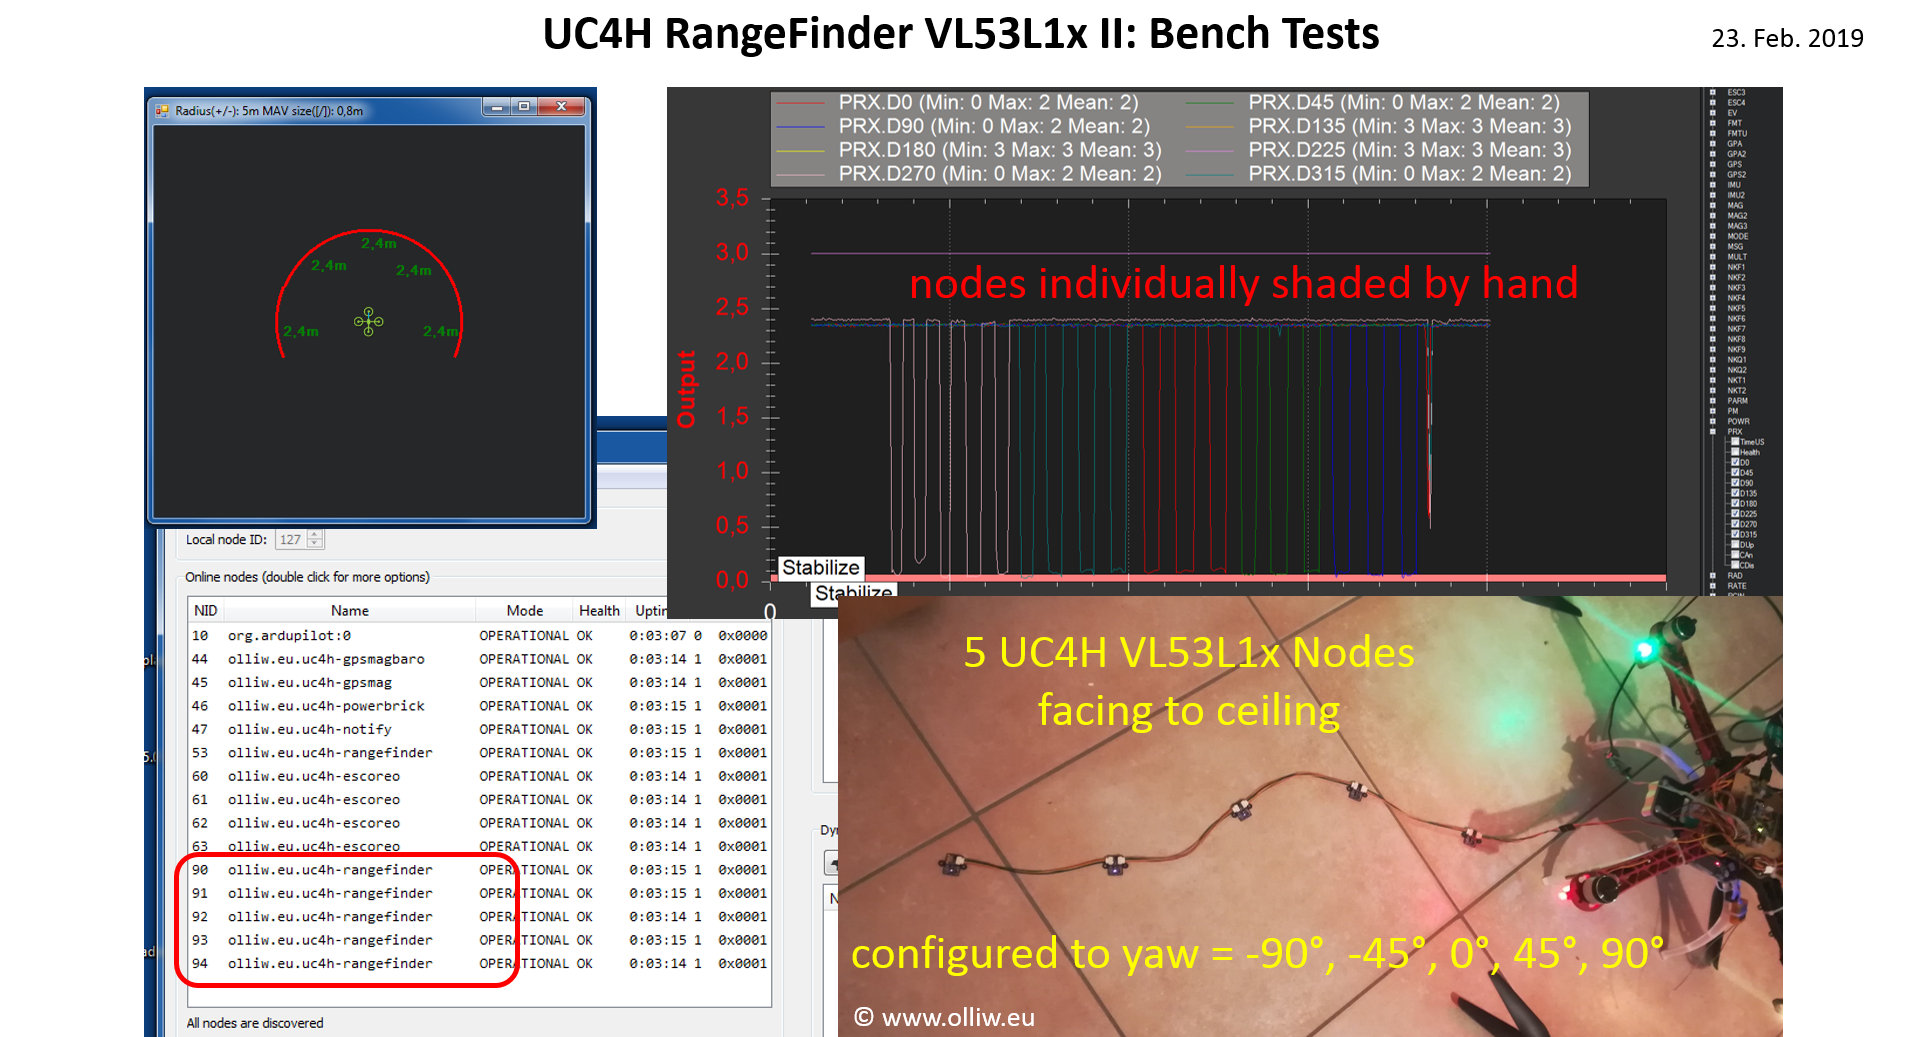
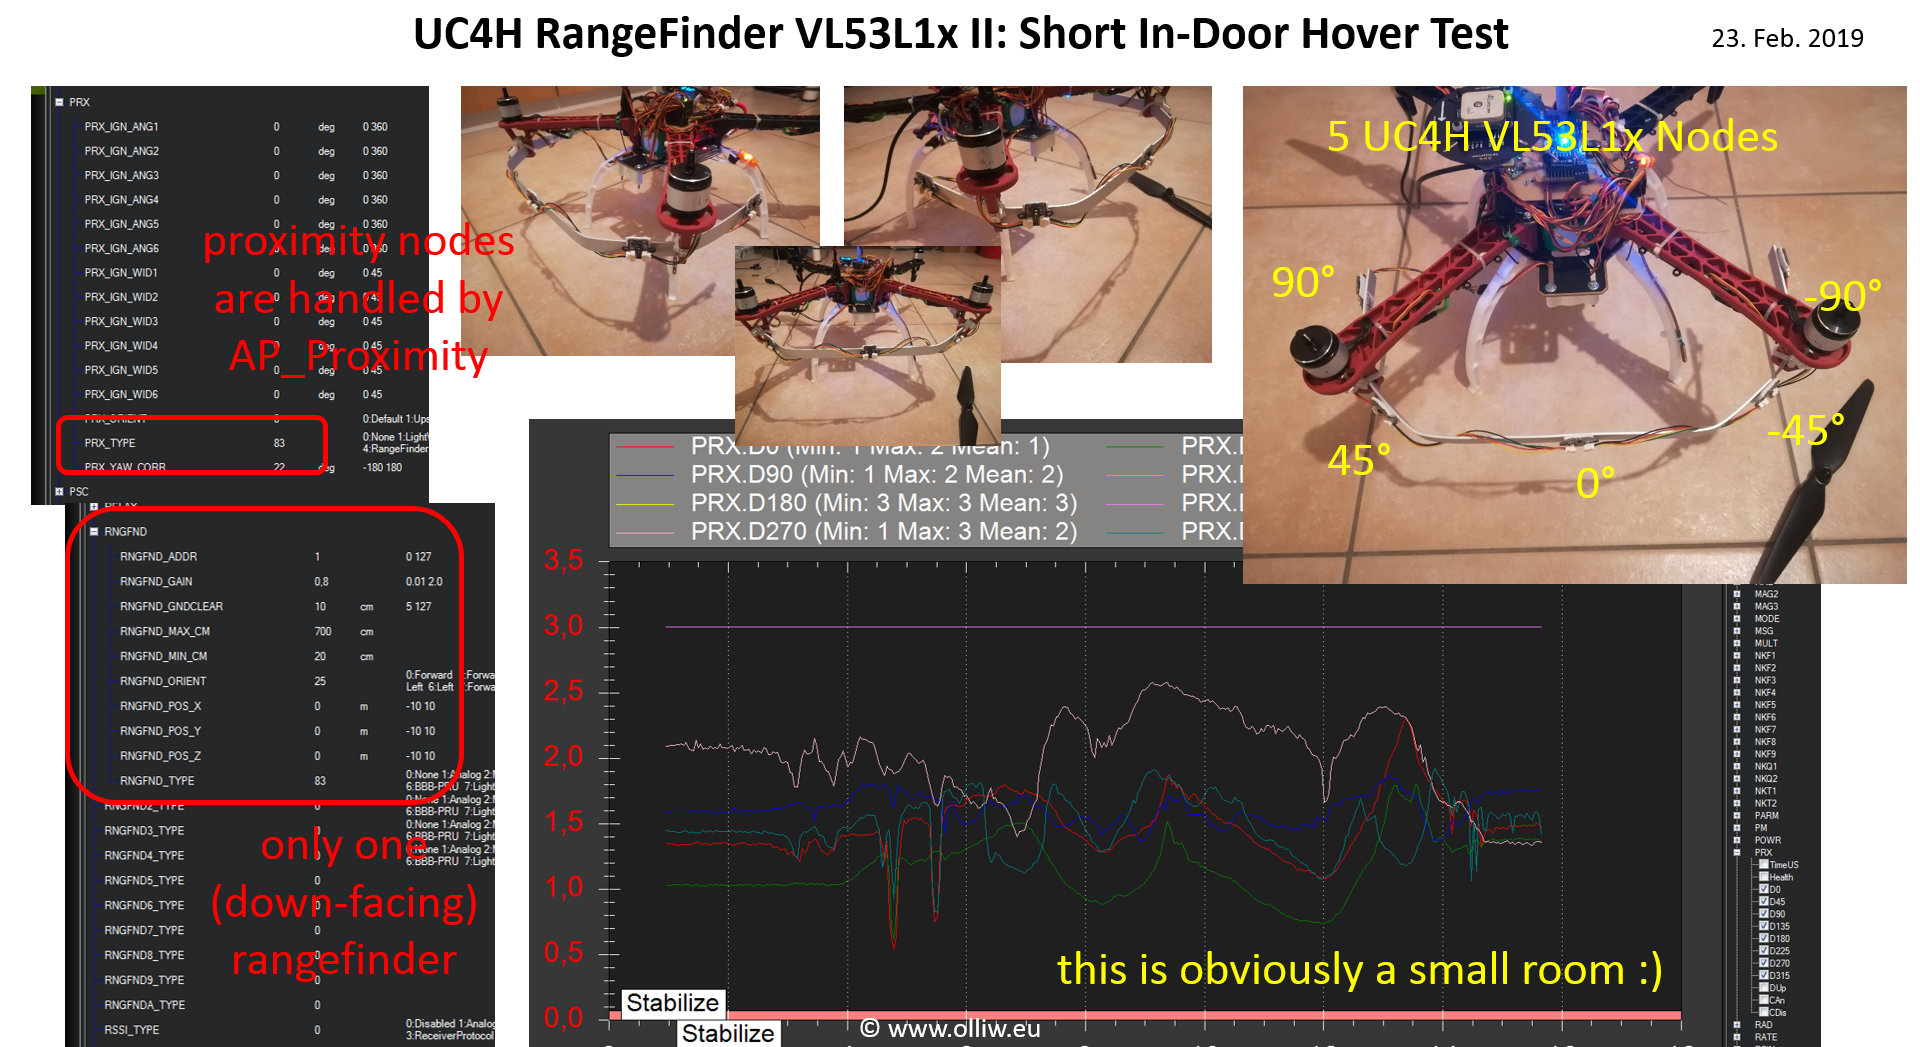
The UC4H RangeFinder VL53L1x PCBs have arrived me, and they really work great. It’s one of the very rare instances where I’m happy with a PCB design on the first shot. This is actually somewhat surprising since I’ve modified the scheme, in order to get nodes as small as possible. Anyway, I’ve build 5 of them and gave them a first test. I already had adapted BetaCopter before to handle up to 10 rangefinders, so this was a quick thing to do. Quite differently to how ArduPilot works, in BetaCopter the proximity rangefinders are handled directly by the AP_Proximity class. This makes configuration much easier, and is also much more natural for UAVCAN proximity sensors (IMHO), and is probably also more efficient (I have the sensors running at 50 Hz, so this might be relevant).
The CAN bus/UAVCAN concept is really shining here. Just compare this build to all the tweaking people had to do in order to get more rangefinders to work, and in addition they had to pay in terms of significantly lower data rates.
I also did a short in-door hover, but I do not really have a suitable room for flying a 450 copter. So, it’s a bit scary. Obviously, the goal will be to use the rangefinders for collision avoidance, but this will need quite some work, so is really more a projection into the future.
As indicated before, the goal will be 10 rangefinders; my vision is actually what I will call „UC4H Spider Eyes“. Right now there are „just“ 6 rangefinders, 5 proximity sensors, and a down facing one. I didn’t wanted to go with 10 right away. I first wanted to test these VL53L1 before I’m further investing money into this, especially since there seem to be very few reports on practical experience.
In fact, my tests so far seem to indicate some weaknesses. The range is given as up to 4 m. This appears to be correct, however above ca. 3 m the signal becomes really very noisy. I would say that the usable range is something like 2.5-3 m (which still is great, IMHO). Furthermore, these things really need filters (the above PCB had been designed with this in mind 😉 ). The disastrous out-door performance I did show already below. However, I also had to disable the OreoLEDs on my copter since they spoofed their signal. Ok, the +-45° VL53L1x sensors are installed quite close to the OreoLEDs, nevertheless, given that these sensors use IR light I wouldn’t have expected such a sensitivity to them (do the WS2128B emit also in the IR range? I guess I need to check that LOL). Anyways, my feeling is that these little beasts are great, but need a bit of caretaking 😀
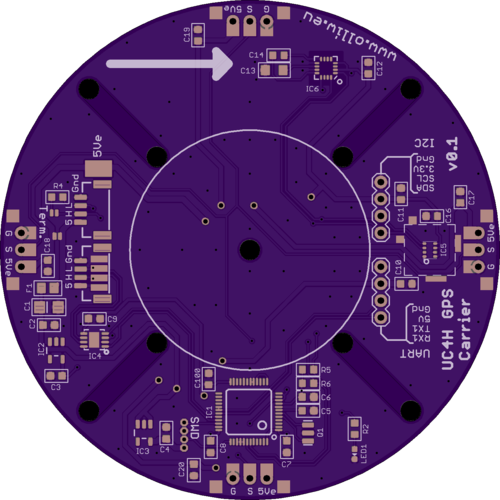
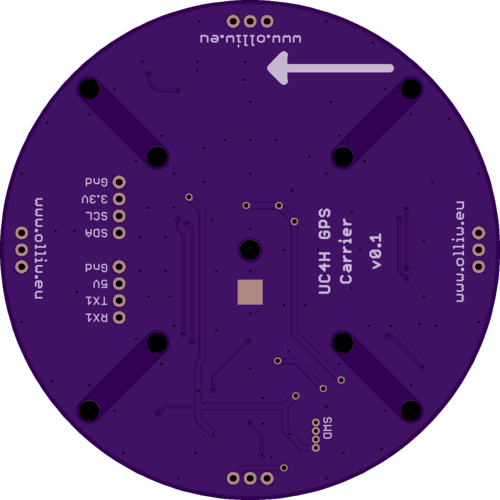
UC4H GPS Carrier Board III: v0.2
17. Feb. 2019
As indicated in the previous post, I’ve revised the design of the UC4H GPS-Mag-Baro Carrier board. That’s how v0.2 is going to looking like:
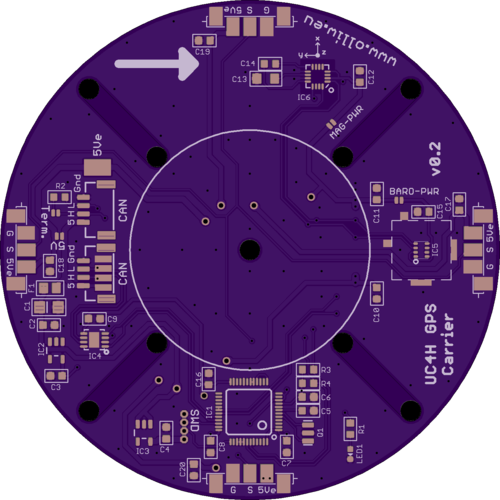
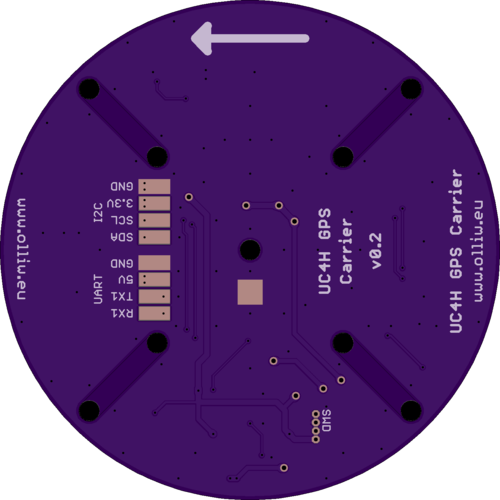
Just sad that it will take another ca 3 weeks before I get them …
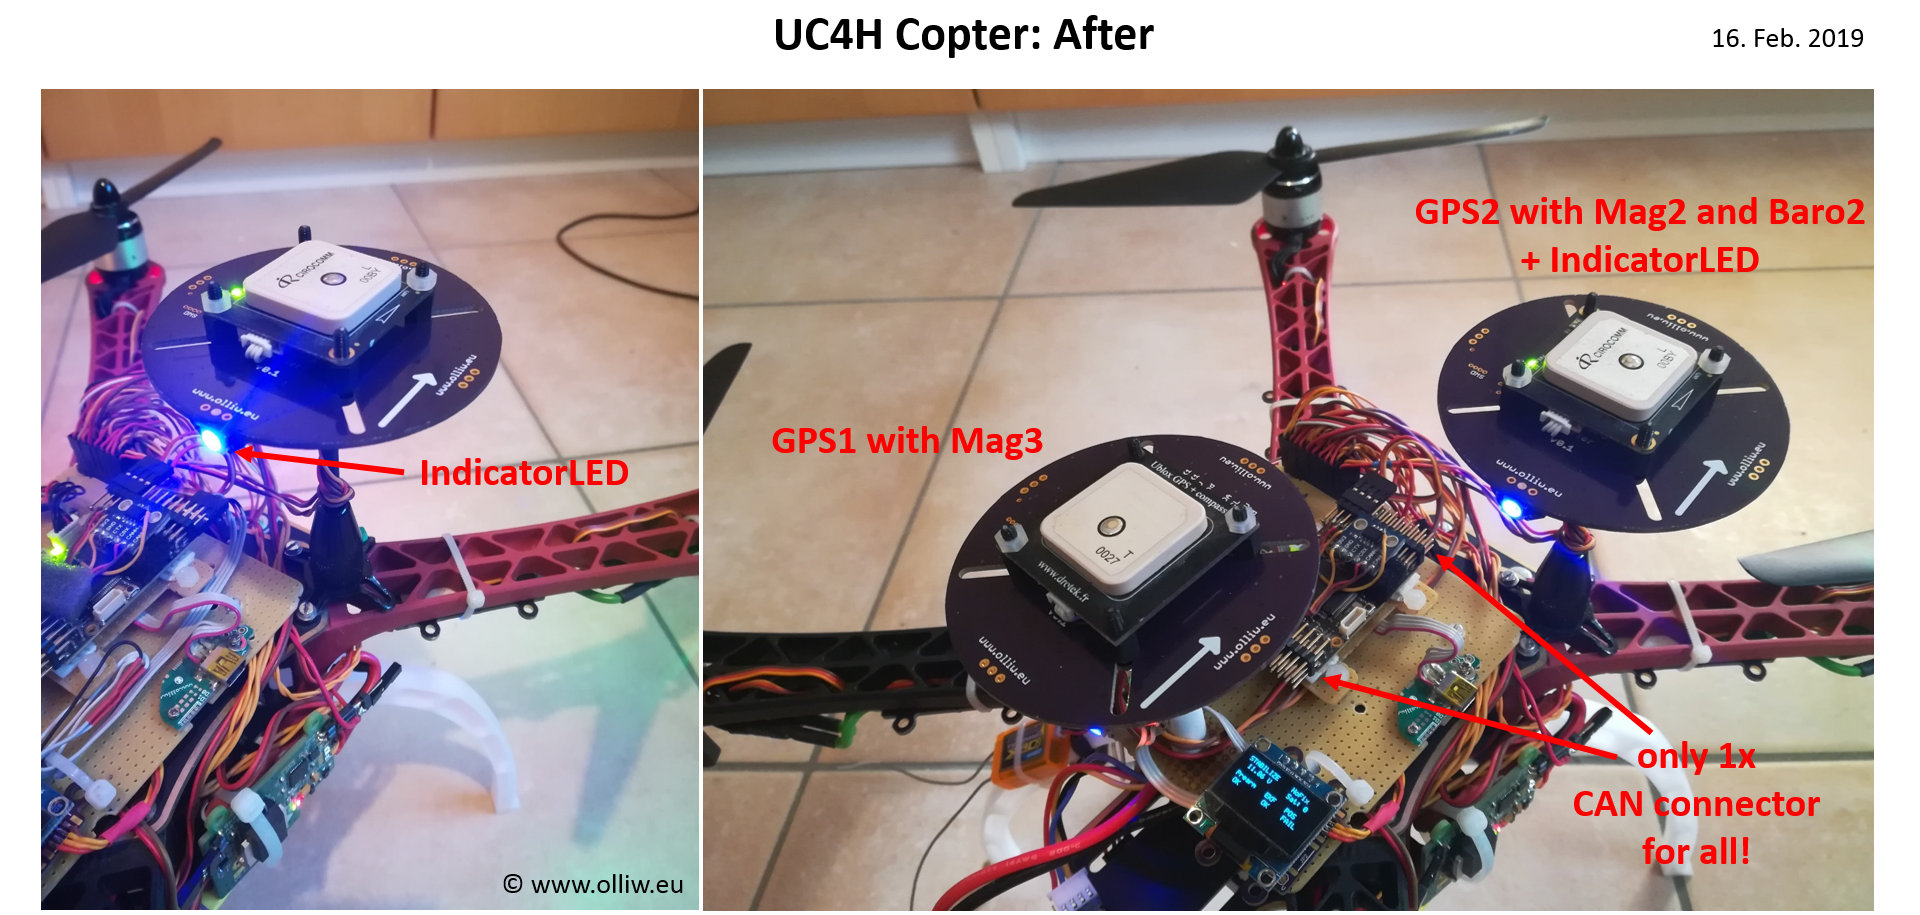
UC4H GPS Carrier Board II: The cheapest complete UAVCAN GPS-MAG-BARO-LED
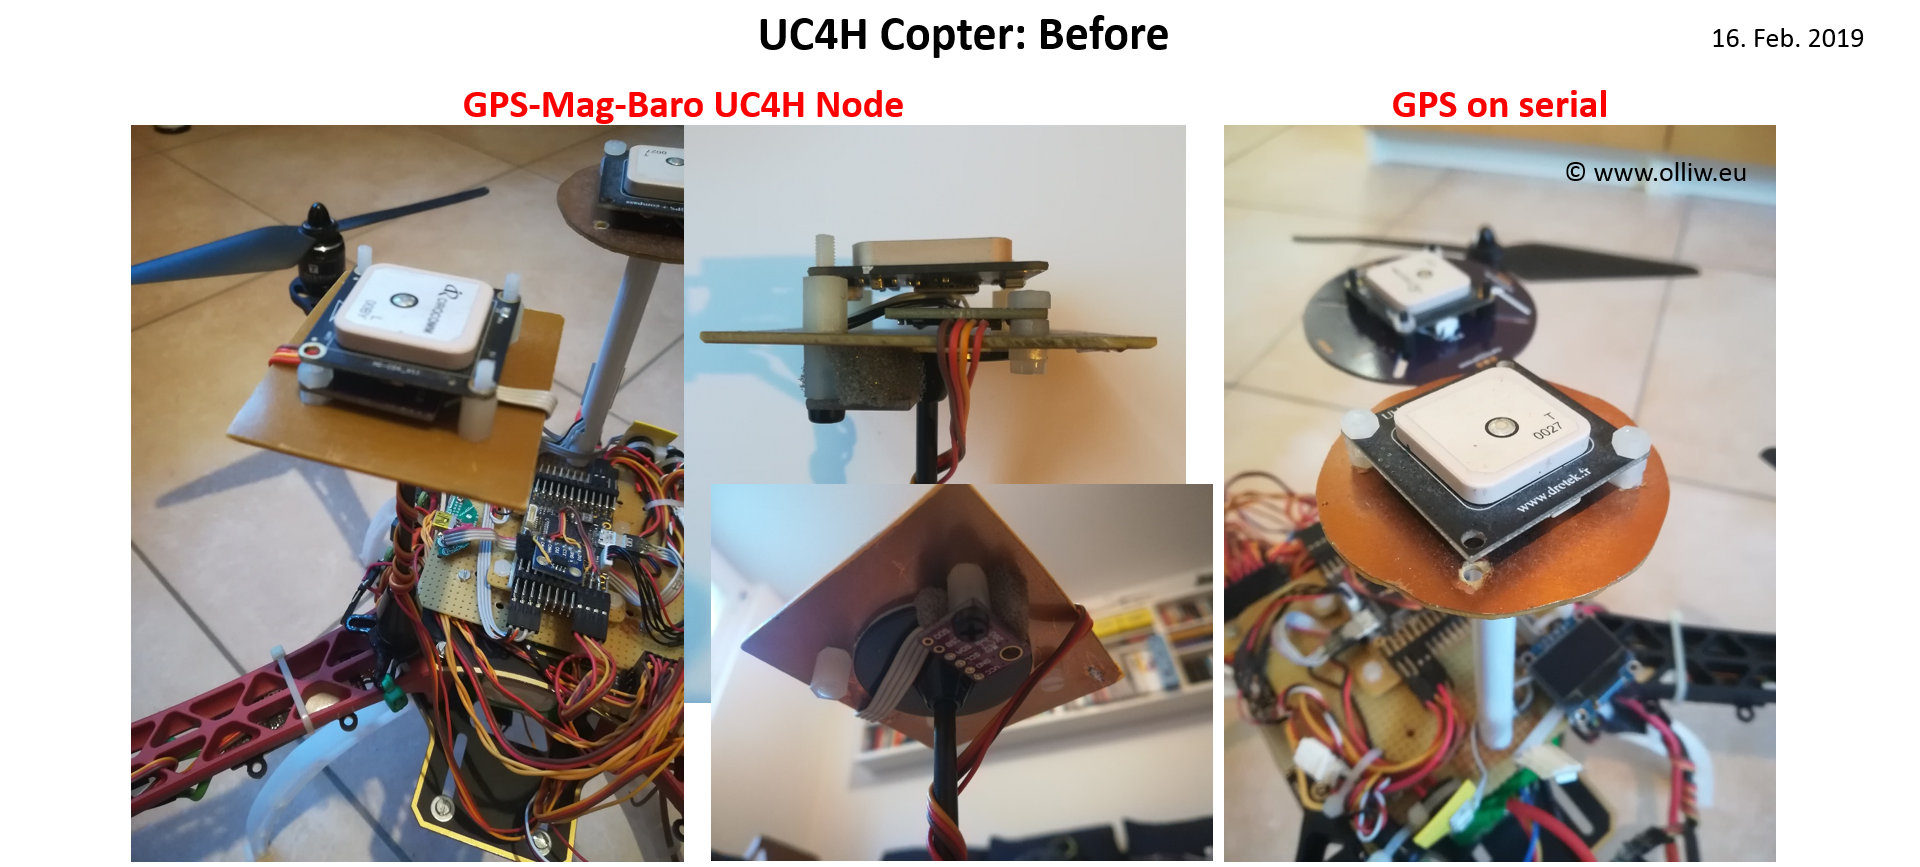
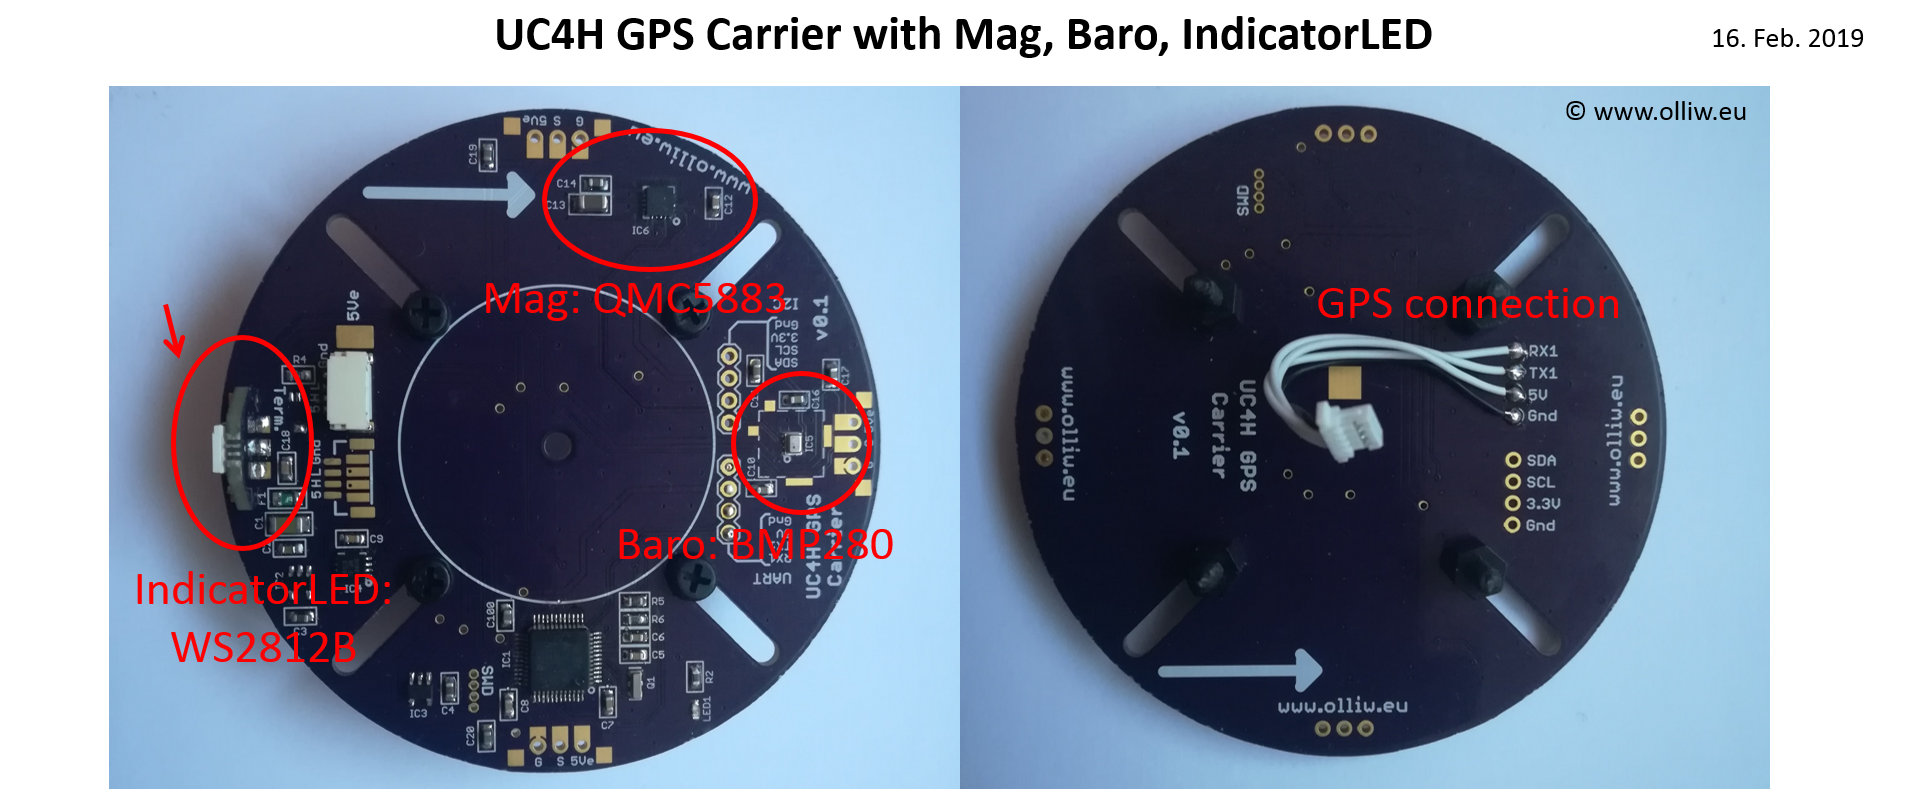
16. Feb. 2019
I really don’t understand why not just everyone is crying for CAN.
I got my UC4H GPS-Mag-Baro Carrier boards, and quickly assembled two of them. And they just work as I wanted them to work. Fantastic.
This is really what I wanted to have for a long while, since it makes my copter so much cleaner. It also solves three nasty points: First, the magnetometer on the 1st GPS module started to misbehave in cold weather some while ago. So it needed a replacement. Now it is replaced by the magnetometer on the UC4H GPS Carrier board this GPS is mounted to. Second, the 2nd GPS module I kept so far on serial (except for tests), since I didn’t had enough general-purpose UC4H boards, and also because I didn’t wanted to have yet another one on my copter. So, now this GPS is also on a UC4H GPS carrier. Finally, the magnetometer on this 2nd GPS module I didn’t use since I didn’t wanted any I2C cables anymore, but it made me sad to not use an available external magnetometer. Now, this magnetometer became available as 3rd MAG with no effort.
And of course, the integrated IndicatorLED is also just a great feature.
And of course, it is just great that there is now only one (= 1 !!!) connector left which is going to the flight controller, namely the CAN bus connector. It hardly can be simpler.
However, as always, everything great can be further improved, which in this case means that I further worked on the layout of the UC4H GPS Carrier, i.e., there will be a version v0.2 🙂
The one main thing which is missing now, is a UC4H flight controller. 😀 😀 😀

Release Day
15. Feb. 2019
Some releases.
UC4H RangeFinder v0.03:
• Initial release of firmware for UC4H range finders
• Supports the TFMini and VL53L1x
• Emits the UC4H specific DSDL message olliw.uc4h.Distance, allowing dense and information-rich data transmission important when many range finders are used
• Includes a UAVCAN tunnel bridge for range finders with serial port, such as the TFMini
• New improved frame scheduling method for the UAVCAN tunnel bridge
UC4H Gps-Magnetometer-Barometer v0.28:
• New improved frame scheduling method for the UAVCAN tunnel bridge
UC4H UartBridge v0.08:
• Supports up to 3 UARTs, on F103C8/CB chips, like on the bluepill
• New improved frame scheduling method for the UAVCAN tunnel bridge
UC4H Bootloader v0.07:
• Recovery pin: grounding SWD-CLK or SWD-IO on power-up will force the bootloader
• Vendor specific status code counts flashed pages (1kB)
• more robust (recovery should never be needed, pl drop a message if this happens)
BetaCopter 3.6.6 v018u:
• Based on Copter 3.6.6
• Support of uc4h.Distance messages via a new RangeFinder backend, type = 83
• Support of up to 10 range finders, PR #8816 integrated, two bugs corrected
• Much improved handling of range finder parameters, as suggested in Issue #10502
• Report of detection and usage of range finders for improved user experience
• New improved frame scheduling method for the UAVCAN tunnel bridge
UC4H MavlinkBridge:
• Uc4hParameterMetaData.xml updated to support UC4H RangeFinder
UC4H RangeFinder TFMini Carrier v0.2:
• Carrier PCB for the TFMini
Firmwares and Eagle files as usual in the github repository: https://github.com/olliw42/uavcan4hobbyists
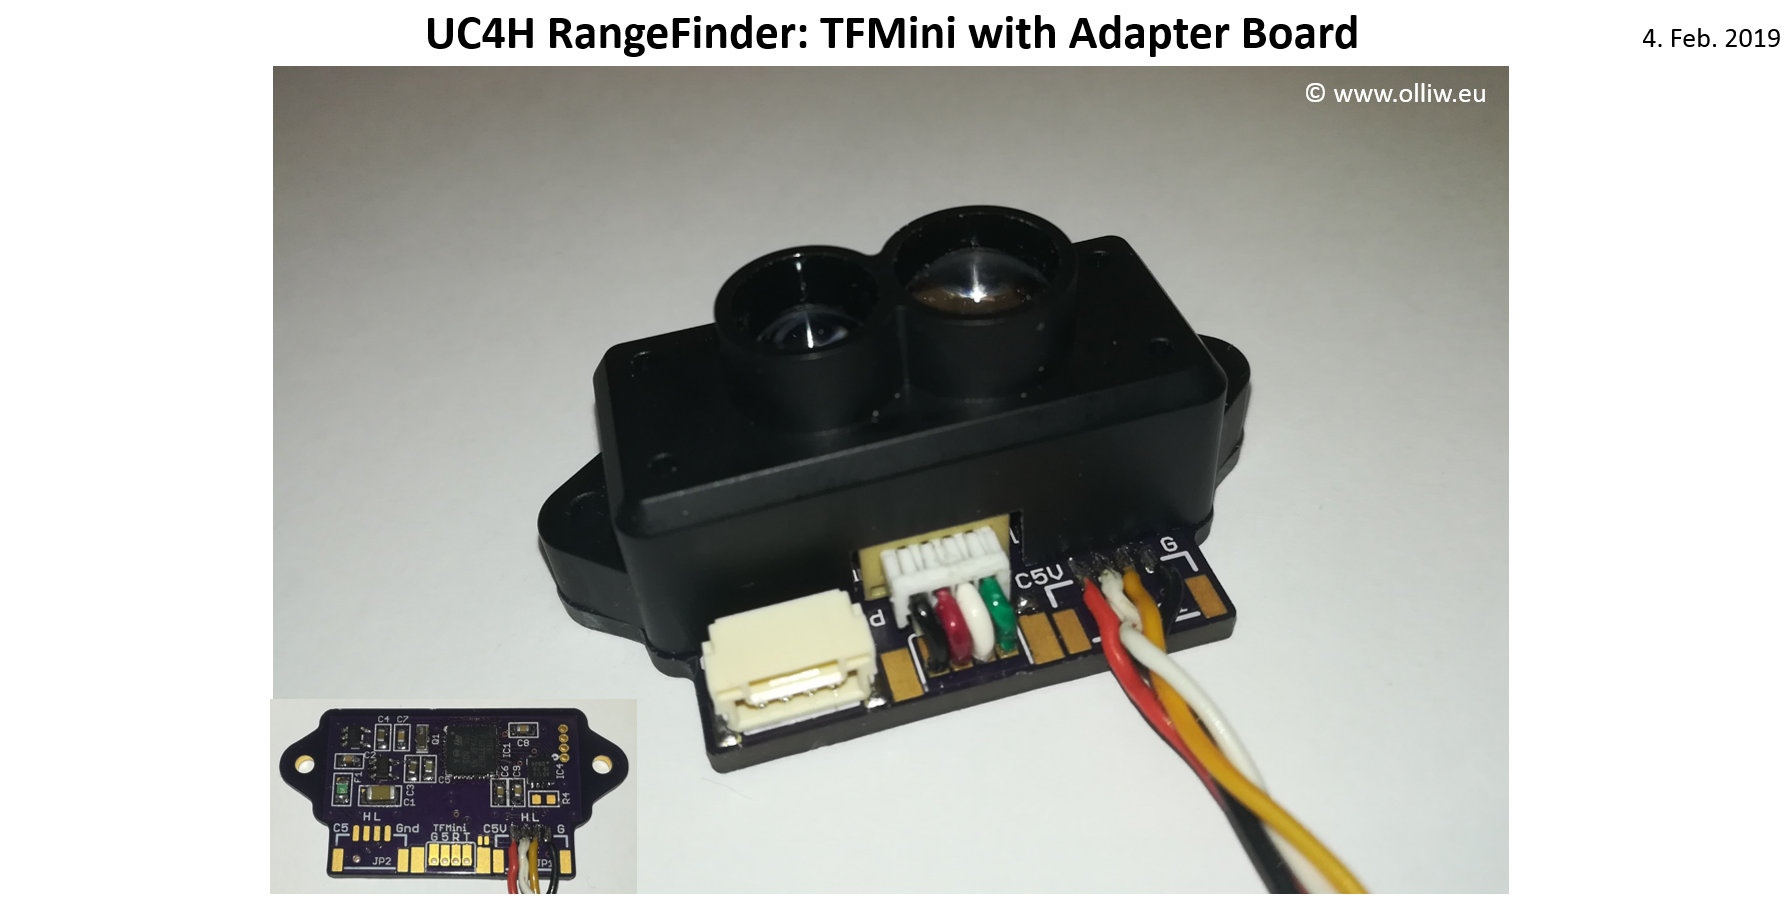
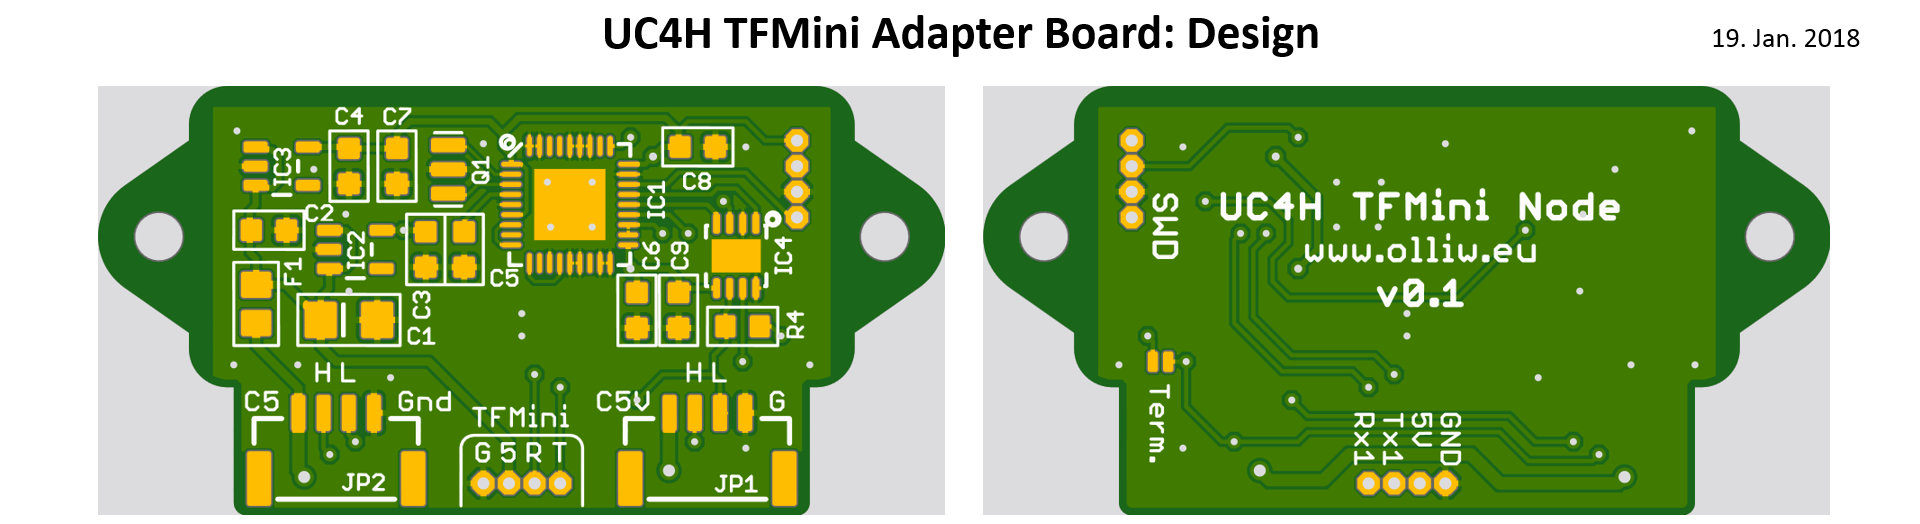
UC4H RangeFinder III: TFMini with UC4H Adapter
4. Feb. 2019
The UC4H adapter board for the TFMini range finder arrived. It was easy to assemble, and is a perfect match. What a cute little item this is, the first UC4H RangeFinder…
UC4H RangeFinder II: VL53L1x
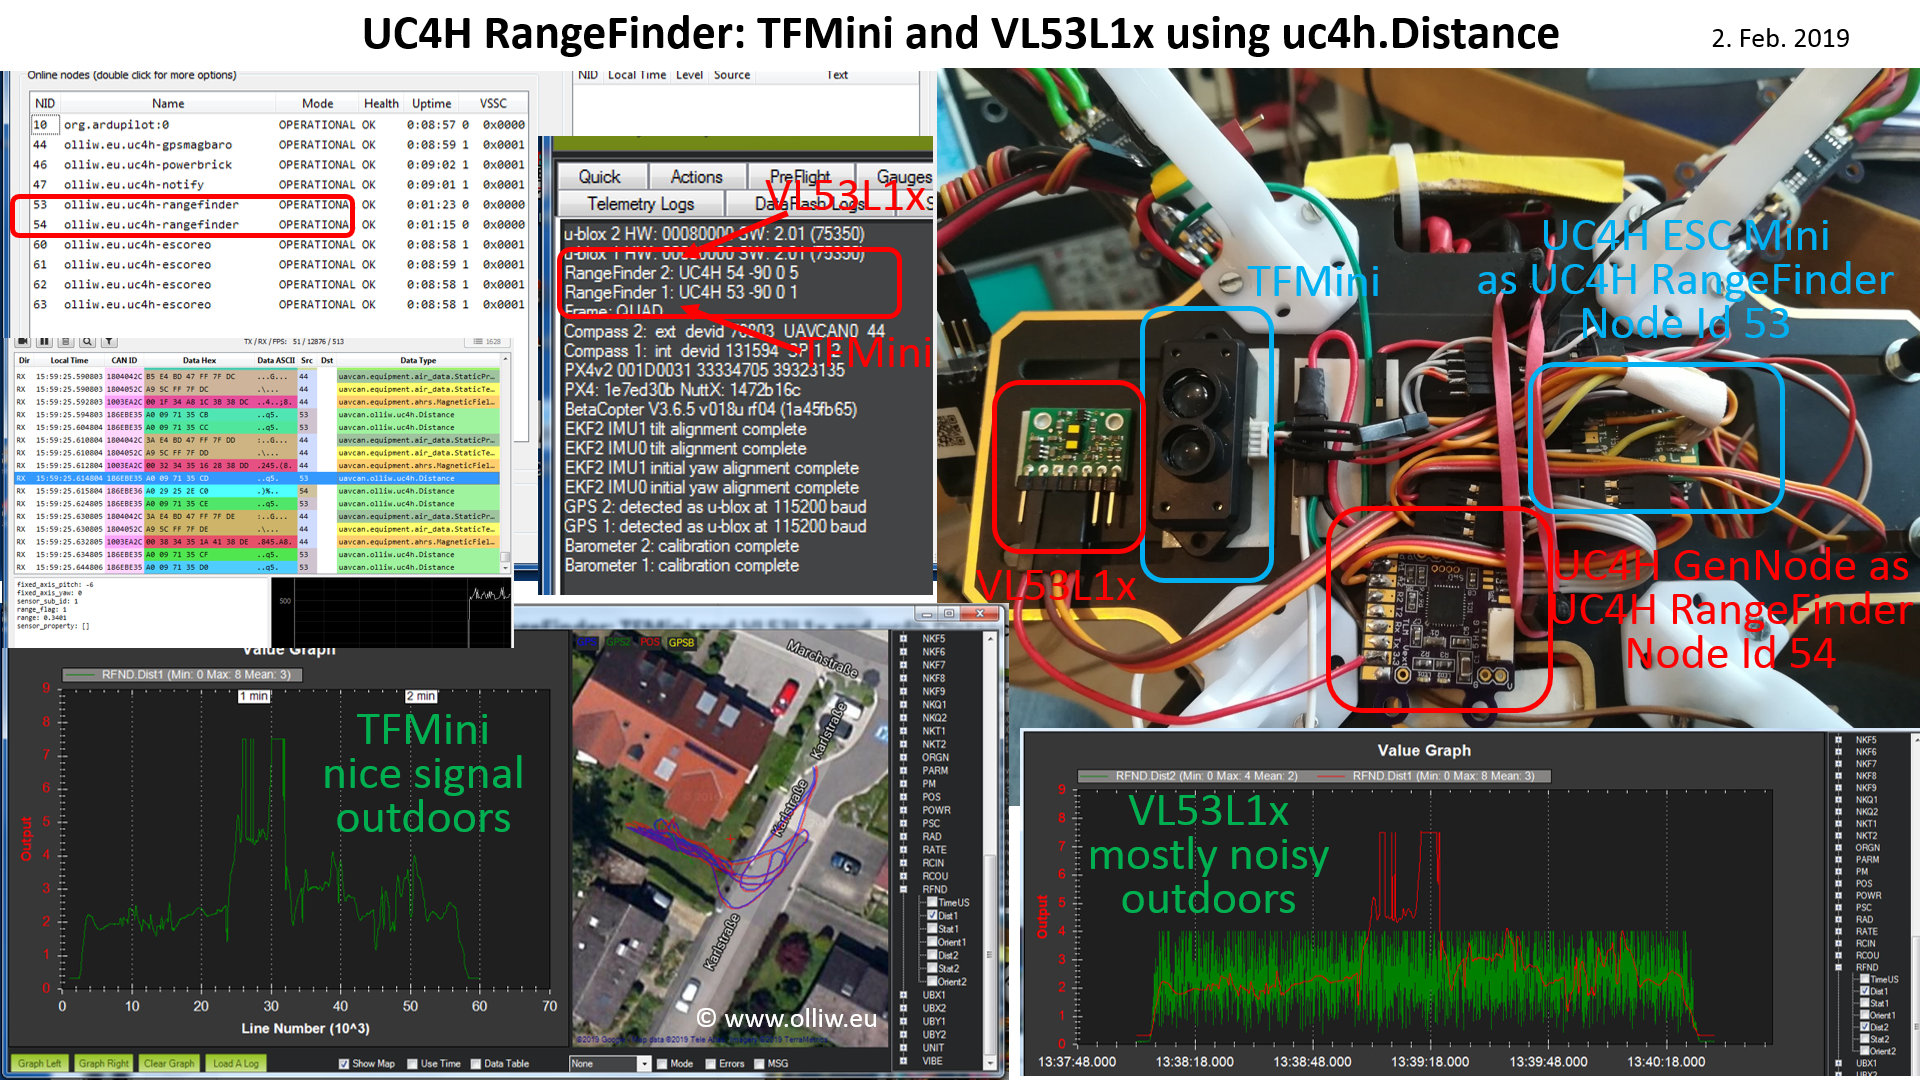
2. Feb. 2019
I’ve added now support of the STMicroelectronics VL53L1X range finder to the UC4H RangeFinder firmware. The uc4h.Distance message came in very handy here, and I had to do only minor modifications to BetaCopter. Gladly ArduCopter 3.6, on which BetaCopter is based, supports already two rangefinders, so doing flight tests with both a TFMini and a VL53L1x installed was easy.
The VL53L1X works nicely in my indoor bench tests, it is substantially more noisy than the TFMini though. In my flight tests (of course done outdoors) it however produced essentially unusable data. I could only find very few reports on practical tests of the VL53L1X, but it seems that its poor outdoor performance was observed before (see here and here). A bit disappointing.
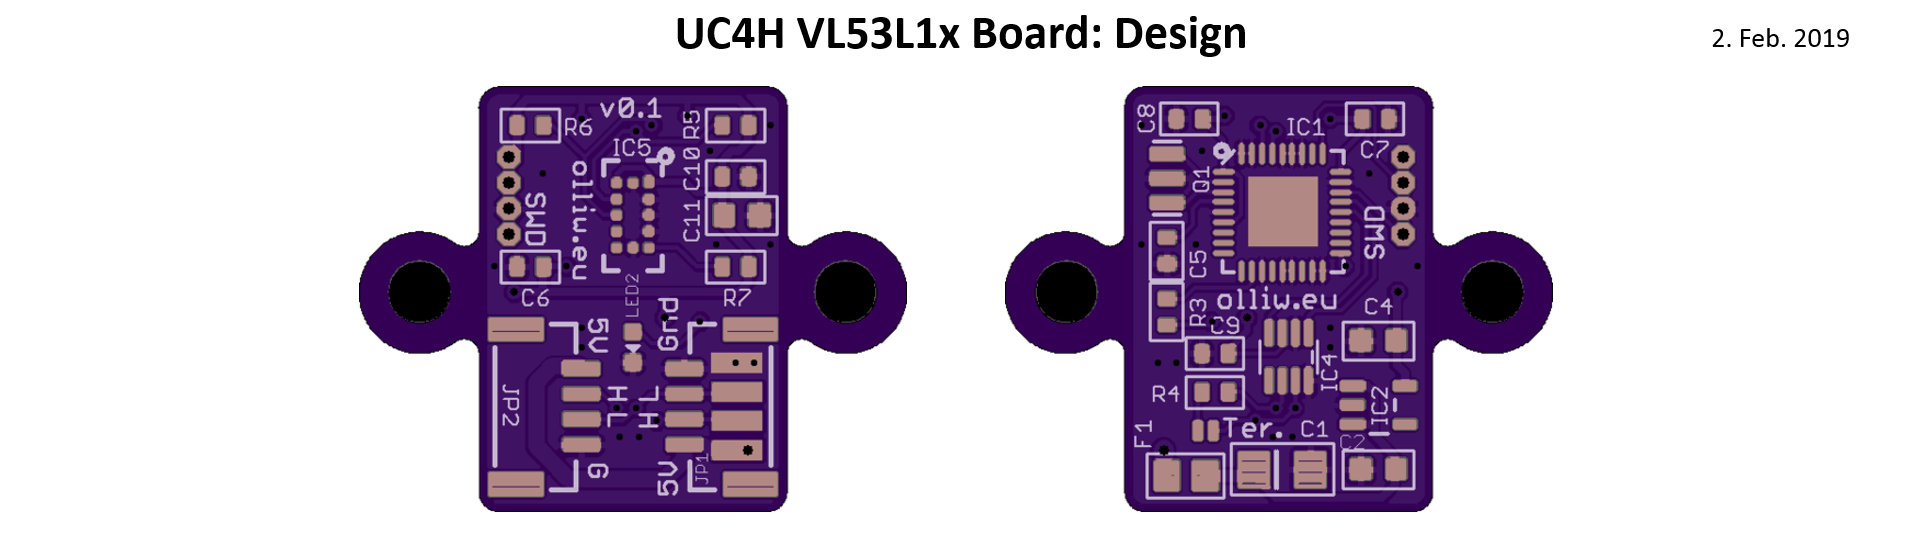
I’ve also designed a little PCB for a UC4H VL53L1X node, I just need to build 9 of them now 😉
UC4H GPS Carrier Board: The cheapest complete UAVCAN GPS-MAG-BARO-LED
30. Jan. 2019
The UC4H GPS-Magnetometer-Barometer firmware since a while allows building a function-wise quite complete UAVCAN GPS module, with integrated magnetometer, barometer, as well as ArduPilot status indication lights. However, so far this required lumping together the various modules, which is very DIY and cheap, and works great, but is not very „professional“ looking. So, a dedicated PCB was required, pretty much like the UC4H PowerBrick and the UC4H ESC Carrier boards, and here it comes, the UC4H GPS Carrier board.
It has a diameter of 75 mm and its slots allow to carry most GPS modules, ranging from 35×35 mm to 50×50 mm. The top plane has as few wires as I could manage, and should well work as a ground plane to shield the GPS from the flight electronics below. It of course also has a magnetometer (QMC5883L) and barometer (BMP280) on board, as well as locations for WS2812 indicator LEDs. It uses a STM32F103CB instead of the STM32F103T8 I’m using so often, since it’s cheaper and easier to source and space was available. It of course follows the UC4H 2nd generation design, and should thus be very robust electrical-wise.
I do not have 3D printer capabilities, but I could imagine nice cases build this way, making this a really nice UAVCAN GPS node. 🙂
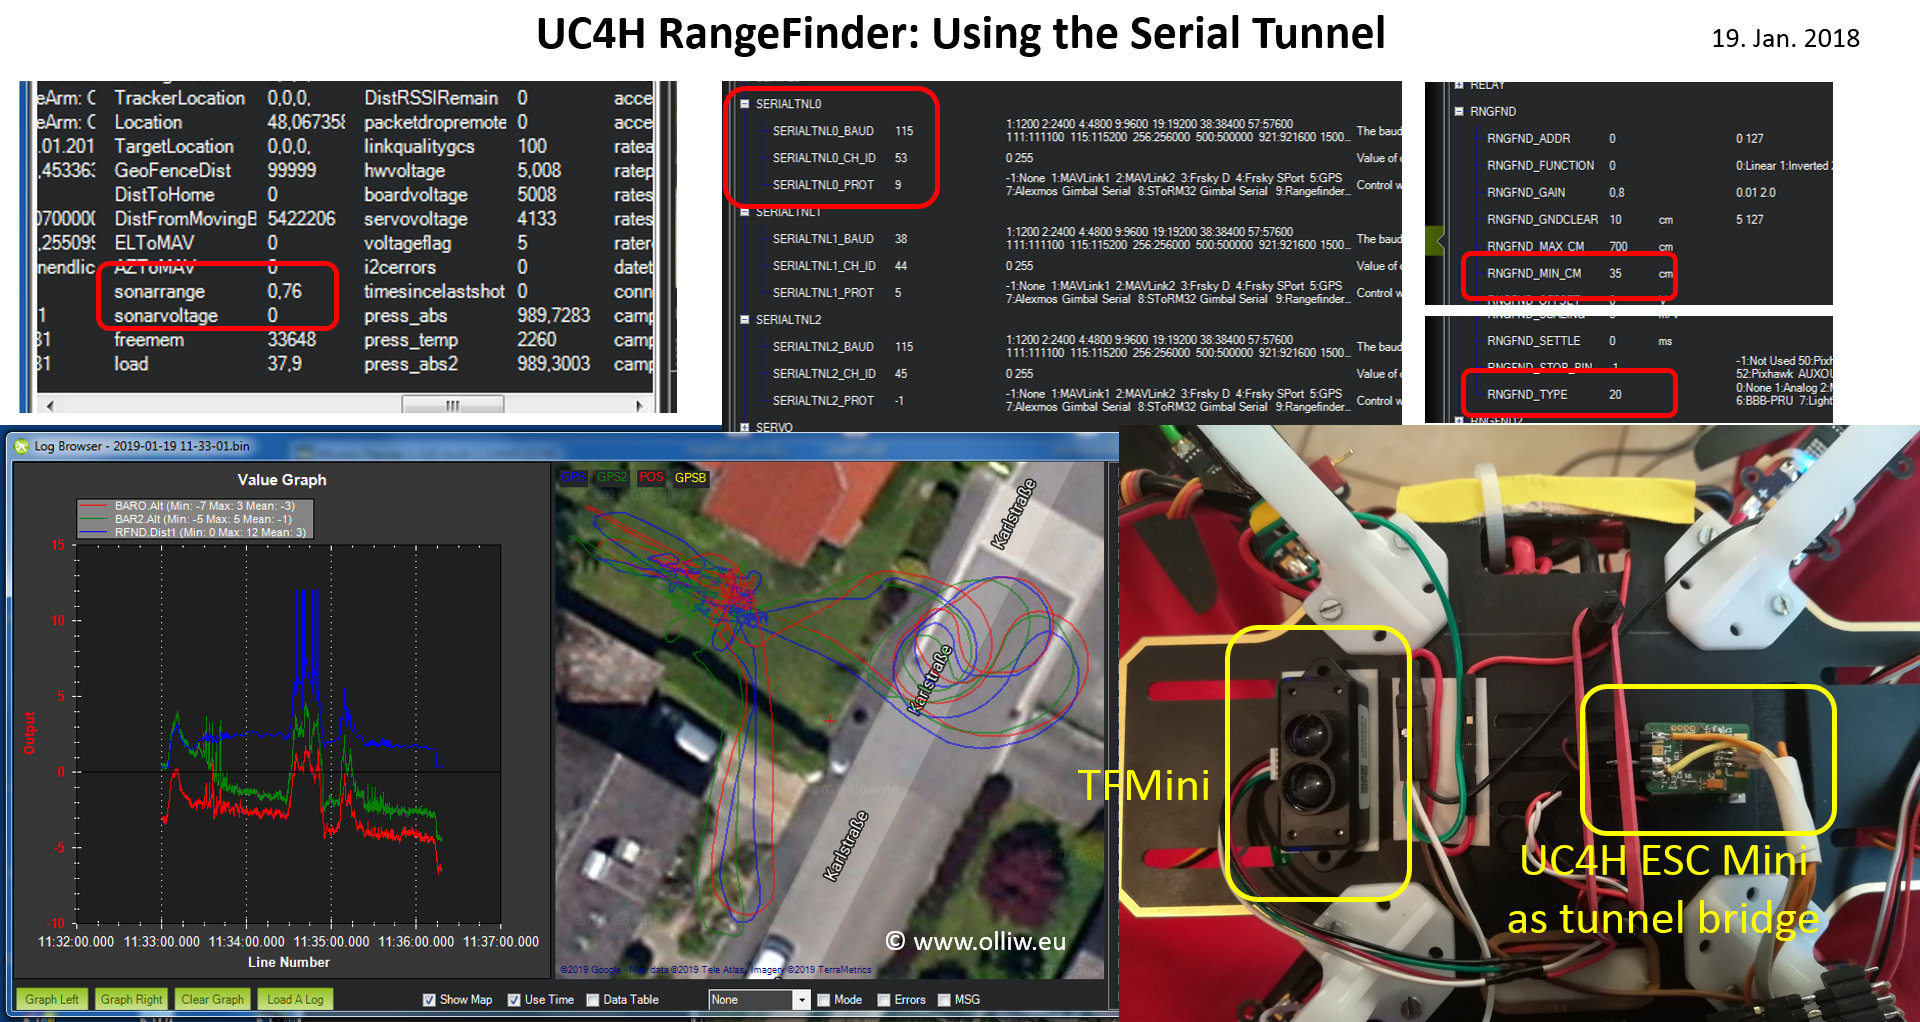
UC4H RangeFinder
21. Jan. 2019
Motivated by the great demonstration work of ppoirier on using range finders together with UC4H (here), I also went into exploring range finders. I actually can’t believe that I were never considering them before, so simple and so useful (a bit pricey though).
So I got me a Benewake TFMini range finder, and it’s working just great together with the UC4H tunneling and BetaCopter (the tunneling code on the UC4H side needs a tiny adjustment to make it work perfect, I’m nevertheless working on a new scheduling mechanism to hopefully get something „universal“).
The UC4H’s serial tunneling concept has proven itself again. However, it doesn’t scale well, and this – IMHO – bites especially for rangefinders. So, I designed a new compact yet data rich DSDL message, which reduces the bandwidth requirements by a factor of four and yet offers more data (the distance message of the standard DSDL isn’t very useful). And I of course adapted BetaCopter to consume it. This new message will become relevant if not crucial for what I have in my mind: A copter with 10 rangefinders, all on UAVCAN 😀 (I’m going to call this the UC4H Bumble Copter LOL).
Since I like it nice, I also designed a little adapter board for the TFMini. This will pack it all together into one little cute package. This easily could become the first UAVCAN Rangefinder!
The next bigger step will be to also support the VL53L1X, including designing a nice little PCB. I mean, I’m not going to afford 10 TFMinis, so 9 of the 10 rangefinders will have to be VL53L1X LOL.
Release Day
13. Jan. 2019
Some releases.
UC4H MavlinkBridge v0.06:
• Initial release of firmware for the UC4H MavlinkBridge. Use MissionPlanner beta.
UC4H Gps-Magnetometer-Barometer v0.27:
• Baudrate for GPS mode (gnss.Fix) changed from 57600 to 115200
• Support for QMC5883 magnetometer added
UC4H PowerBrick v0.10:
• Support for FrSky Lipo Cell Voltage Sensor. Use MissionPlanner beta.
BetaCopter 3.6.4 v017u:
• Based on Copter 3.6.4.
• Battery cell voltages support for UAVCAN/UC4H battery monitor (DataFlash, Mavlink).
• Report of detected and usage of compasses to improve user experience.
Firmwares as usual in the github repository: https://github.com/olliw42/uavcan4hobbyists
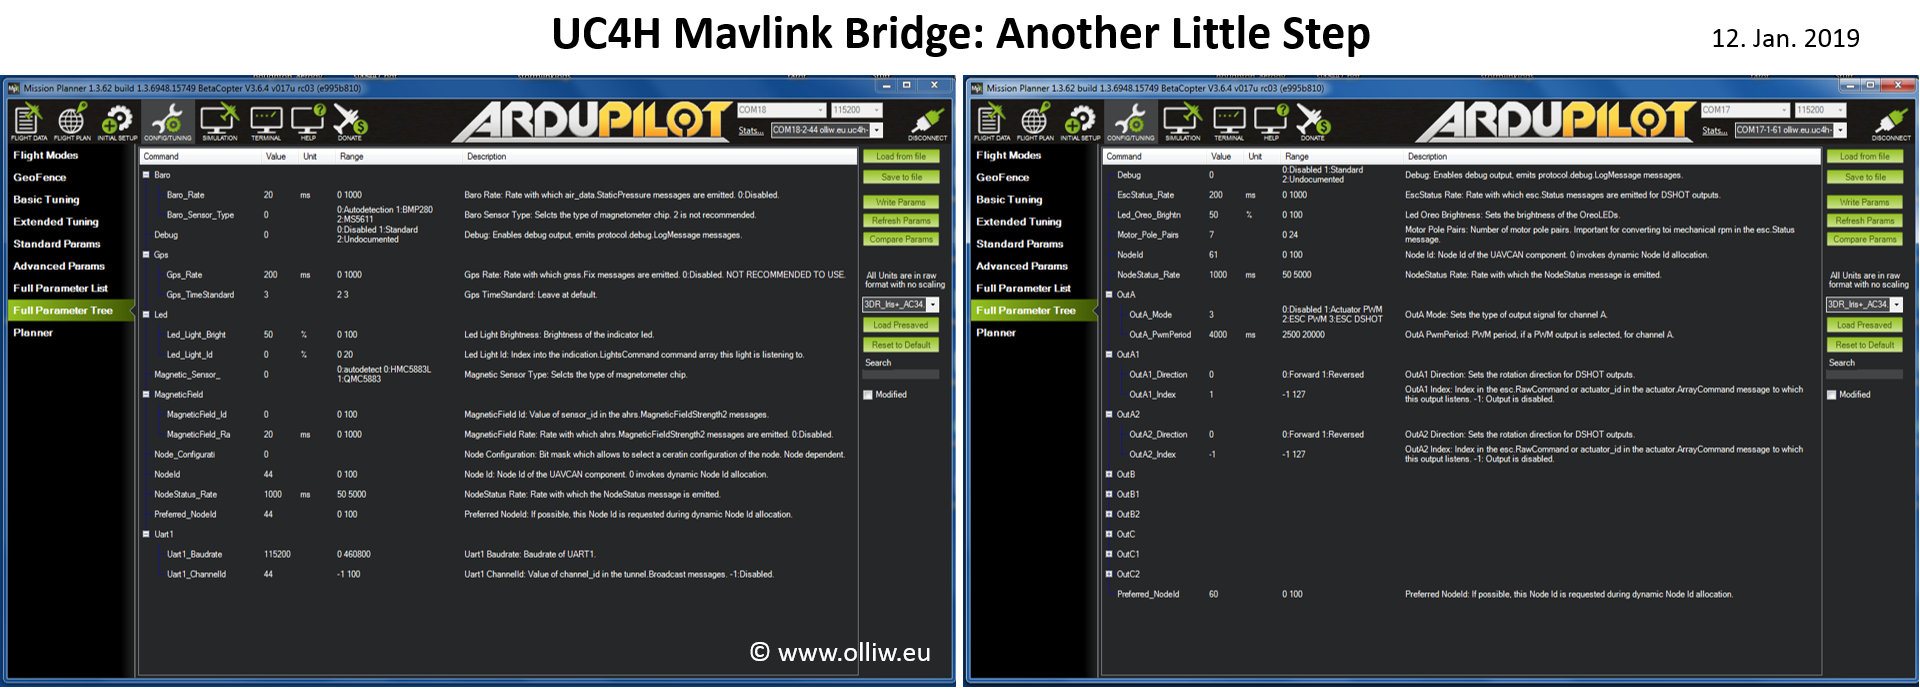
UC4H Mavlink-Bridge III
12. Jan. 2019
I was trying to convince MissionPlanner to show parameter information, such as range or description, also for the parameters of the UC4H nodes. It unfortunately was necessary to modified the UC4H MavlinkBridge such that it replaces all blanks in the parameter names by _. The good thing: By copying some info into MissionPlanner’s parameter meta data file it indeed shows now the descriptions. I actually find this of great help, since one doesn’t always have to memorize or look up what is what. Very useful. The bad thing: The parameters are now also organized into sections, which I don’t like much. So, my opinion is a bit mixed on this. I really would wish that MissionPlanner would provide some better means to present UAVCAN node parameters. But for the moment that’s the best we can get, I guess. 🙂
UC4H Mavlink-Bridge II
2. Jan. 2019
The UC4H MavlinkBridge has matured. It now also has passed flight testing, i.e., is ready for prime time. A short demo video:
Many thanks to Michael Oborne, the MissionPlanner maintainer, for having swiftly added some UAVCAN Interaction features to MissionPlanner. Thx, sir!
UC4H Mavlink-Bridge: First working Prototype
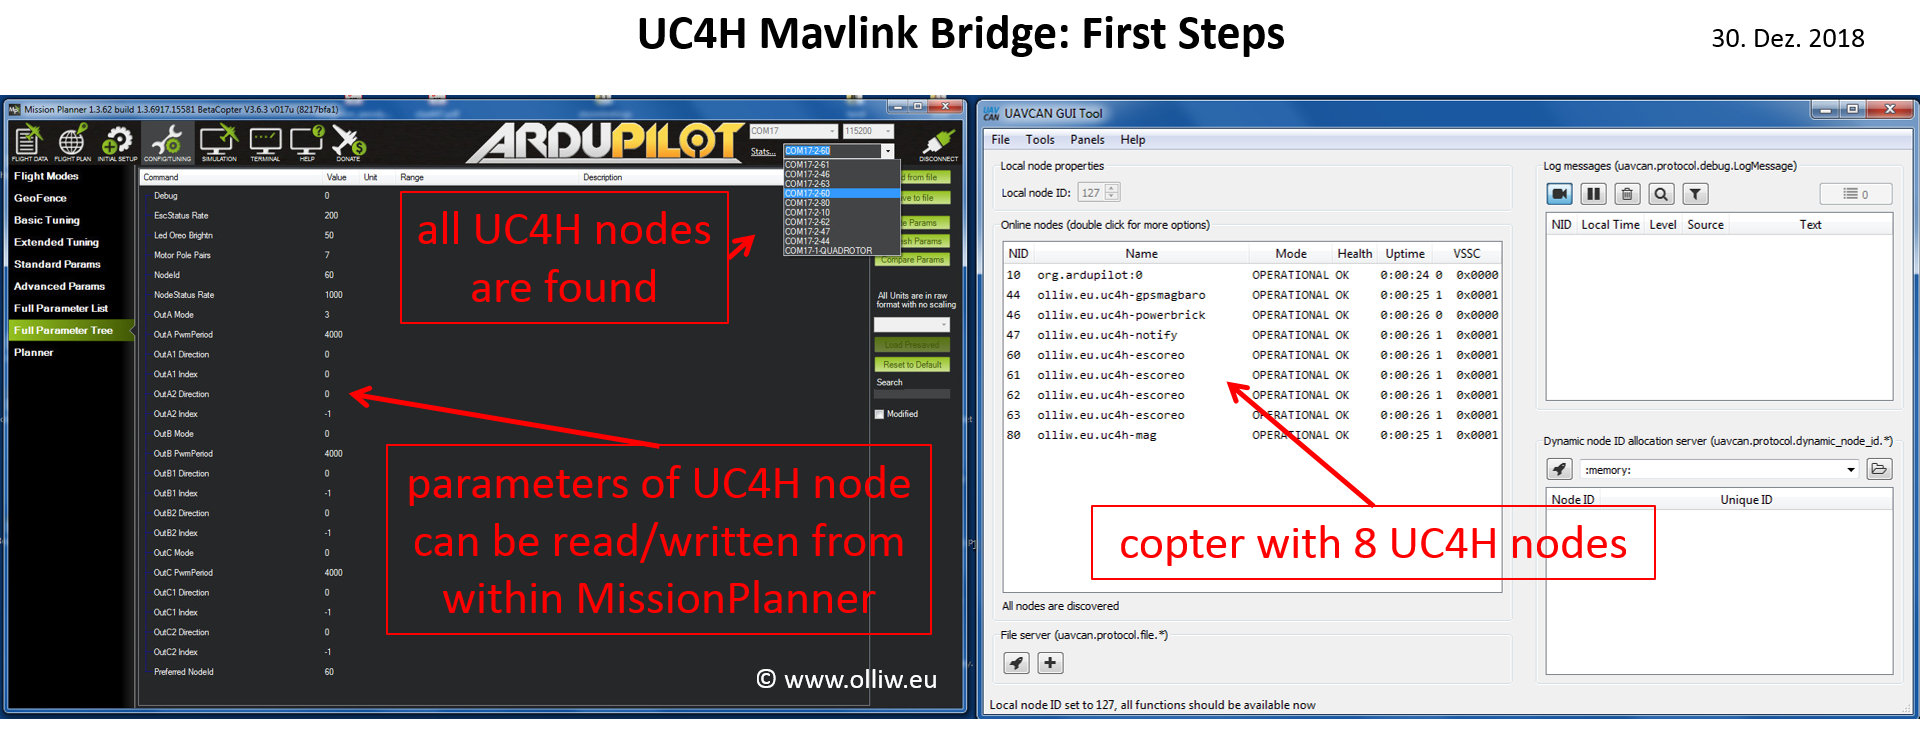
30. Dez. 2018
Another feature which was badly missing is the possibility of configuring the UAVCAN nodes seamlessly in a user-friendly way with „ArduPilot tools“, i.e., without the need to connect an extra SLCAN adapter and use special software, such as the UAVCAN GUI Tool. I’m not claiming to have solved that completely now, but this might be a significant step forward.
As regards configuration of parameters, a solution has in principle been defined several years ago as UAVCAN-MAVLink bridge, see here (and it appears to be implemented in PX4 since 2016). As usual with UAVCAN, ArduPilot is behind, and doesn’t have anything of this. Interestingly, MissionPlanner in contrast has already some support!
In principle, the MAVLink bridge should be part of the ArduPilot code, but this I couldn’t yet achieve. However, I could do it with a „piece of on-board equipment“, such as a general-purpose UC4H node. As usual with UAVCAN, the UAVCAN messages have not been well designed, which results in some not-so-nice issues code-wise and makes it trickier and more resource-hungry than needed. I guess I’m going to add my own UAVCAN messages. Anyway, a first well-working prototype I have now completed:
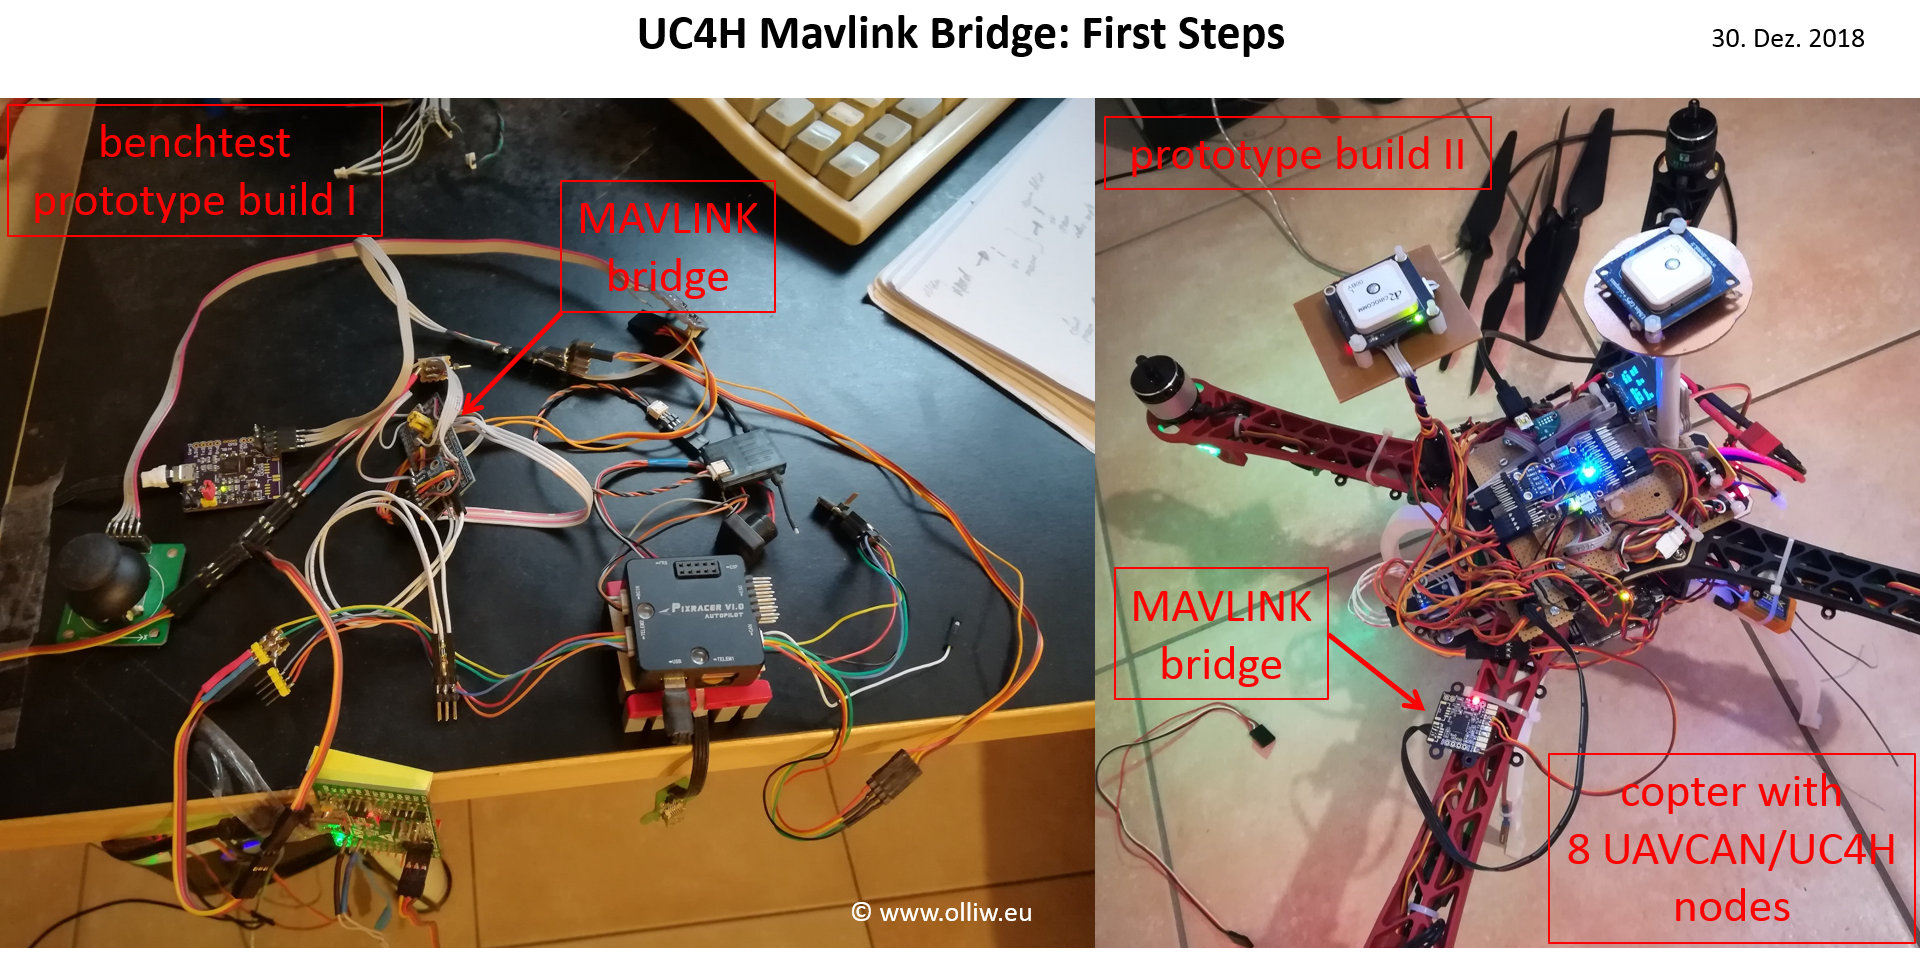
Finally, I have to say that I’m not convinced that the UAVACN-MAVLink bridge concept is the final answer. An alternative approach would be an integrated on-board SLCAN adapter, which would decouple the development of the UAVCAN configuration tools from the ArduPilot development, which would be much more efficient workload-wise and likely would give the user much better tools. I guess I’m going to try this approach too.
UC4H PowerBrick: Cell Voltage Support by using a FrSky MLVSS
23. Dez. 2018
One feature which was missing so far was monitoring of the voltages of the individual cells of the battery. I was actually pondering about this for a while, and how a solution could look like. I didn’t wanted to have the required additional electronics on the UC4H PowerBrick board, since it would make it bulkier. So I ended up thinking that if a FrSky lipo voltage sensor (MLVSS or FLVSS) is good enough for many it should be good enough for us here too. The advantage: It is readily available, relatively cheap, folks are used to how to use it, and anyone can decide freely if she/he wants to add this feature or not. Gladly, I had put a solder pad on the UC4H PowerBrick, which I now could use to connect to the FrSky sensor. Also, gladly, I had prepared the uc4h.GenericBatteryInfo UAVCAN message for cell voltage support. So, adding respective code to the PowerBrick firmware and the BetaCopter code wasn’t very difficult. And this is the result:
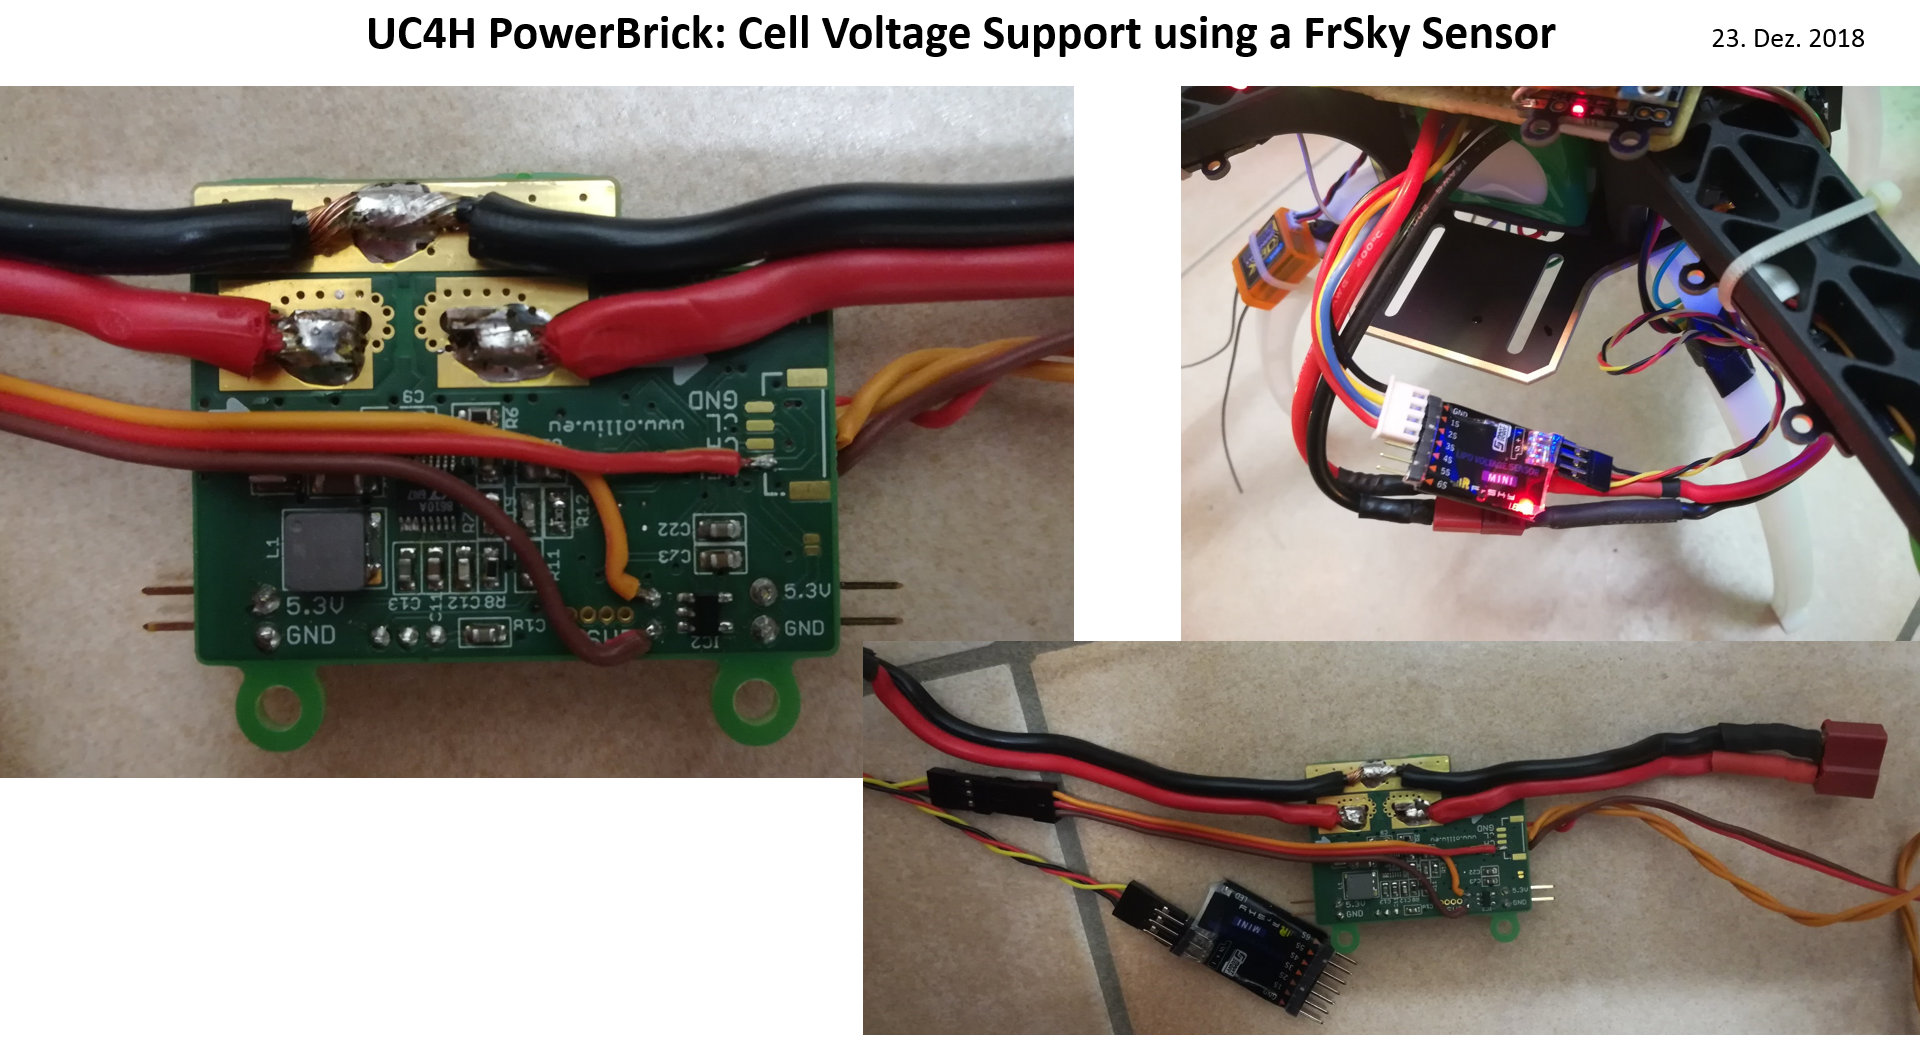
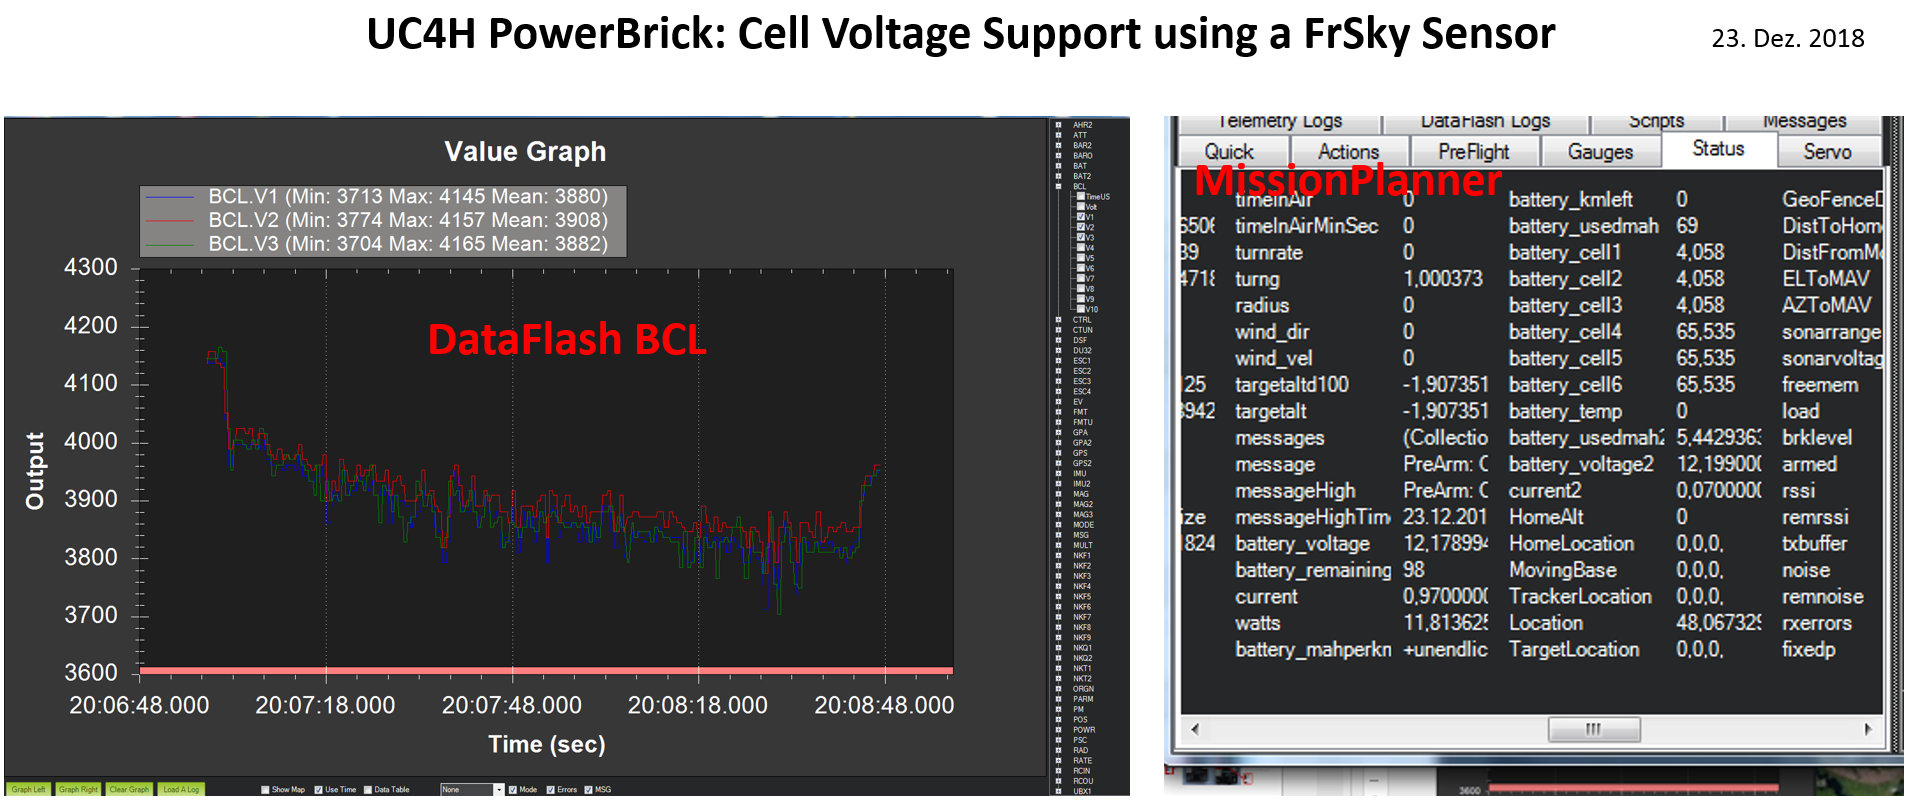
One disadvantage of the FrSky sensor is that it is very slow. For a 3S/4S cell it provides a new data set only every 0.6 s. However, it’s main purpose is to detect battery issues, and this should be good enough, right? And after all, this is the same sensor everyone is using so happily 🙂
I am of course planning to design a new PCB for the UC4H PowerBrick, which offers a FrSky S-Port port. I in fact started already, but this will take time LOL.
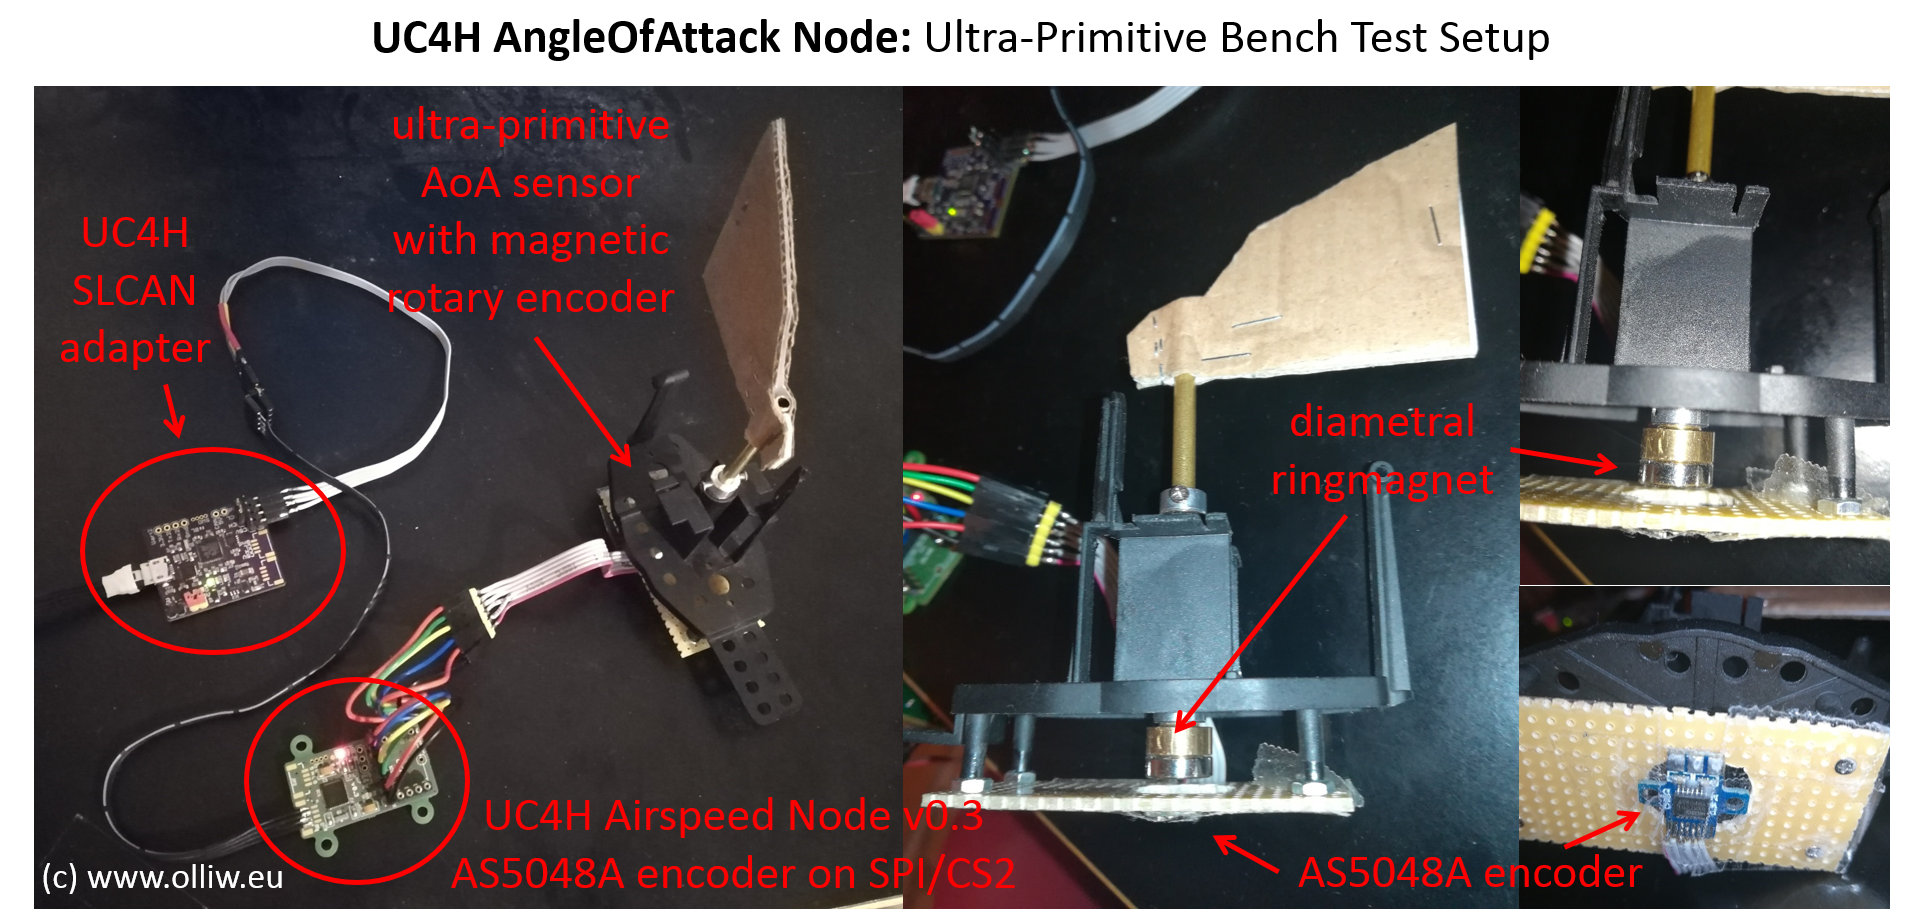
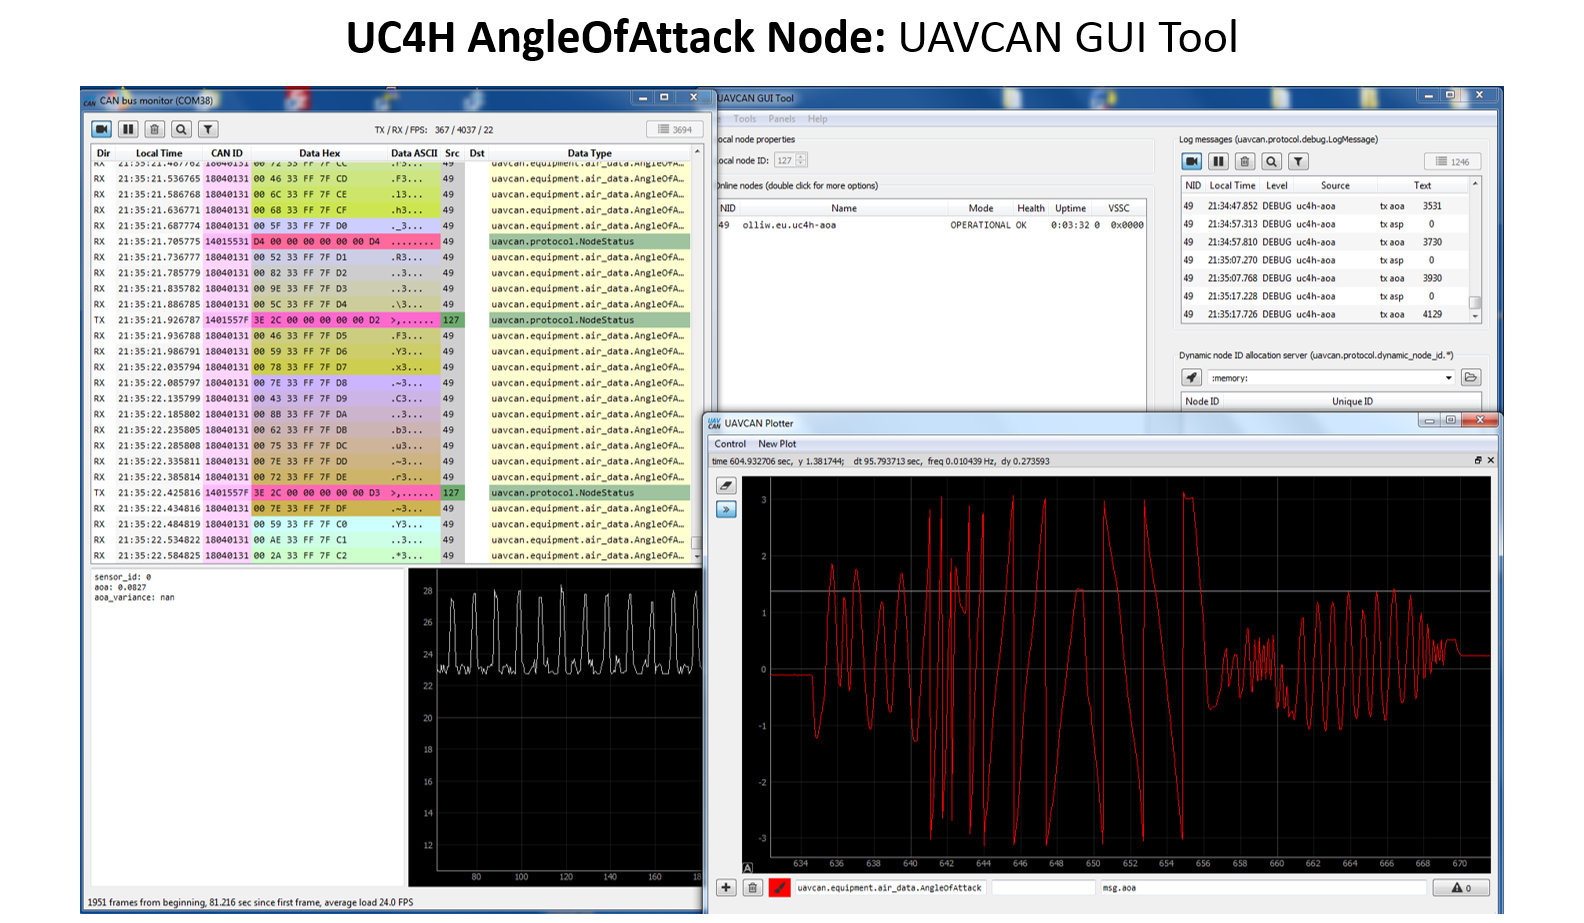
UC4H AngleOfAttack Node
15. Dez. 2018
The second SPI port on the UC4H Airspeed Node needs some usage, right? So I did this little, quick addition, for the sake of the fun, and because I could. LOL. Thanks to the T-STorM32 project I was already familiar with magnetic rotary encoders, such as the TLE5012B or AS5048A. I had the code pieces and hardware pieces available; I „just“ had to put them together. The result you see below. Please don’t tell me that this is a very crude setup mechanical wise, I know this 🙂 You are welcome to do better. The good message: If you decide to do so, you now get a UAVCAN AngleOfAttack sensor. Maybe I do a test-flight with the AoA sensor mounted on a copter … not that this makes sense, but … it’s fun. LOL.
I guess I should start to consider getting me a plane 😀 😀 … UC4H servos, airspeed, AoA, ESCs …
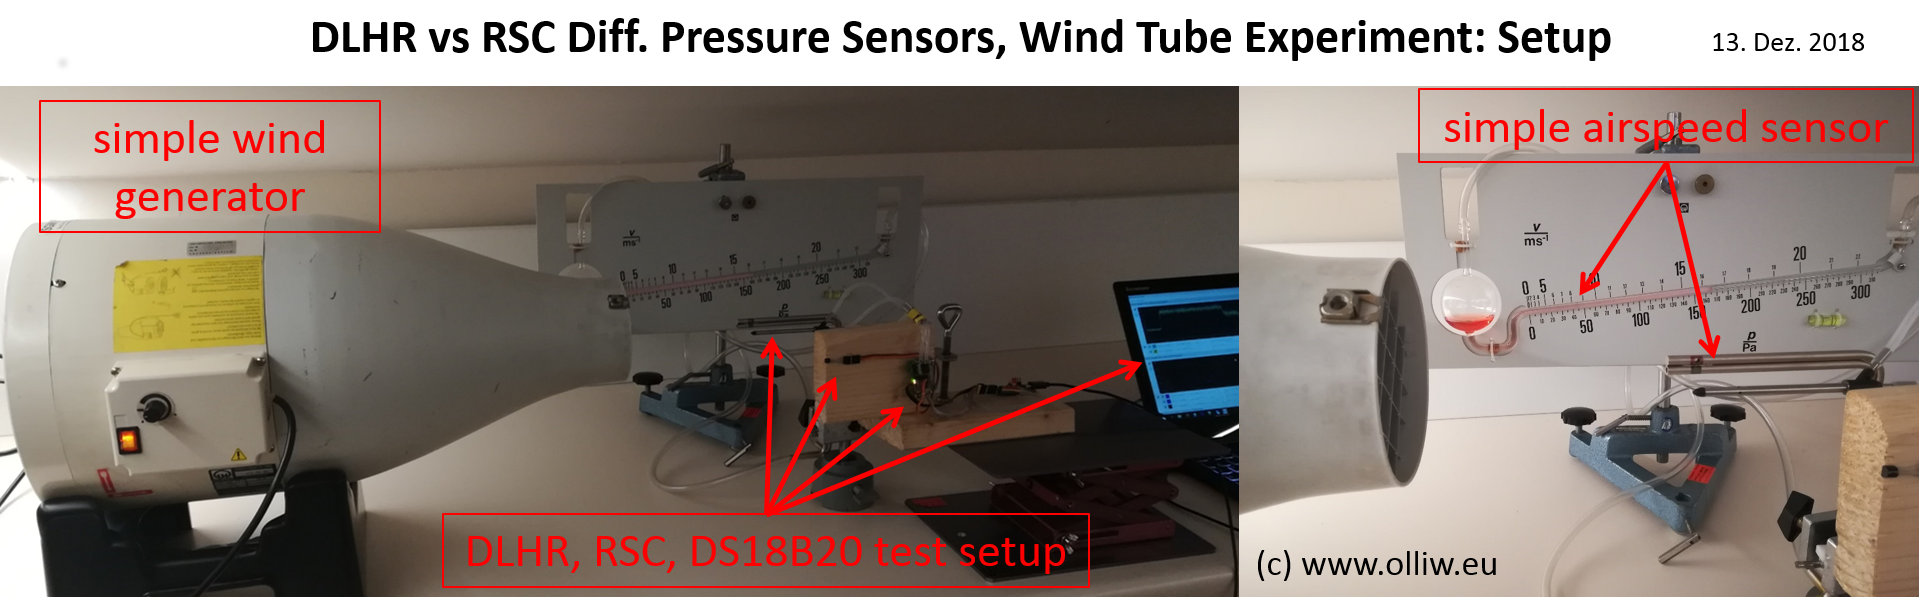
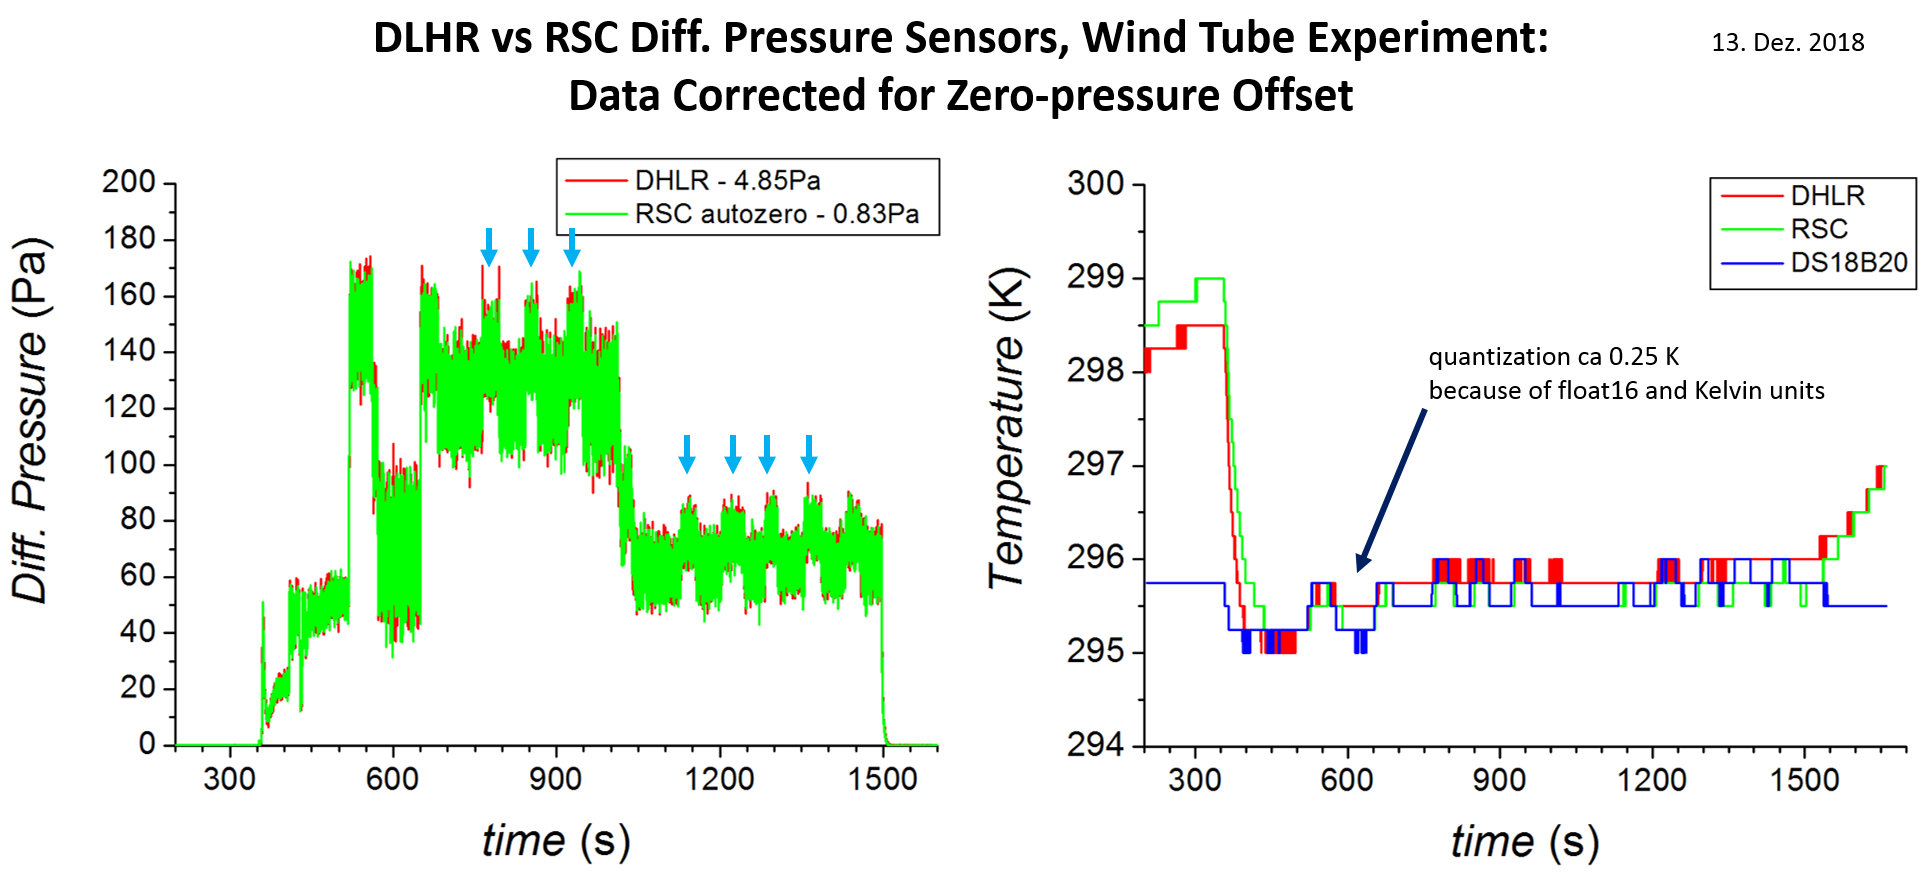
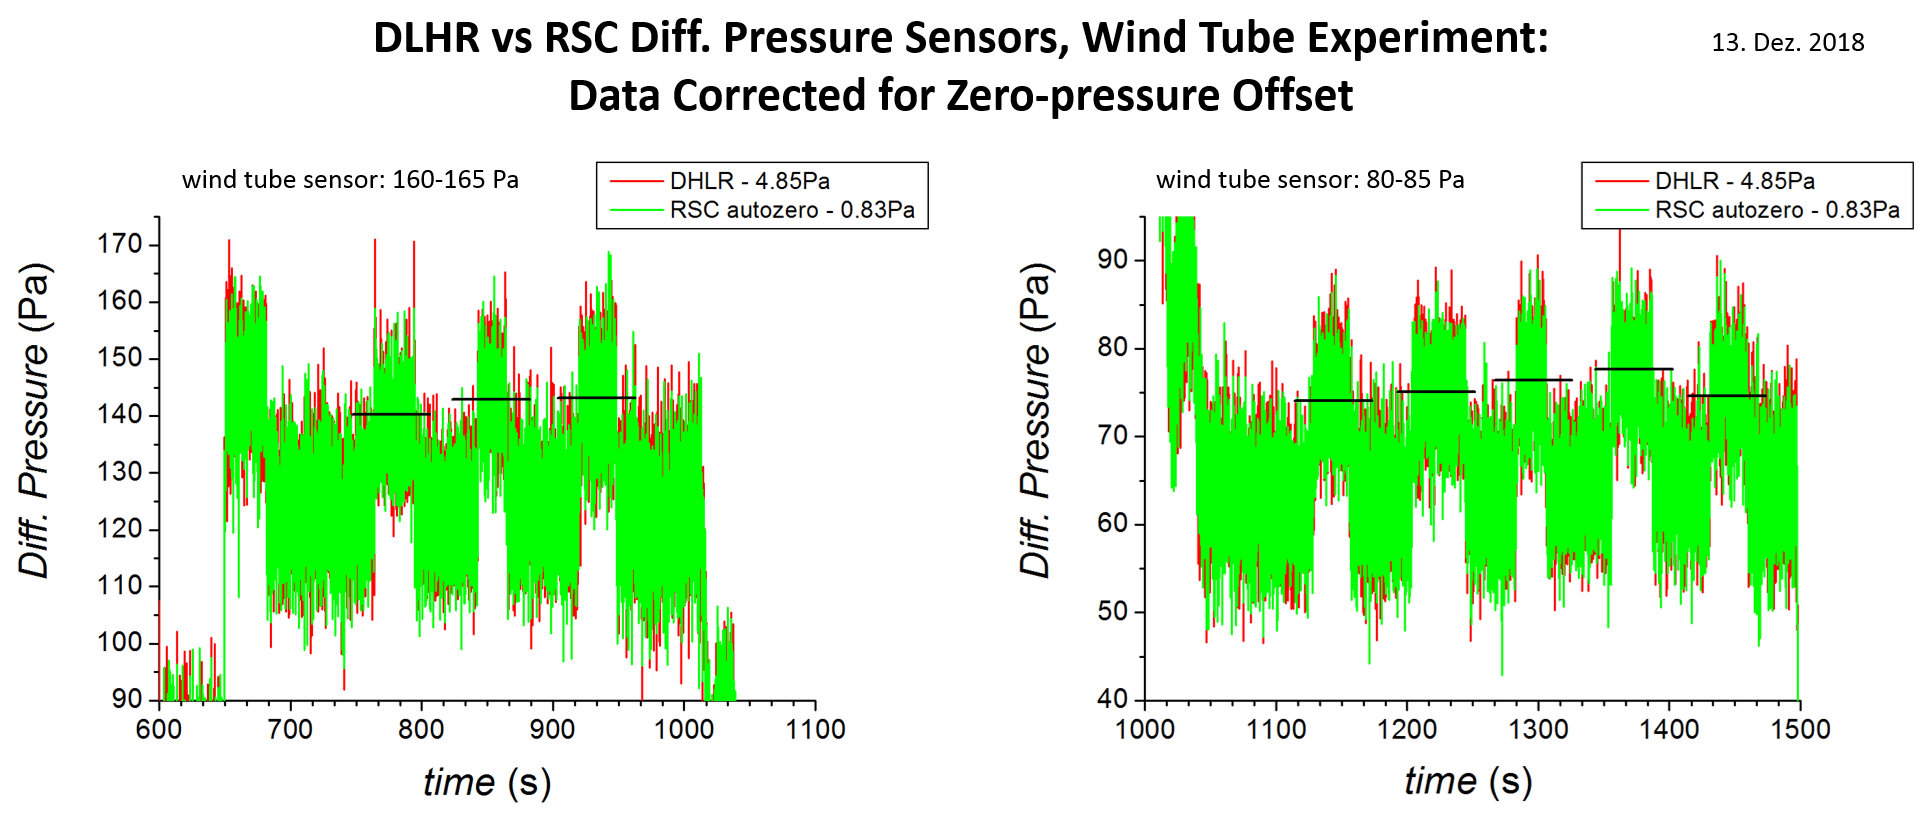
Differential Pressure Sensors: DLHR vs RSC Comparison III
13. Dez. 2018
In continuation of my efforts to evaluate the Honeywell RSC Trustability and AllSensors DLHR differential pressure sensors, I’m trying to also get some „dynamic“, actual airspeed data. An article by xDevs.com reported a scale error of ca 5% for the RSC sensor; the DLHR was found to be within specs. Unfortunately, I don’t have the means for reliable measurements. I did had the chance to use a simple wind generator with airspeed meter. It was clear that it won’t be very accurate, but I thought it might be worthwhile to use. I was wrong.
The setup and recorded data are shown below. The DLHR data I corrected by subtracting an offset of 4.85 Pa, and the RSC data by subtracting 0.83 Pa. There is some info in here: The DLHR zero-pressure offset reported some days ago (here) was ~5.4 Pa, which implies a „zero-offset stability“ of ~0.6 Pa. For the RSC the offset was ~0.6 Pa, and now is 0.83 Pa. With that correction, the data of the RSC and DLHR are pretty consistent – within experimental error – which is pretty low here as seen by the huge noise in the data with the wind turbine on. A further point to note is the quantization in the temperature data of ~0.25 K. The resolution of the temperature sensors themselves is much better than that. The 0.25 K comes from the airspeed UAVCAN message, which uses float16 and Kelvin as units; the offset of 273.14 K significantly cuts down the resolution which would not happen with Celsius. This is just another example of the general observation that the UAVCAN messages of the standard DSDL set are very poorly designed. I also tried to „calibrate“ the RSC/DLHR against the simple pitot tube. The reproducibility was some few m/s, but a clear mismatch has to be noted. For two wind speed settings the simple pitot tube was measuring 160-165 Pa and 80-85 Pa, and the RSC/DLHR sensors were reporting 140-145 Pa and 75-80 Pa. Clearly, this experiment wasn’t even close to accurate enough to draw any conclusions as regards the scale accuracy of the RSC and/or DLHR sensors. I need to find a way to do better. LOL.
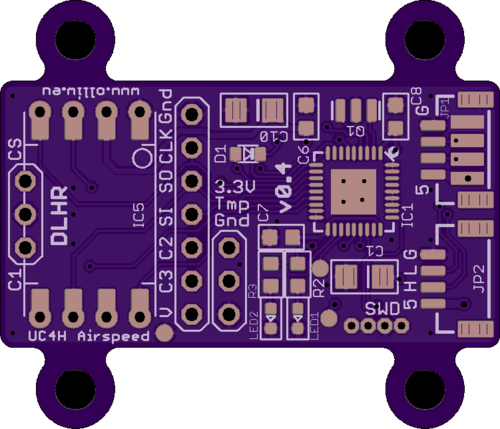
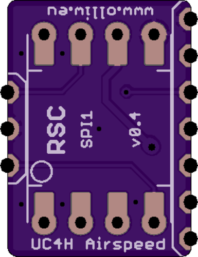
UC4H Airspeed v0.4 released
8. Dez. 2018
The v0.3 version of the UC4H Airspeed node PCB is working very well, but I realized I easily could do a minor but significant improvement which furthers its usage range. So I did that, yielding the UC4H Airspeed v0.4 version. The design of this node was a long story now, and went through 5 different versions. However, the v0.4 version I expect to last for quite some time, so I just have released it. The Eagle files and other material you’ll find as usual in the github repository.
Differential Pressure Sensors: DLHR vs RSC Comparison II
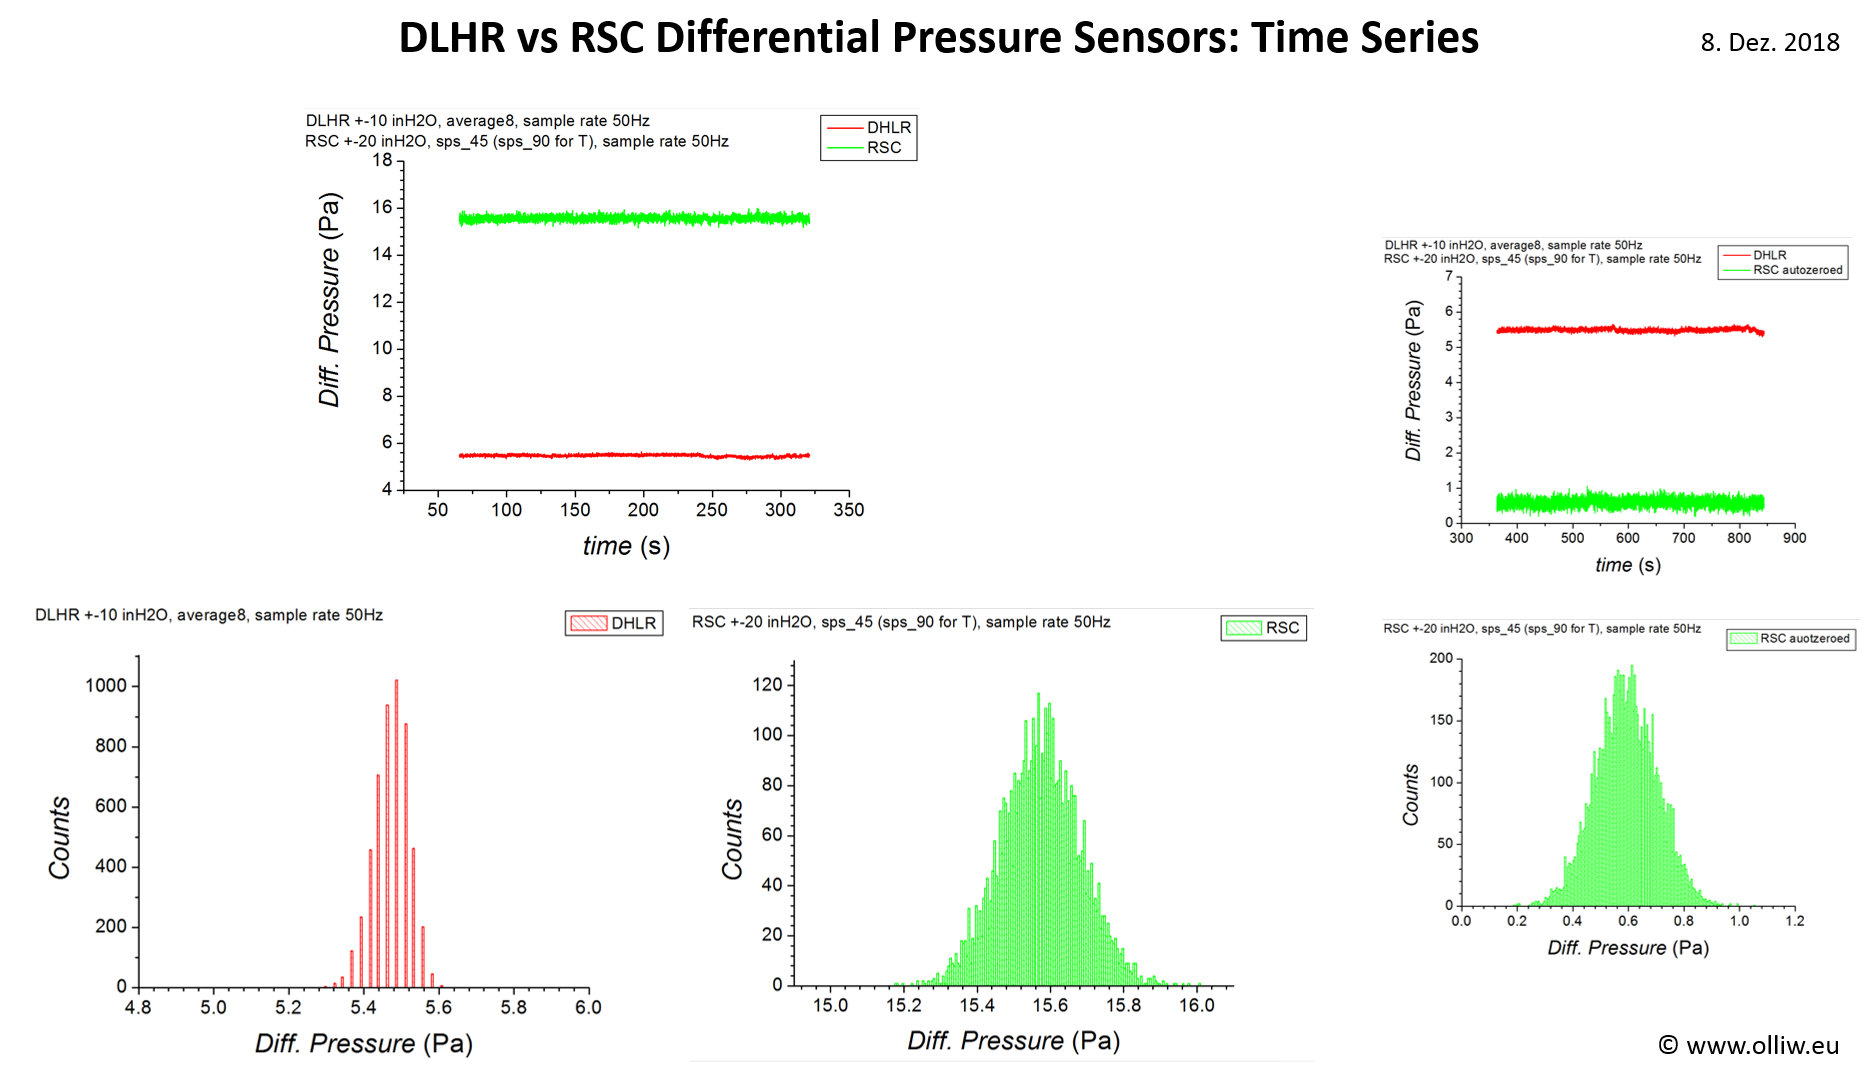
8. Dez. 2018
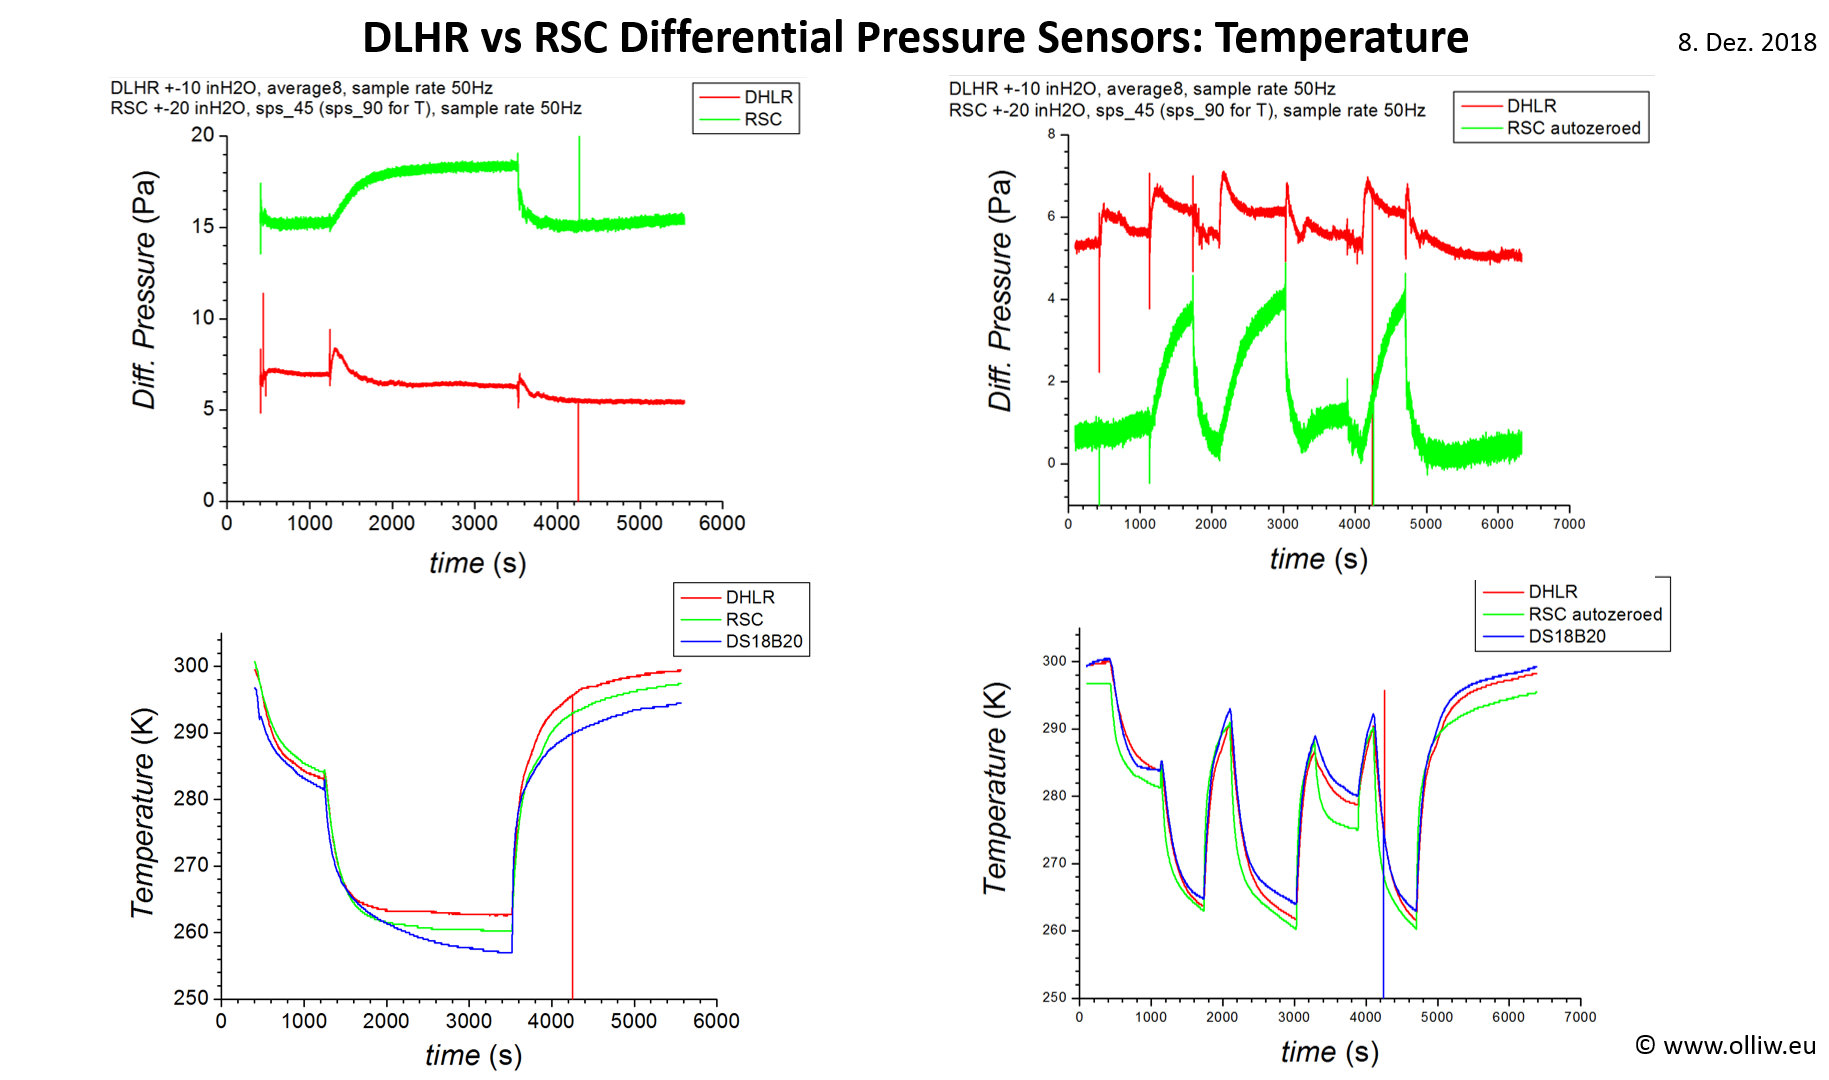
Both the Honeywell RSC Trustability and AllSensors DLHR differential pressure sensors are very promising candidates for application in state-of-art airspeed sensors. I’m interested in understanding better their relative advantages. So, I’ve added support of the DS18B20 temperature sensor to the UC4H Airspeed node firmware, for independent temperature measurement, and built a setup there both sensors are connected to one and the same pitot-static tube. In this first set of experiments I focused on the zero-pressure offset, with respect to its noise and dependence on temperature variations. For achieving different temperatures I put the setup repeatedly in ambient air, in the fridge, and the freezer.
The RSC sensor datasheet provides an autozero algorithm, so the data were taken first without this being done, which shows the „raw“ offset and then with autozero applied. The autozero procedure is not simply an offset subtraction, so it was interesting to see if it does anything.
In the comparison of the data the different pressure ranges of the two used sensors has to be considered. RSC: ±20 inH2O, DLHR: ±10 inH2O (±20 inH2O correspond to ±5000 Pa).
The noise analysis reproduces the findings I’ve obtained earlier here. The temperature dependent results indicate a significantly better offset stability of the DLHR sensor.
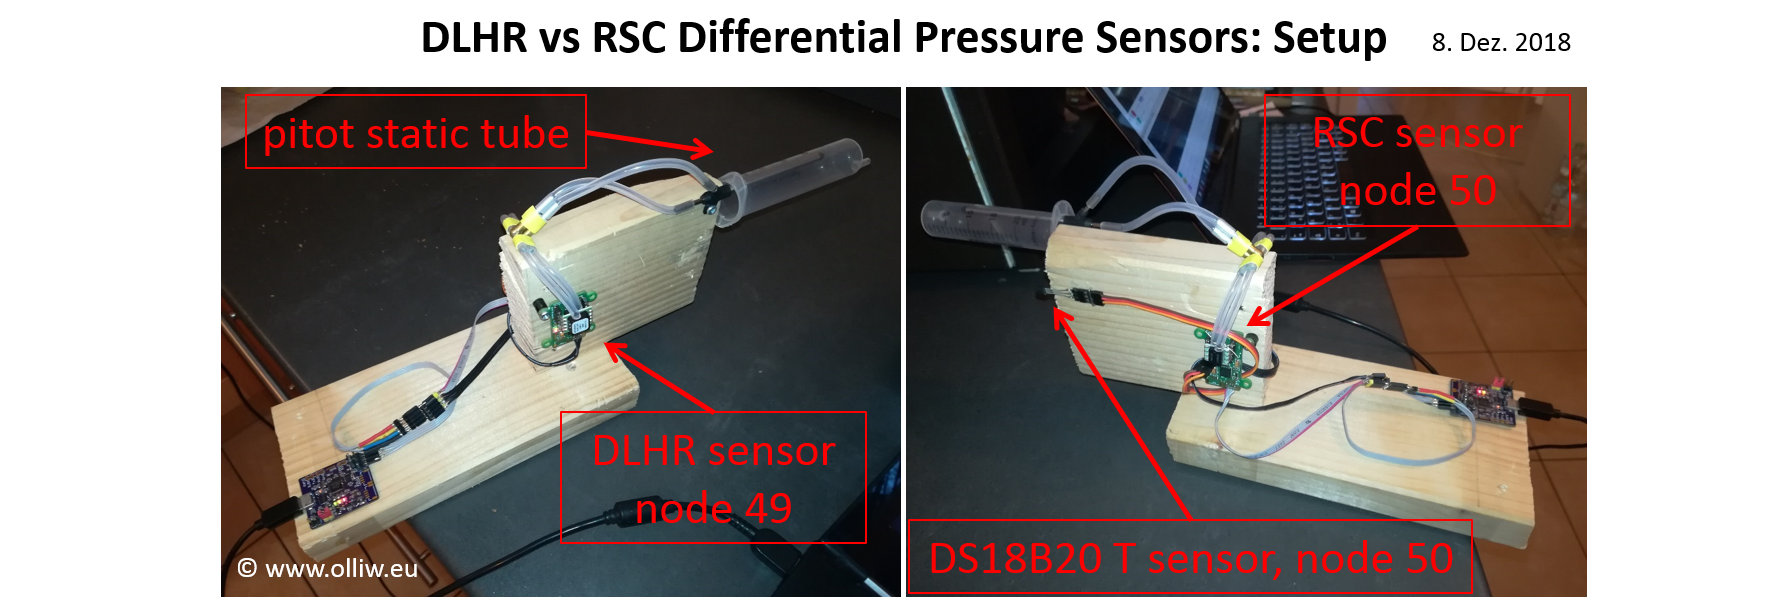
UC4H Airspeed v0.3 arrived
6. Dez. 2018
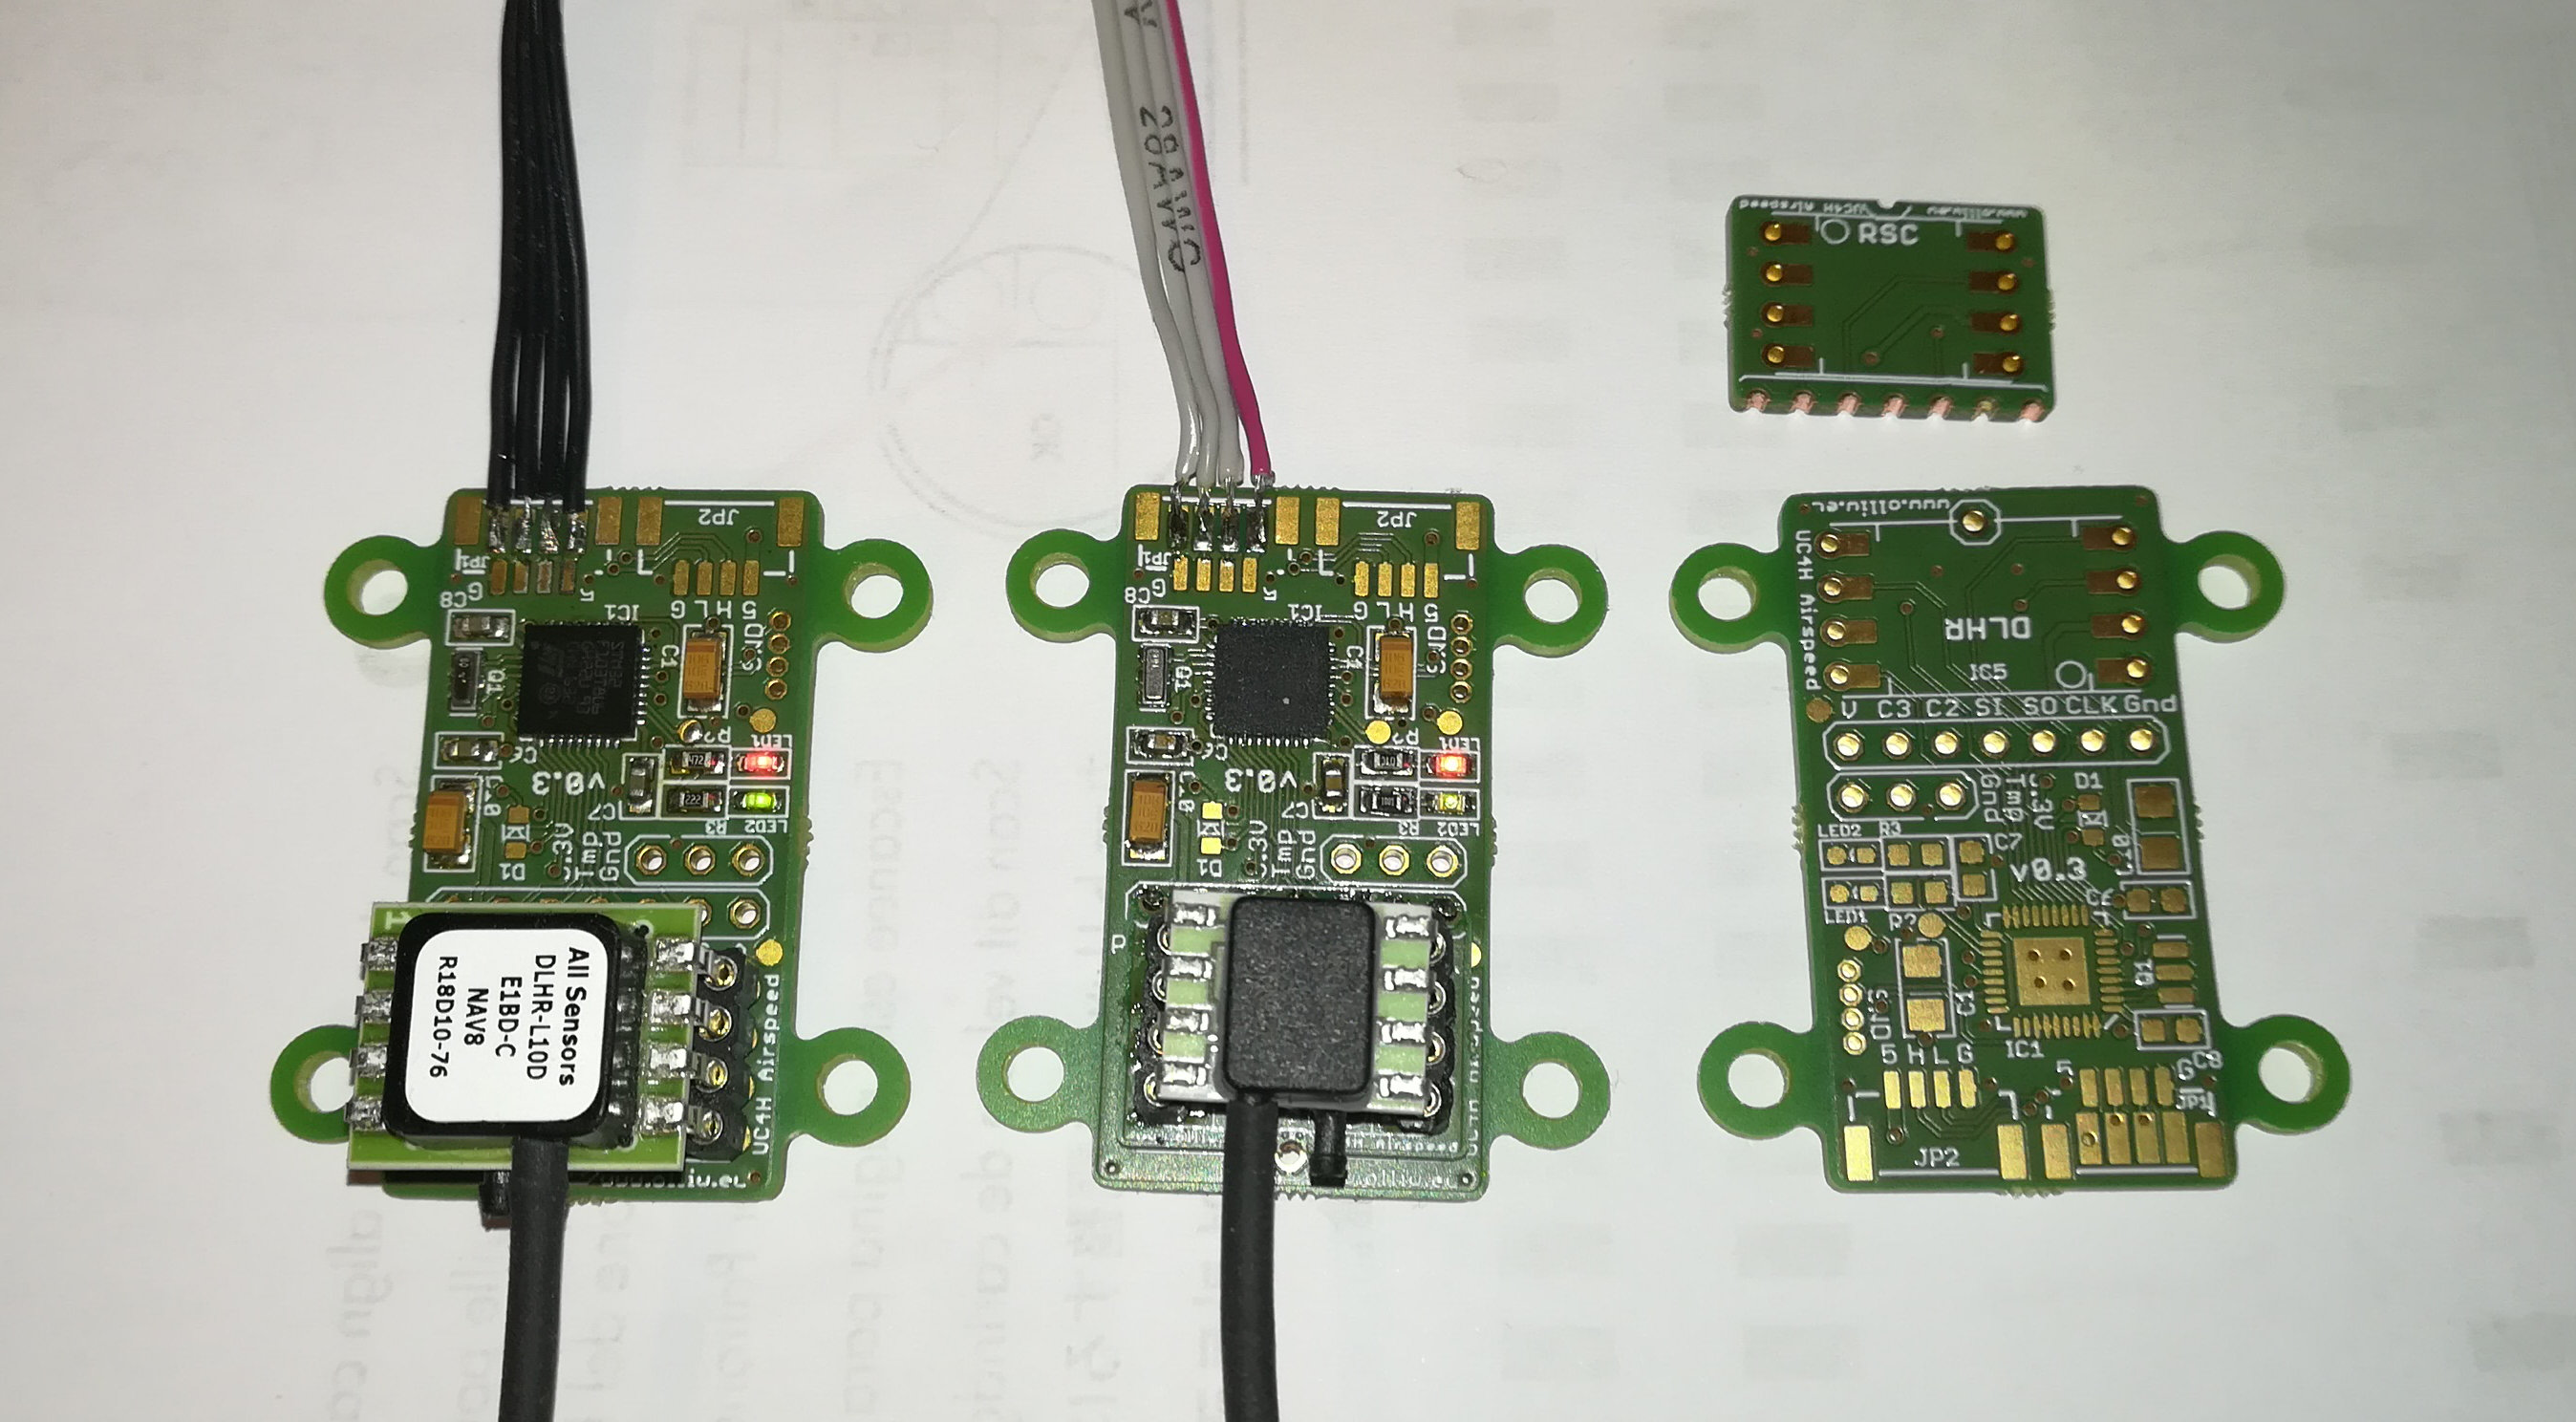
The new UC4H Airpseed v0.3 PCBs just arrived, so I had to assemble two of them. The „new“ feature of the v0.3 board is that it allows installing different differential pressure sensors using a small add-on PCB. Per default it hosts a DLHR sensor, and I also did one hosting an RSC sensor. I plan to do some comparative tests of these two sensors.
Dual UC4H Magnetometer Setup: First Tests
6. Dez. 2018
Since I’ve installed the dual GPS setup about a year ago or so on my flame wheel, I also wanted to use the magnetometer on the second GPS module as an additional external magnetometer. However, at that time back I couldn’t get it to work with ArduPilot. I now decided to look at this again. First, things have progressed since then and it should work now. Also, my current external magnetometer on the first GPS module started to develop a strange behavior in that it wouldn’t startup properly if it is too cold outside (I could proof that beyond doubt). So, I installed a UC4H general purpose board with a second external magnetometer, configured things, et voila:
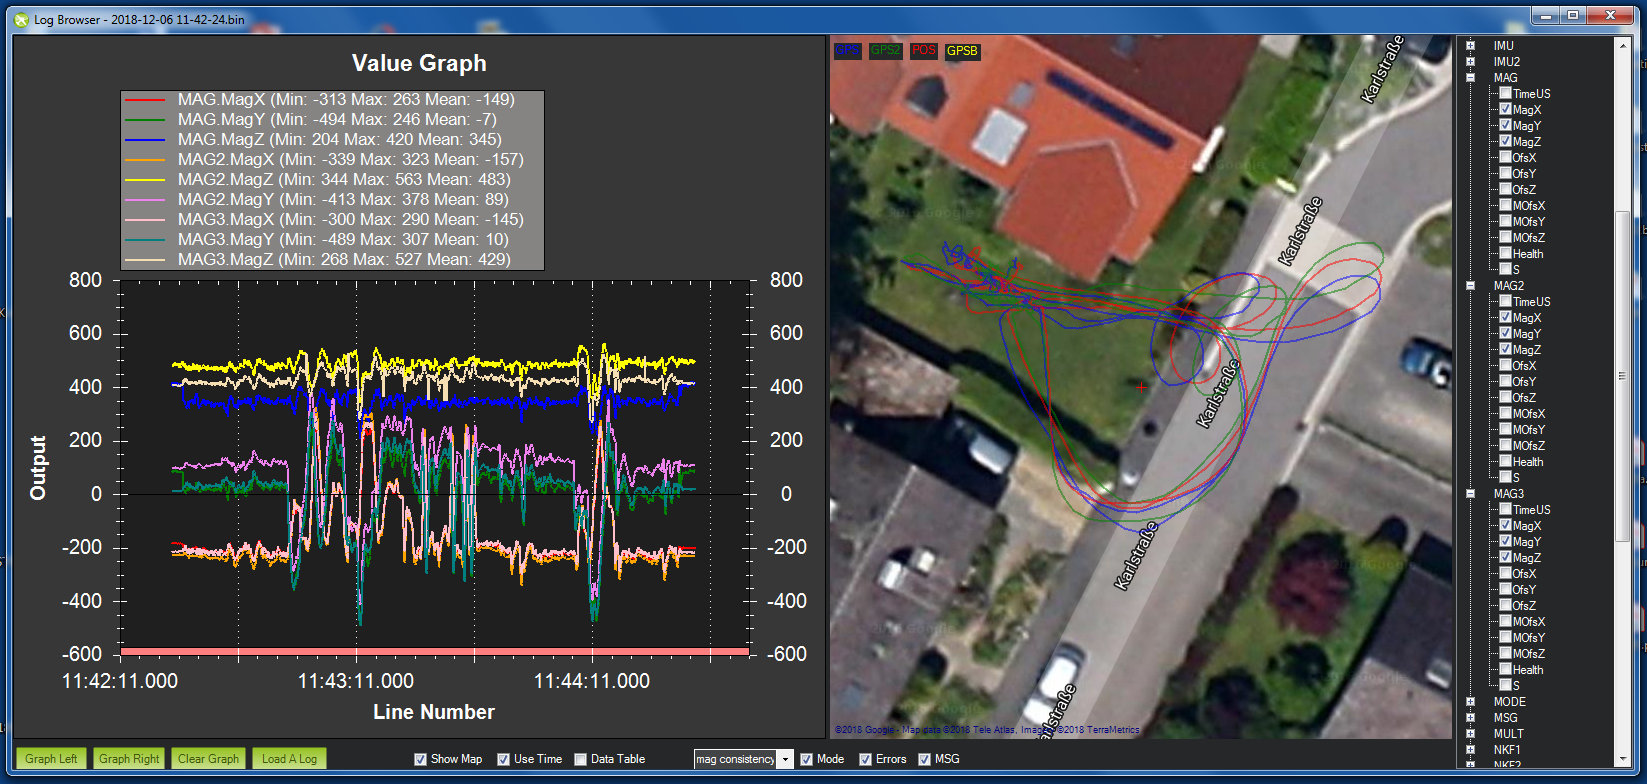
MAG is the internal magnetometer, and MAG2 and MAG3 are both external UAVCAN magnetometers on node id’s 44 and 80. Calibration was a bit of a pain, but that’s normal for ArduPilot. Otherwise the setup was straight forward.
Clearly, it would be cool now if things would work such that ArduPilot would select the better external magnetometer at startup, and would choose the proper calibration data if one of them should be found to be unhealthy at startup. Unfortunately, ArduPilot itself can’t do that (which is a longstanding complain), so trying to improve that in BetaCopter would be the next step.
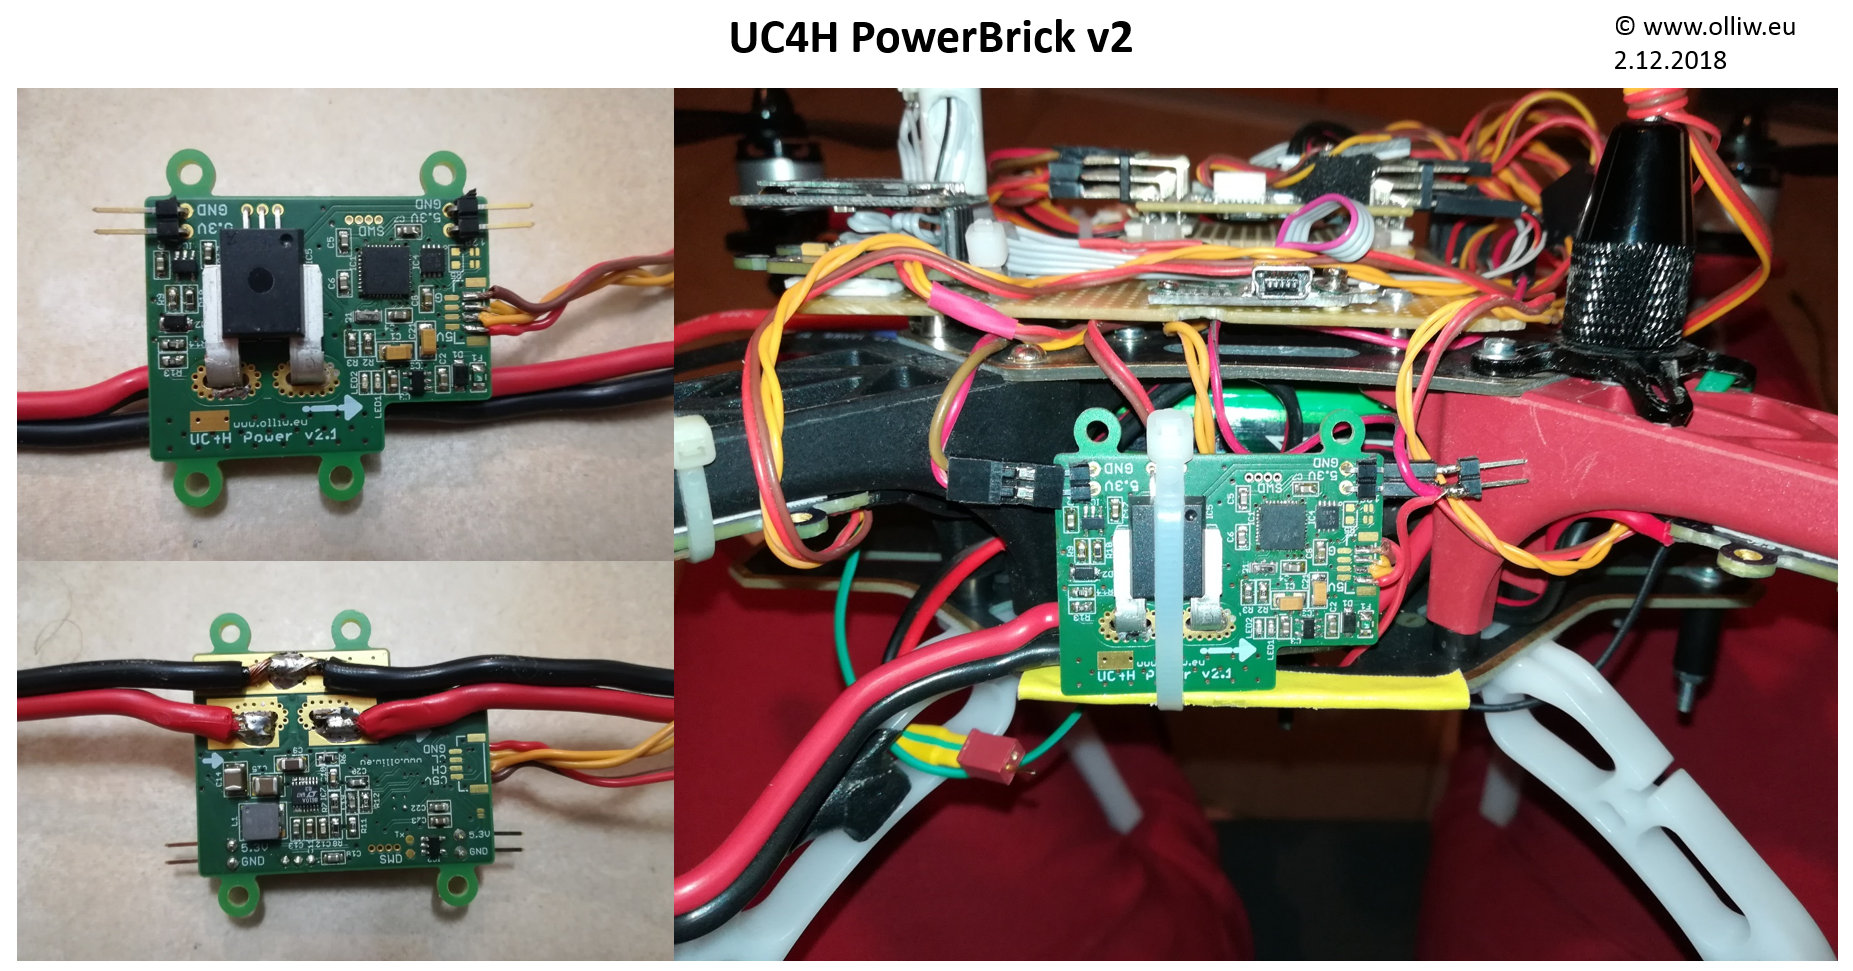
2nd Generation UC4H PowerBrick
2. Dez. 2018
Also this was long overdue, the remaking of the UC4H PowerBrick. First, it now also follows the „2nd generation“ guide lines (see the main thread for an explanation). Second, I removed some pin headers from the design which made it slightly smaller. And finally, the 5.3 V voltage is now available on two pin header ports, which is very convenient for powering the flight controller and realizing a more reasonable CAN bus power scheme.
It passed all test flights without any issues. Well, why should there be any, the predecessor I had in use for more than a year without any issues :).
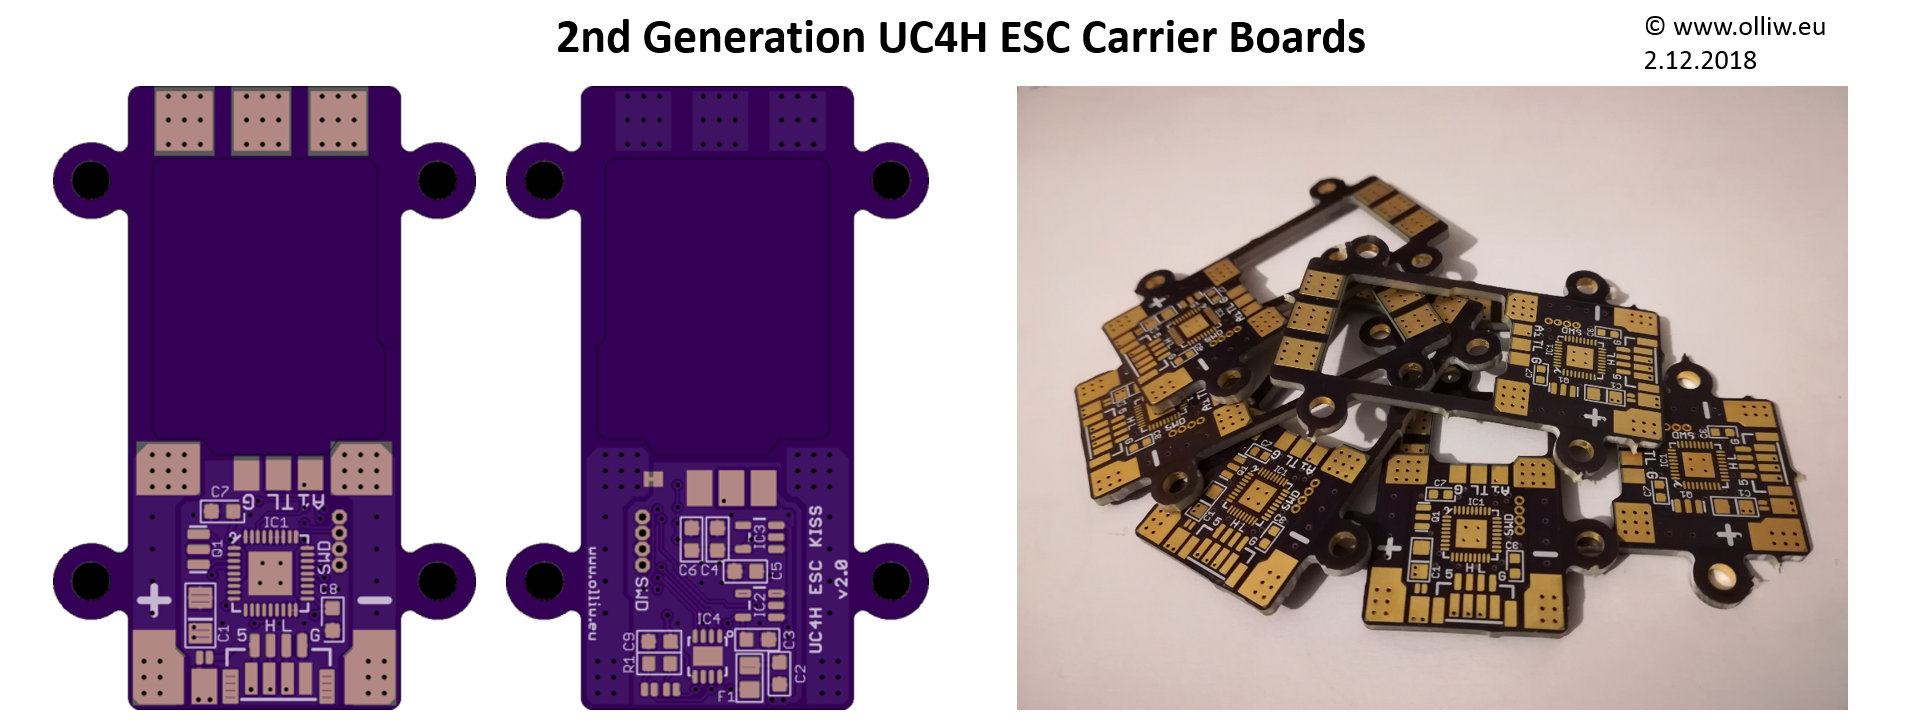
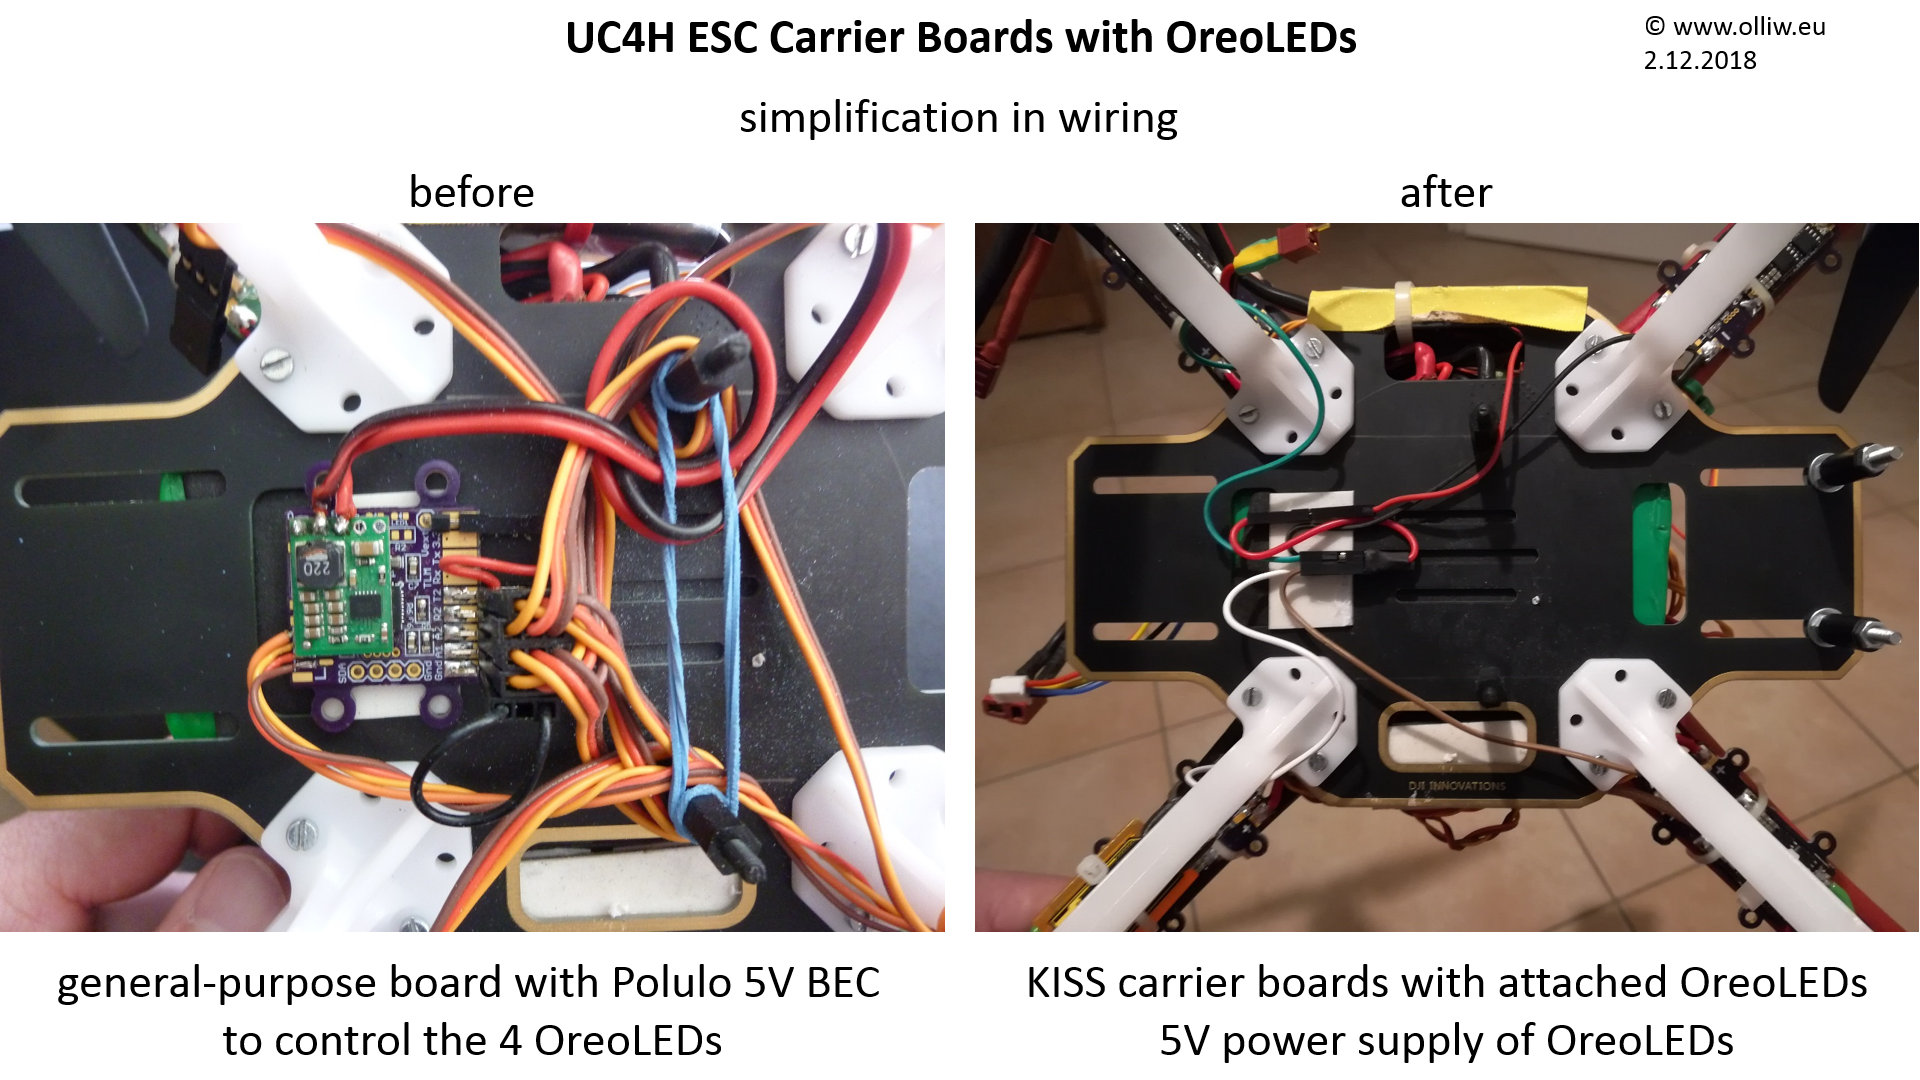
UC4H ESC KISS Carrier Boards v2 with integrated OreoLEDs
2. Dez. 2018
This is something I wanted to do since about 10 months, since I’m installed the v1 UC4H ESC KISS Carrier boards, namely to operate and drive the OreoLEDs directly from the carrier boards. The main advantage is obviously the massively simplified wiring, and that one UC4H node less is needed. With the v2 KISS carrier boards this now became possible. Doing the firmware was not really difficult since I gladly had essentially all modules at hand, and the synchronization scheme I had in mind, and which is required to keep the OreoLEDs to blink in sync, turned out to work well out of the box.
Initially I thought that I will have to do a special firmware for that application, but gladly I could avoid this. So, the OreoLED support is now part of the „standard“ esc-actuator firmware, v0.22. Available as usual from the UC4H github repository.
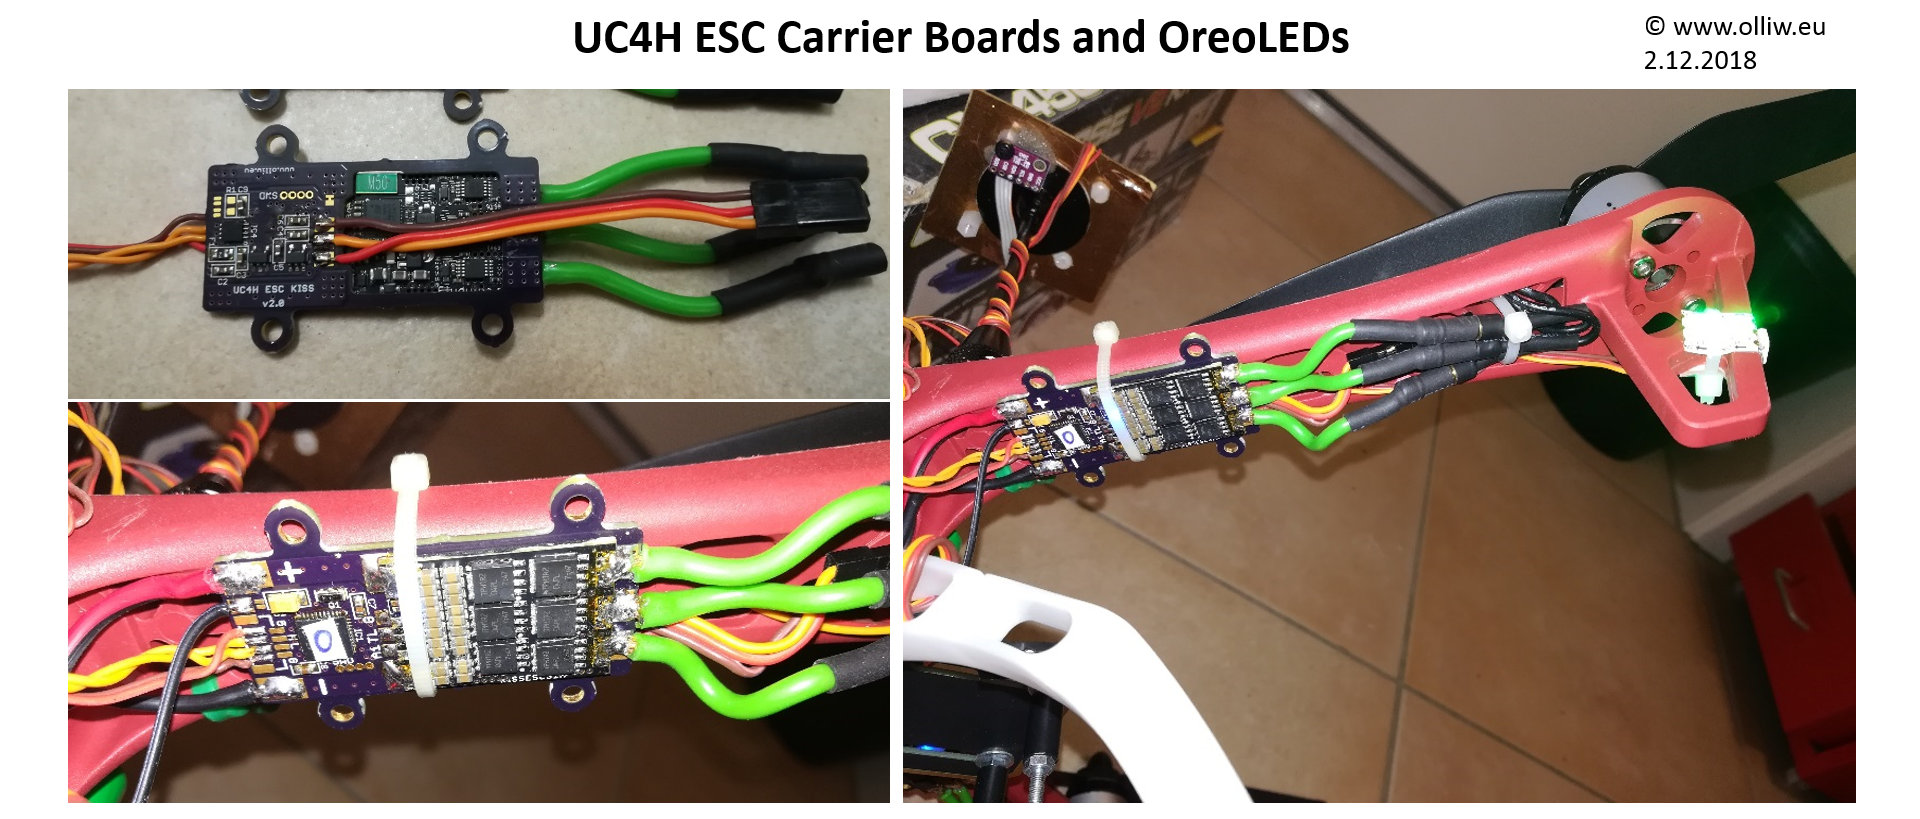
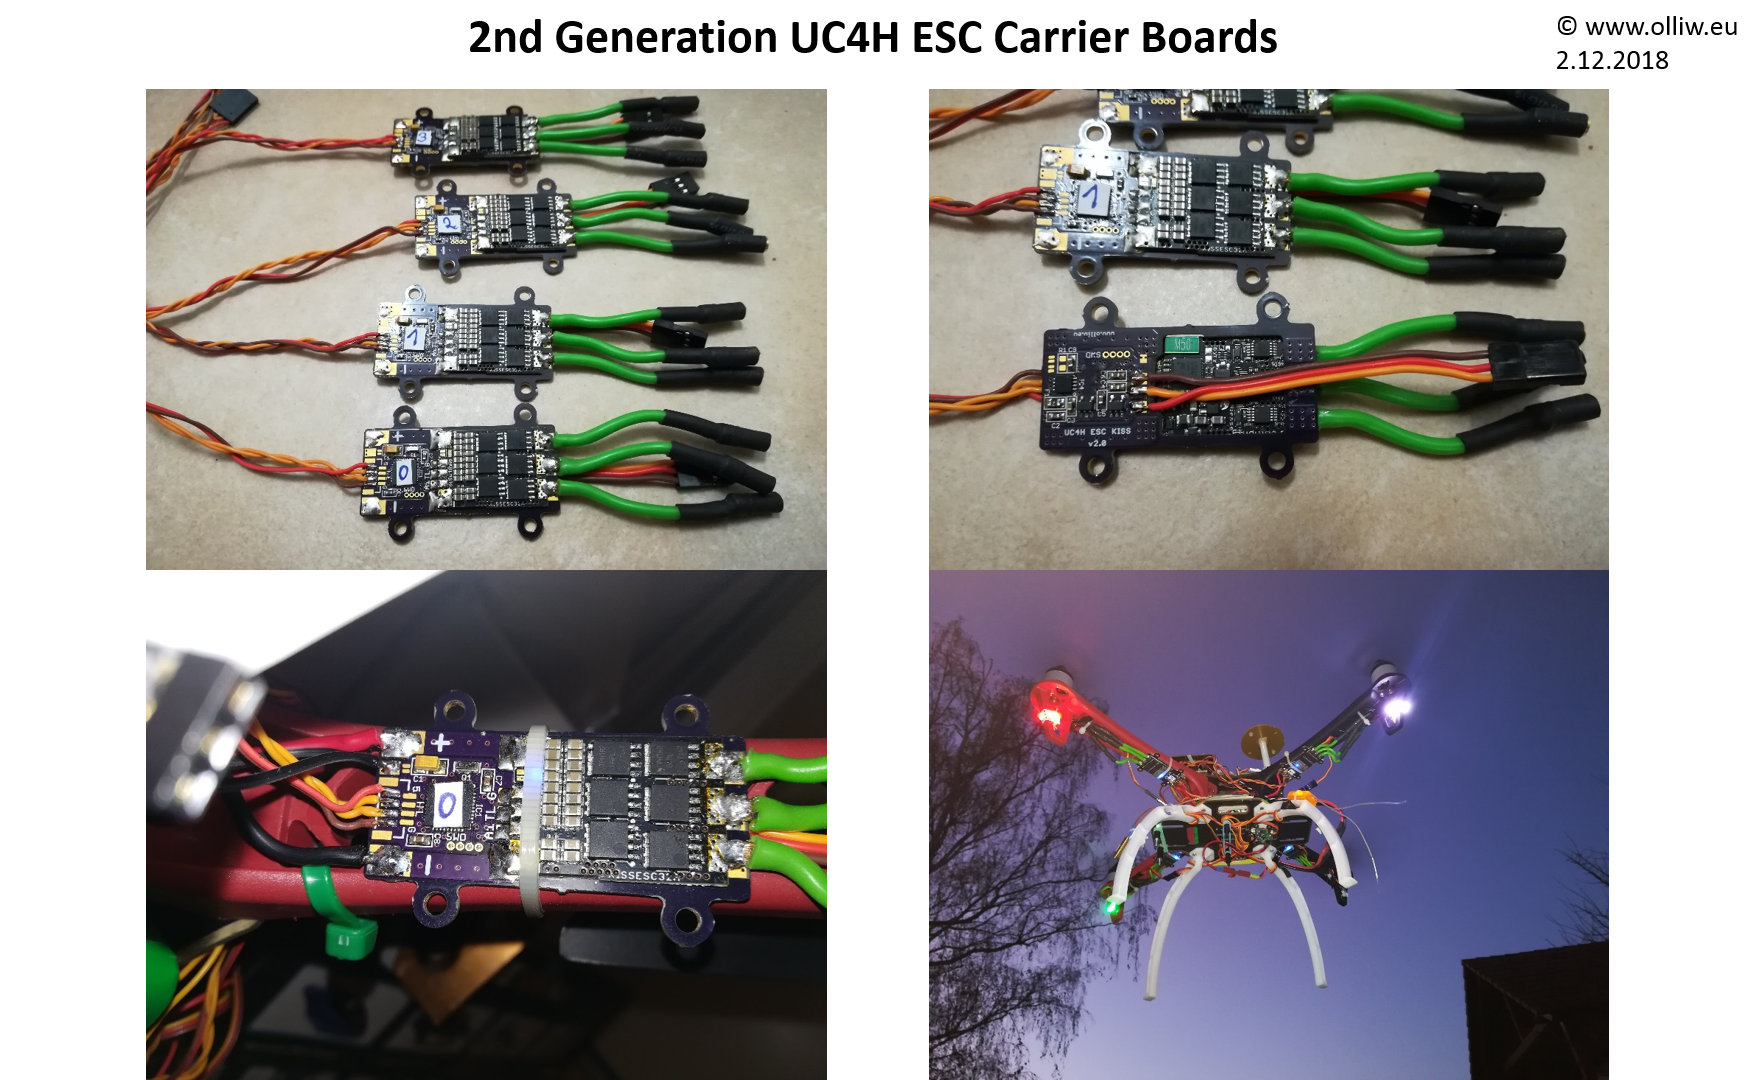
2nd Generation UC4H ESC KISS Carrier Boards installed and tested
23. Nov. 2018
The v1 UC4H ESC KISS Carrier board worked great for me, but it has two design issues. First, it also should be upgraded to the „2nd generation“ principle (see the main thread for an explanation), to make its CAN frontend electrically fool proof. Second, I wanted it to be also able to drive an OreoLED, but the pin which was accessible turned out to be not usable because of a hardware fault in the STM32F103 chip, and the layout wasn’t optimal anyhow. So, here they come, the v2 UC4H ESC KISS Carrier boards. I’ve build and installed them and am flying them since some days. They fully satisfy my expectations :).