Using a ESP8266 Wifi Module
The information on this page refers to firmware v2.29e and higher.
Since firmware version v2.28e, communication via Wifi using the popular ESP8266 Wifi module is available.
Ordering Information
Things to have at minimum:
- ESP-01 ESP8266 Wifi Module with 1MB (8Mb) flash
- USB-to-serial adapter
The need for a ESP8266 Wifi module should be obvious. The USB-to-serial adapter is required for flashing the ESP8266 module with a dedicated firmware and upload other files to the ESP8266. However, you probably have one anyhow, since it's also needed for upgrading STorM32 v1.x main boards.
It is important to get the correct ESP8266 module. Quite many different versions are available, see e.g. [1]. You need a module with 1MB (8Mb) flash, since the STorM32's ESP firmware is made for that flash size.
With proper cabling any ESP8266 module with said flash size can be used. The STorM32 v3.x boards are however prepared for hosting a ESP-01 module. The original ESP-01 module has only 512KB (4Mb) flash and is thus not suitable. You need a "new" ESP-01 module, which nowadays are in fact mostly sold. These are typically black instead of blue, and come with a label "AI-Cloud inside", or as ESP-01s "s series". However, as always with this Asian stuff, one can't be absolutely sure, so buy with care.

Installation
The installation consists of four steps: flashing the ESP8266 module with the dedicated firmware, uploading some data files to the ESP8266 module, connecting the ESP8266 module to the STorM32 controller, and configuring the STorM32 controller.
Flashing the ESP8266
Uploading of Data Files to the ESP8266
Connecting the ESP8266
STorM32 Configuration
ESP8266 Operation Modes
The ESP can be put into different operation modes. You can set and configure the mode by a corresponding entries in the storm32web.cfg file, which is located in the data file folder, and which you just uploaded together with some other files in that folder. However, in the following, we will use the default configuration, which is the AP Bridge mode (for further details see below). The ESP provides then an access point, with these credentials:
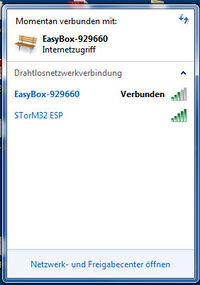
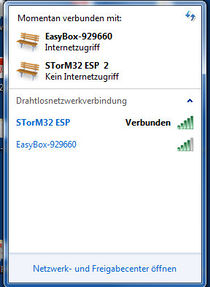
- SSID = STorM32 ESP
- password = thisisgreat
- url = 192.168.4.1
- port = 80
When powered up, you should find an entry 'STorM32 ESP' in the wlan list. For using it you will of course have to connect to it.
 :
: 


The AP Bridge mode allows us to access the STorM32 via both the GUI or the STorM32 Web App, but not both at the same time. Also, once the STorM32 Web App has been called, a connection to the GUI is not possible anymore (using first the GUI, and then the STorM32 Web App works fine, but not vice versa). In order to get again access via the GUI, you have to reset the STorM32 controller (or enter '192.168.4.1/bridge' in the browser).
Comment: This is so because for connecting with the GUI the ESP is switched internally to work as a bridge while for running the STorM32 Web App the ESP is switched internally to act as a web server. It is possible to switch from bridge to web server operation, but back.
GUI
STorM32 Web App
Brief
brief instructions for using the ESP8266 wifi support
0) you need a black ESP-01 (i.e. a ESP-01 with 1M instead of 0.5M)(typically they come with a label "AI-Cloud inside", or as ESP-01s "s series").
1) you need to flash the firmware onto the ESP - connect the ESP to a usb-ttl adapter and connect the pins to bring it into bootloader mode, exactly as explained on one of the many instructions on the web - browse to the o323BgcEspWebApp directory in the STorM32 firmware folder - double click cmd-here.bat - enter uploadInoBin COM??, where COM?? stands for the com port (e.g. COM23), and hit enter
2) you need to upload the files in the data subfolder to the SPIFFS file system - connect the ESP to a usb-ttl adapter and connect the pins to bring it into bootloader mode, exactly as explained on one of the many instructions on the web - browse to the o323BgcEspWebApp directory in the StorM32 firmware folder - double click cmd-here.bat - enter uploadDataToFs COM??, where COM?? stands for the com port (e.g. COM23), and hit enter
3) Connect the ESP to the STorM32 board - connect the ESP's Tx and Rx pins to the STorM32's UART Rx and Tx pins - provide 3.3V power to the ESP (do NOT use the STorM32's 3.3V pins, they are too weak)(do NOT use voltages larger than 3.3V)
4) Configure ESP in STorM32 GUI - set the parameter "Esp Configuration" in the Expert tab to "Uart"
5) Connect Wifi By default the ESP is configured as access point with ssid "STorM32 ESP" and password "thisisgreat". So, connect to it, start the browser, and go to 192.168.4.1. Alternative, start the GUI and choose "ESP" in teh Port field.
You are greatly encouraged to improve the javascript and css files. This is made very easy. The ESP just provides a very rudimentary HTML skeleton, everything essential is filled in by the js and css scripst, and these are stored in the ESP's filesystem. In order to use your own js and css, you just have to upload them to the EPS's filesystem (step 3). You also can provide links to js and css files on your own webspace, which makes development most easy. See storm32web.cfg for details.
repository
The provided ESP firmware, which you just flashed, can be put into three different operation modes: Station, AP, and AP Bridge.
The mode is determined by a corresponding entry in the storm32web.cfg file, which is located in the data file folder, and which you just uploaded together with the other files in that folder. The storm32web.cfg file has some more entries, which need to be set correctly.
- Station: This mode is activated by an entry 'mode = station' in the storm32web.cfg file. In this mode the ESP is configured as client. That means, at startup the ESP will connect to the access point with the SSID and password as set in the storm32web.cfg file (parameters 'router ssid' and 'router password'). Typically this will be your Wifi router. In this mode, the STorM32 can be accessed via the STorM32 Web App, but not the GUI. The url is not trivial to predict, it might be 192.168.2.117.
- AP: This mode is activated by an entry 'mode = AP' in the storm32web.cfg file. In this mode the ESP is configured as access point. That means, after startup you will find a new access point with the SSID and password as set in the storm32web.cfg file (parameters 'AP ssid' and 'AP password'). Per default the SSID is 'STorM32 ESP' and the password 'thisisgreat'. In this mode, the STorM32 can be accessed via the STorM32 Web App, but not the GUI. The STorM32 Web App is started by browsing to the url 192.168.4.1.
- AP Bridge: This mode is activated by an entry 'mode = AP Bridge' in the storm32web.cfg file. In this mode the ESP is configured as access point. That means, after startup you will find a new access point with the SSID and password as set in the storm32web.cfg file (parameters 'AP bridge ssid' and 'AP bridge password'). Per default the SSID is 'STorM32 ESP' and the password 'thisisgreat'. In this mode, the STorM32 can be accessed via the STorM32 Web App, but not the GUI. The STorM32 Web App is started by browsing to the url 192.168.4.1.