Updating the Firmware of NT Modules: Difference between revisions
| (32 intermediate revisions by 2 users not shown) | |||
| Line 1: | Line 1: | ||
All NT | All "OlliW" NT modules can be updated with a new firmware using the procedures below. For proprietary NT modules please see the producer's documentation. | ||
Since firmware version v2.xx it is possible to upgrade an individual NT module with the module being installed in the gimbal. No disconnecting, no other hassles. Furthermore, no additional hardware such as a USB-TTL adapter is needed; one simply connects the STorM32 board to the GUI. Very convenient. This "in-situ" upgrading procedure is called '''''{{GUIPARAM|Upgrade via STorM32 USB port}}'''''. | |||
<!-- | |||
The older procedure of using an USB-TTL adapter connected to the NT bus plug, which may be useful whenever a separate NT module shall be upgraded, is available as '''''{{GUIPARAM|Upgrade via System Bootloader @ UART1}}'''''.--> | |||
== | {{COMMENT|Upgrading implies that the NT module has a NT firmware running. If the NT module has never been flashed with a NT firmware before, or runs a different, non-NT firmware, then you must first do a "First-Time Flashing". Please consult the respective wiki pages.}} | ||
== Upgrading via STorM32 USB Port == | |||
'''1.''' Connect the STorM32 board via its USB port to the PC, open the GUI, and go to the {{GUI|Flash Firmware}} tab. | |||
'''2.''' Select the correct port in the {{GUIFIELD|Port}} field (it's the same port you choose when connecting to the GUI). | |||
'''3.''' Choose the NT module in the {{GUIFIELD|Board}} combo box. Select the firmware via the {{GUIFIELD|Firmware Version}} field, or via the {{GUIFIELD|Selected Firmware Hex File}} text field. Select {{GUIPARAM|Upgrade via STorM32 USB port}} in the {{GUIFIELD|STM32 Programmer}} field. '''''Importantly''''', choose which NT module shall be upgraded in the field {{GUIFIELD|Module Id}}. | |||
::[[File:Storm32-nt-firmware-updating-insitu-gui-screen-02.jpg|640px]] | |||
'''4.''' Hit the {{GUIFIELD|Flash Firmware}} button. A confirmation message box will open, like this one: | |||
::[[File:Check_NT_upgrade.jpg|480px]] | |||
'''5.''' When the selected module and module type are correct, press the {{GUIFIELD|OK}} button. | |||
'''6.''' Now a black window (DOS console) should open and run the flash loader program. Wait until it is finished (takes some seconds). | |||
::[[File:GUI_Flash_2.jpg|640px]] | |||
<!-- | |||
== Upgrading via System Bootloader == | |||
'''1.''' You need a USB-TTL adapter with a FTDI chip set, CH340 chip set, or [[How to configure CP2102 USB adapters for high baud rates|properly configured CP2102]] ({{WARNING|'''not'''}} PL2303). Ensure that it is working (drivers installed, etc.). | '''1.''' You need a USB-TTL adapter with a FTDI chip set, CH340 chip set, or [[How to configure CP2102 USB adapters for high baud rates|properly configured CP2102]] ({{WARNING|'''not'''}} PL2303). Ensure that it is working (drivers installed, etc.). | ||
{{COMMENT|To avoid confusion | {{COMMENT|To avoid confusion about which USB-TTL adapter works, please read [[STorM32_FAQ#Which USB-TTL adapter should I use.3F|FAQ: Which USB-TTL adapter should I use?]].}} | ||
'''2.''' Connect the USB-TTL adapter to the NT bus connector. | '''2.''' Connect the USB-TTL adapter to the NT bus connector. | ||
: | :GND -> connect it to GND of the USB-TTL adapter | ||
: | :Tx -> connect it to Rx of the USB-TTL adapter | ||
: | :Rx -> connect it to Tx of the USB-TTL adapter | ||
: | :VCC -> connect it to power from the USB-TTL adapter | ||
The connections between USB-TTL adapter and NT module are shown in the scheme below. | |||
{{COMMENT|For the CC3D Atom this power scheme often doesn't work. Please use an external power supply, or power it via its USB connector.}} | |||
::[[File:Storm32-nt-firmware-updating-02.jpg|640px]] | |||
'''3.''' Connect the USB-TTL adapter to the computer and open the GUI. | '''3.''' Connect the USB-TTL adapter to the computer and open the GUI. | ||
'''4.''' Go to the {{GUI|Flash Firmware}} tab as seen below. Choose the | '''4.''' Go to the {{GUI|Flash Firmware}} tab as seen below. Choose the NT module in the {{GUIFIELD|Board}} combo box. Select the firmware via the {{GUIFIELD|Firmware Version}} field, or via the {{GUIFIELD|Selected Firmware Hex File}} text field. Select {{GUIPARAM|Upgrade via System Bootloader @ UART1}} in the {{GUIFIELD|STM32 Programmer}} field, and the {{GUIFIELD|Com Port}} associated with your USB-TTL adapter. | ||
::[[File:Storm32-nt-firmware-updating-gui-screen-02.jpg|640px]] | |||
'''5.''' Hit the {{GUIFIELD|Flash Firmware}} button. A DOS box will open, and the firmware will be flashed. | |||
--> | |||
Latest revision as of 04:44, 3 June 2018
All "OlliW" NT modules can be updated with a new firmware using the procedures below. For proprietary NT modules please see the producer's documentation.
Since firmware version v2.xx it is possible to upgrade an individual NT module with the module being installed in the gimbal. No disconnecting, no other hassles. Furthermore, no additional hardware such as a USB-TTL adapter is needed; one simply connects the STorM32 board to the GUI. Very convenient. This "in-situ" upgrading procedure is called "Upgrade via STorM32 USB port".
Comment: Upgrading implies that the NT module has a NT firmware running. If the NT module has never been flashed with a NT firmware before, or runs a different, non-NT firmware, then you must first do a "First-Time Flashing". Please consult the respective wiki pages.
Upgrading via STorM32 USB Port
1. Connect the STorM32 board via its USB port to the PC, open the GUI, and go to the [GUI:Flash Firmware] tab.
2. Select the correct port in the [Port] field (it's the same port you choose when connecting to the GUI).
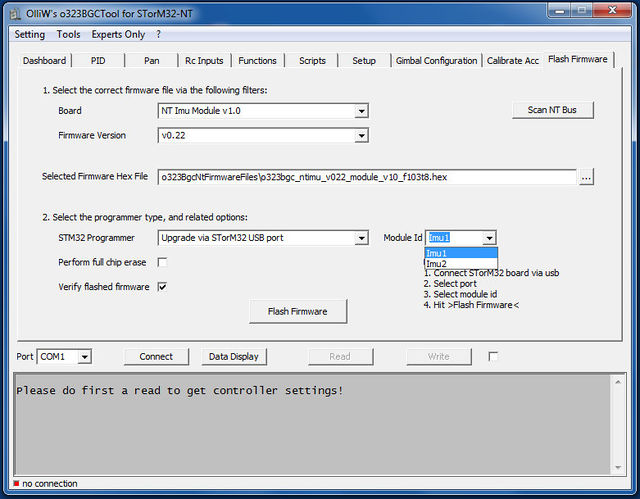
3. Choose the NT module in the [Board] combo box. Select the firmware via the [Firmware Version] field, or via the [Selected Firmware Hex File] text field. Select "Upgrade via STorM32 USB port" in the [STM32 Programmer] field. Importantly, choose which NT module shall be upgraded in the field [Module Id].
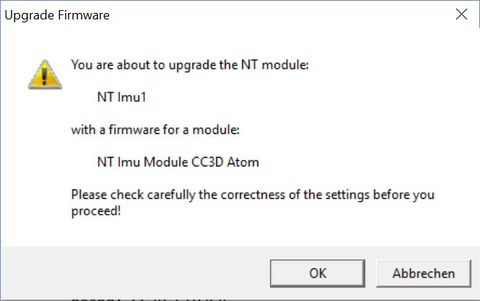
4. Hit the [Flash Firmware] button. A confirmation message box will open, like this one:
5. When the selected module and module type are correct, press the [OK] button.
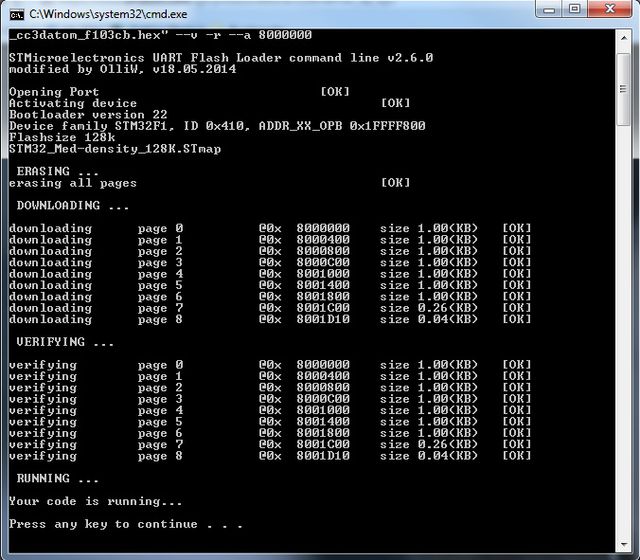
6. Now a black window (DOS console) should open and run the flash loader program. Wait until it is finished (takes some seconds).


