Tuning Recipe
The biggest problem for people new to brushless gimbals is finding the correct values of the PID parameters. A PID controller is a well known and often used method for calculating a new input value by measuring the difference between the current state compared with the target state and applying a formula to the difference. In theory, after such calculation, the target state would be reached immediately, but in reality the motor is not indefinitely fast. So in the next iteration there is a an error still, smaller but it exists and a better input value will be calculated based on the now current difference between actual and target.
Due to this iterative approach the control loop can react very precisely to any kind of distortions, however all kind of bad things might happen if the formula is wrong. For example the gimbal might look down by 15°, our formula is: motorpower = 15° * 2W/°. Due to this amount of power the motor turns 30° instead of the expected 15°. So in the next iteration the direction is inverted to -15° * 2W/° = -30W (30W in the reverse direction). The effect would be a shaking of the motor between the +15° and -15° position. The formula used by a PID control algorithm is more advanced than above example and is optimized for quick reaction without overshooting the the target position (much). But even here, if the parameters are wrong, you get all kinds of weird movement patterns.
see Wikipedia for the details
Balancing the Gimbal
Before you do any tuning, the gimbal has to be balanced. Balancing means the center of gravity of the mounted camera is in the center of all three gimbal motor axis. This can be tested quite easily by moving the camera by hand, while all gimbal motors are turned off, and the camera should remain in that position if you let go. A perfectly balanced gimbal has multiple advantages
- We want to move the camera with the RC stick. When the center of gravity would e.g. be below the pitch axis, the camera would try to get into the vertical position by itself. Which sounds like a good idea at first sight, but as soon as we look downwards or upwards, this effect would work against us.
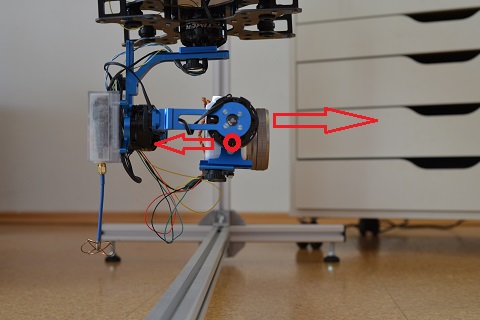
- If the gimbal as a whole is accelerated, the camera would move as well - see image below.
- The motors need to apply more power to keep the camera in the selected position.
In reality you will always need to compromise here, e.g. the Nex Camera has a lens that moves in and out when zooming, the gimbal does not allow infinite adjustments etc. Hence take considerable effort to balance the gimbal but at some point it will be good enough. The stronger the motors are in relationship to the camera weight the more reserve you have, for weaker motors a perfect balance will be more important.
Imagine the copter would accelerate to the right. Because the center of gravity is below the pitch axis, the camera would look a bit downward then.
Tuning Procedure
As each value on every axis might impact the other axis, best approach is to enable one axis after the other. Hence the first step in tuning a brand new gimbal would be to disable all motors except the Pitch motor and find the proper parameters for that. Then enable the Roll motor and tune its parameters, finally the Yaw axis.
Hence we need to go through the steps below for each single axis at a time.
The Starting Point
Set the P, I and D value to zero. Without a P and I there will no position correction at all, the motor will just hold its current position.
Setting Vmax
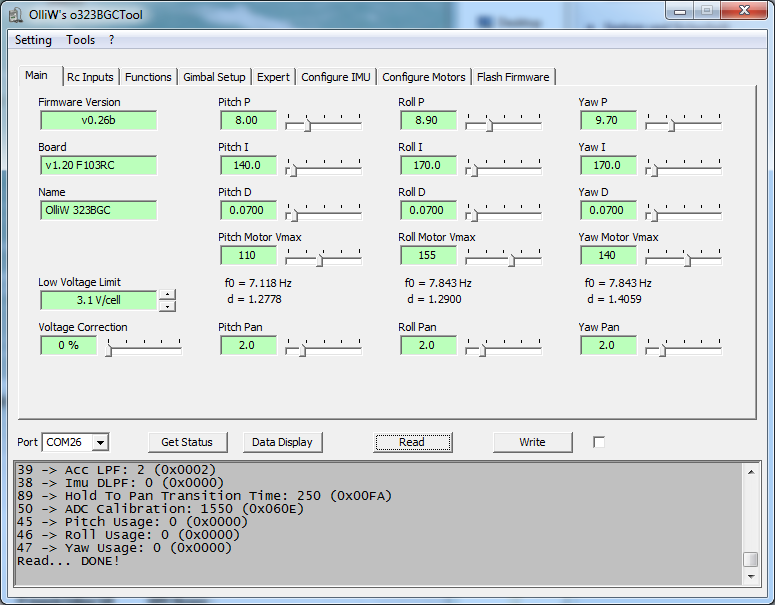
With this [Vmax] parameter we control the amount of energy applied to the motor. The software has the option to increase the value if required, that is controlled by the [Voltage Correction] percentage, which would be yet another unpredictable variable impacting the tuning. Hence set this to zero for now. Now turn the motor by hand against the motor momentum and predict how much force will be required to hold the camera in a steady position at any time.
In this example video the starting value is 190 and there is a clear resistance to any manual movement. Then the value gets reduced to 55 and you can see that the motor can be turned almost freely. In fact, it does not even have enough power to keep the current position - so much about my gimbal being balanced perfectly, right? And finally the value is set to its max of 255. In principle using the max value would be okay, except that it is a waste of battery power and the motor might get hot. Therefore the advice is to define a useful low [Vmax] value, in case this is too low in extreme situations, we can allow temporarily higher values later by using the [Voltage Correction] option.
The D-Parameter
The [D]erivative term of the PID control loop is not directly related to the movement of the gimbal, it is a high frequency correction looking ahead, in order to dampen future oscillations. If this value is too high, the frequency of the correction itself gets visible/audible. Therefore, by keeping P and I at zero and just increasing the D value, we can see at what value there is no high frequency noise on the gimbal motor. The value should be as large as possible but without noise. Once you found a good value, move the motor by hand to doublecheck this noise is not audible at any motor position the gimbal might ever reach. If you find that one value does work in almost all positions except one, that would be an indicator for an imperfectly balanced gimbal on this axis. Go back to start.
Note: You can move the slider with the cursor keys as well. Click on the slider handle and then one click with the left/right key does change the value by its minimal step width. Very useful, especially for the D values.
Listen to this video here. Initially D=0.17 and the gimbal is shaking like mad. A very low frequency with high amplitudes. Then the value is reduced to D=0.10 which lets the position to be stable but a higher frequency noise can be heard clearly. With D=0.05 the frequency is even higher, we want the frequency to be so high that no noise is audible. At D=0.04 the noise is suddenly gone.
The P-Parameter
Now set the I value to 5, which is the lowest non-zero value and start tuning the [P]roportional term of the PID controller. This constant is multiplied with the positional error to get the correction amount. Exactly like in the example shown in the introduction at the top of this page. The higher the factor is the higher the calculated input amount will be. If it is too high we will have the tendency of overshooting the target position and if it is way too high we would get even totally erratic movements. Hence our goal is to have a very high value here but a smooth movement in all motor positions.
The video below shows the procedure. As soon as P and I are set to values greater than zero, the Gimbal moves into the target position automatically. Then the P value is increased and we keep seeing the same behavior. Once P=15 there are some weird shakes when the motor is released from a tilted position, which gets worse and worse and with P=23 the camera does shake for a while even. Only once the P value is down at 13.0 a smooth movement from all positions is achieved.
The I-Parameter
What is annoying still is the amount of time it takes the camera to reach a horizontal position. In the previous video it is so slow that the camera cannot be kept level when the gimbal itself is moved. The [I]ntegral term (integral over the time) is responsible for this part of the movement. So again, we want to increase that value to the maximum possible without introducing any side effects.
Initially the I value is increased to 480 in the video and in comparison you can see the same movement with I=5. Perfect movement now, fast speed, the camera remains horizontal, it truly is horizontal, everything fine. But maybe we can increase it even further. At 700 the same situation, everything looks nice. But at I=1200 you can see that the camera no longer is horizontally aligned, the "time" aspect of the control loop starts to overcompensate. If you look careful at the yellow cable of the IMU connector, it is vibrating - sorry, not very visible in the video. So 1200 is a too high value for sure. There were slight vibrations in some positions of the camera at 700 even, so [I] got set to 620 at the end.
Repeat above 5 steps
First with the roll axis and at the end with the Yaw axis. Yaw is somewhat differently as there is no "horizontal" or zero position in Yaw. And because the Yaw axis has to carry the most weight, the power values are usually higher there, or a larger motor is used.
Next step - RC Inputs
With these settings we have a self leveling gimbal. No matter what movements the gimbal support is undergoing, the camera remains stable. While this might be perfectly sufficient for basic operation, normally the gimbal shall also be moved via a RC stick or, on a hand-held gimbal, via a joystick, or functions such as switching between hold and pan modes or releasing the shutter of the camera remotely are desired.
You can learn about these possibilities in the next chapters; continue with Configure the RC Input.

