
I present here a C2 programmer for flashing Silicon Labs microcontroller, which is build using an Atmel AVR microcontroller. The Atmel AVR microcontrollers are very popular among hobbyiests, and the hard- and software for programming them are thus often already available, and are very cheap anyway. The presented C2 programmer can be build very easily.
Also, „great“ opportunities emerge from it for a brushless mCPX using BLHeli-BESCs, namely the Windows GUI BLHeliTool and the programming box BLHeliBox! Check out the section Applications below or the Tutorials.
BLHeliBox, the box which does it all… 🙂
Latest News (only in German)
27. Okt. 2013: Service Update: Support für ESCs mit F390 Chips und Eazy 3A V2 (Firmware).
1. Aug. 2013: Service Update: Support für Turnigy KForce 120A V2.
23. Juli 2013: owSilProg Firmware zur Verwendung des Cheapduino als owSilProg Programmer. Danke Eric für diese geniale Idee!
18. Juni 2013: Service Update: Support für BLHeli 10.4.
11. Mai. 2013: Service Update: Support für BLHeli 10.3.
22. Apr. 2013: Service Update: Support für BLHeli 10.2-b.
14. Apr. 2013: Service Update: Support für BLHeli 10.2.
20. Mar. 2013: Service Update: Support für BLHeli 10.1.
8. Mar. 2013: Service Update: Bug in AvrBurnTool beseitigt. Danke Malphodo!
22. Feb. 2013: Service Update: (i) Unterstützung für BLHeli 10.0, (ii) Implementierung der neuen AN127 und Unterstützung von 14 C8051FXXX Familien. Firmware-Update mit Beschreibung der Neuerungen wie immer unter Firmware. Großer DANK geht an Maksims, der mich auf das AN127-Update gestoßen und stark unterstützt hat!
4. Feb. 2013: Der Bluetooth-Release: Die Unterstützung von Bluetooth ist nun voll integriert, und BTConfigTool ermöglich eine vollautomatische Konfiguration des Bluetooth-Moduls. Auch die ArduBox, nun v0.12, ist für Bluetooth ausgelegt. Firmware-Update mit Beschreibung der Neuerungen wie immer unter Firmware. Die Tutorials werden ASAP angepasst.
29. Jan. 2013: Der Bluetooth-owSilProg Programmer funktioniert nun! Siehe hier und/oder hier. Ich werde den Aufbau natürlich noch vereinfachen und die Tutorials ASAP anpassen.
21. Jan. 2013: Platinen zum Aufbau der BLHeliBox No. 5 sind nun auch käuflich erhältlich.
20. Jan. 2013: Service Update: (i) Unterstützung für BLHeli 9.4, (ii) BLHeliTool v1.01, COM Port endlich konform mit Windows, Flash weiter optimiert und dadurch erneute ehrhebliche Beschleunigung, (iii) BLHeliBox v1.01, Bug entfernt. Firmware-Update mit Beschreibung der Neuerungen wie immer unter Firmware. Die Tutorials sind nun auch vollständig an die Version v1.XX angepasst!
3. Jan. 2013: Das Große Neujahr Update ist da, mit vielen neuen Features und vielen großen und kleinen Verbesserungen! Updates auf owSilProg v1.00, BLHeliTool v1.00, BLHeliBox v1.00, und AvrBurnTool v1.00. Auch die neueste Box, die BLHeliBox No.5, ist aufgeschlagen. Die Firmware-Updates, mit einer Beschreibung der Neuerungen, sind wie immer unter Firmware verfügbar. Die Tutorials werden so schnell wie möglich angepasst!
15. Dez. 2012: Die neue supercoole Funktion ist da: Die Multiple-ESC-Funktion! Eine genauere Beschreibung wird noch kommen, für den Moment möchte ich auf die Threads bei rcgroups und helifreak verweisen.
ältere Nachrichten
Tutorials
- Building a owSilProg Programmer
- BLHeliTool: Flashing the BLHeli Firmware
- BLHeliTool: Setting the BLHeli Parameters
- The Multiple-ESC Functionality
- BLHeliBox: What it is and how to use it
- BLHeliBox: Construction Manuals
- The Bluetooth Extension
Discussion threads
- Flashing Turnigy Plush(SiLabs) success, now with tutorial! (@rcgroups)
- owSilProg: Flashing BESCs with Silabs MCU using AVRs (@rcgroups)
- owSilProg: AVR-alternative to Silabs toolstick, BLHeliTool, BLHeliBox (@helifreak)
Introduction
The microcontroller from Silicon Labs are certainly not everyone’s cup of tea… there are, IMHO, good reasons for why hobbiests prefer AVR’s, PIC’s, STM’s and so on. However, in the RC area Silabs microcontroller cannot always be bypassed. Recently they turn up more and more often in brushless ESCs, and thanks to the diligent work of some dedicated developers flashing BESCs with improved firmware is also becoming more and more easy and hence popular (for BESCs with Silabs MCU’s the BLHeli firmware by sskaug is to be mentioned).
In principle, with the USB Toolstick of Silabs an appropriate and not too expensive programmer is available, and the required software/toolchain is available for free. However, what is considered expensive or cheap is obviously also a matter of opinion… and for me it depends a lot on how serious I want to get into a topic. Getting into programming of Silabs MCUs, e.g., isn’t what I wanted, and just for flashing a BESC one or two times I find the toolstick too expensive and installing the toolchain too cumbersome. Anyway, the topics ‚Silabs‘ and ‚flashing of BESCs‘ hadn’t been on my agenda (especially as I am very satisfied with my brushless conversion of the mCPX). However, somehow, I nevertheless peeked into the data sheets on the Silabs programming interface and it occured to me: Well, this is not really difficult, and should be easily accomplished with an AVR… and the idea for the owSilProg project was born…
First I of course searched the web for DIY projects on Silabs programmer. For a serial port I found:
– Kawamoto „nanashino“ Yasuhisa’s Simple C8051F300x Writer (google translated), original (Japanese)
and for the LPT port:
– Wojtek Zabolotny’s Simple evaluation board and Linux programmer for C8051F320
– Okb Rosa’s SLABPROG Simply LPT-programmer for Silabs MCU with C2-interface
I didn’t however find these soutions really „trustworthy“ and useful for own purposes, and thus not only the idea was born but also the decisson was made to tackle the owSilProg project…
Overview and Concept
The basic concept of the project is actually pretty simple. An Atmel AVR microcontroller is programmed such that on the one side it handles commands comming from a serial interface (TTL level) and returns corresponding data, and on the other side provides the C2 interface for flashing Silabs MCUs. The corresponding firmware I named owSilProg. The serial interface is usually connected to a PC, and made available to the user via a GUI. The Windows GUI, which I offer, I called SilProgTool. PCs do not provide serial TTL interfaces, and therefore an adapter is additionally needed in order to connect the serial TTL interface to a port of the PC. This will usually be the USB and a USB-TTL adapter is then needed, but it can also be, e.g., Bluetooth, or any other interface.
The concept thus consists of three components, an AVR which is flashed with owSilProg, an adapter, and a „control software“. SilProgTool uses the COM port, and the block scheme looks then like this:

The nice thing about this concept is IMHO its great flexibility. The distinction between the three components is not strict. For instance, one can think about merging owSilProg and the adapter in one AVR and create a USB-C2 programmer. One also can combine all three components in one device and realize a programming box for a BESC (see BLHeliBox). Since the communication involves simple commands send over a serial interfaces without any serious synchronization requirements, it should be also simple to develop a new control software according to the needs. With using one of the cheap Bluetooth TTL adapters the operating software could be a smartphone app. And so on and so forth. The possibilities are only limited by our creativity. I in fact hope for your creativity and am looking forward to see to where this will lead.
owSilProg Firmware
There is not much to say about the firmware for the AVR. It can be in principle adapted to any ATmega or ATiny with more than 4kB flash (tell me your needs and I’ll try to meet them :)). Also the clock frequency can be choosen widely; everything from 1 to 20 MHz should work. However, a ceramic resonator must be used (quartz is better of course), since the internal RC oscillator is not accurate enough.
Below I provide the hex files for a couple of configurations. The baud rate is fixed at 38400 bps. Which pins (of the microcontroller) are used for the C2CK and C2D lines can always be read off from the file name of the hex file. For Arduino boards it is convennient to use the ISP connector for the C2 interface connections, and the pin assignment (except for Mega boards) is then as follows:
PD1 = Tx
PD0 = Rx
PB3 = C2CK
PB4 = C2D
owSilProg Commands
The communication generally consists of sending via the serial TTL interface a command to the owSilProg AVR. It sends then back first the recieved characters. Next, the status information „ok“ or „er“ is send back depending on whether the command was recognized and successfully executed or an error has occurred. If no errors are detected and some data has to be retunred then these data are appended. The return message is terminated by the two characters x0D x3E or „\n>“ in C notation. Since the data stream otherwise contains only readable characters, these terminating characters allow us to detect the end of the return message. The „strange“ choice of the two terminating character is very useful, because it results in a command-line-like output if a simple terminal is used (which is very handy for testing purposes). A final note: data have to be formatted as a Hex string, i.e., the value 75 = 0x4B corresponds to the two characters „4B“.
Examples:
„i“ → „iok\n>“ or „ier\n>“
„bw01000012“ → „bw01000012ok\n>“ or „br01000012er\n>“
„br020000“ → „br020000okXXZZ\n>“ or „br020000er\n>“
The following commands are „understood“ (since owSilProg v0.07):
„v“ = version
Returns the version message „OlliW SilProg vX.XX PXXPXX\n>“ (this is the only return message which doesn’t include an „ok“ or „er“). This command is also useful for testing if the communication via the serial interface is working.
„t“ = test serial connection
Returns „tok\n>“, but otherwise has no effect. This command tests if the communication via the serial interface is working.
„r“ = reset
Initializes the C2 interace and executes a reset; returns „rok\n>“.
„d“ = device ID
Reads the device ID of the Silabs MCU; returns „dokXX\n>“ (where „XX“ stands for the device ID byte) or „der\n>“. The device ID of FF33x MCUs is 0x0A. This command is also useful for testing if the C2 communication is (still) working.
„i“ = init
Initializes the FPI; returns „iok\n>“ or „ier\n>“.
„e“ = device erase
Erases the entire flash memory; returns „eok\n>“ or „eer\n>“.
„p“ = page erase
Erases a page in the flash memory. The page number in hex format „XX“ has to be appended to the command, the command is hence „pXX“. Returns „pXXok\n>“ or „pXXer\n>“.
„br“ = block read
Reads a block of bytes from the flash memory. The number „XX“ of bytes to be read and the address „ZZZZ“ at which reading starts has to be specified. The data are then returned as a hex string. By adding a „:“ after the introductory „br“, the data can also be obtained in Intel hex format. The command and its response (if no error has occured) looks thus like this:
“brXXZZZZ“ → „brXXZZZZok…data…\n>“
“br:XXZZZZ“ → „br:XXZZZZok:XXZZZZ00…data as hex…CC\n>“, where CC is the checksum
„bw“ = block write
Writes a block of bytes to the flash memory. The number „XX“ of bytes to be written and the address „ZZZZ“ at which writing starts has to be specified. The data are appended as hex string. By adding a „:“ after the introductory „bw“, the data can also be obtained in Intel hex format. The command and its response (if no error has occured) looks thus like this:
“bwXXZZZZ…data…“ → „bwXXZZZZ…data…ok\n>“
“bw:XXZZZZ00…data as hex…CC“ → „bw:XXZZZZ00…data as hex…CCok\n>“, where CC is the checksum
Other „special“ commands:
„g“ = get last error
„ma“ = query or set max number of ESC (used for the multiple ESC function)
„ms“ = query or set actice ESC (used for the multiple ESC function)
„cl“ = set C2CK low
„ch“ = set C2CK high
„cz“ = set C2CK high-Z
„xXX“ = extended commands
Notes:
- To fully initialize the communication first a Reset followed by a Init has to be performed, i.e., the sequence of commands „ri“ must be executed.
- In the blockread- and blockwrite commands a „?“ can be inserted after the first two characters. The data is then not interpreted in hex format but as single-byte characters. This can be very useful for testing purposes. However, since the data stream doesn’t consist of only readable characters in general, the end-of-data detection by means of the character „\n>“ is then not safe.
Windows GUI SilProgTool
The Windows GUI SilProgTool allows the flashing of hex files. There are a few other features, such as verification and a debug line, but that may change/improve with time. Besides that, the operation should be obvious.
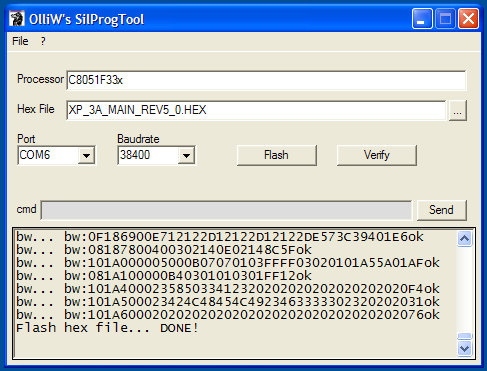
Note: The owSilProg project progressed quite quickly (luckily :)) but I was mainly concerned with flashing BLHeli on Silabs BESCs, as it seems to be the major application currently, and hence the SilProgTool became outdated. Presently, you are better off using BLHeliTool (which in contrast works very nicely :-)).
Useful Resources
Documentation for the C2 interface:
- C2 Interface Specification [.pdf]
- AN127 Flash Programming via the C2 Interface [.pdf]
- AN124 Pin Sharing Techniques for the C2 Interface [.pdf]
Applications
In this section I try to collect examples of applications of owSilProg or links to them.
– The (so far) simplest AND cheapest option for flashing BLHeli. It uses an Arduino Nano V3, and together with the latest versions of AvrBurnTool and BLHeliTool everything is done with a few clicks. As demonstrated by the photos all of the handiwork consists of soldering three cables to the Arduino – it hardly can be easier :). Details are available in the Tutorial. The Arduino Nano is available already for unbeatable $10.50 incl. shipping, for sources of supply look here.


– The BLHeliBox for configuring and flashing BLHeli-BESCs. Using owSilProg it is simple to build a programming box, which can do „all“: (1) Flashing of Silabs-BESCs as usual via a PC, (2) Setting the parameters of the BLHeli-BESCs as usual via BLHeliTool and a PC, (3) „in-field“ setting of the parameters of the BLHeli-BESCs independent of a PC. In the last case the box works as a very comfortable „programming card“. More info is available in the Tutorial. I produced four YouTube videos on the BLHeliBox (v0.07), here one of them as appetizer:
Parts 1, 3, and 4 of the videos you find in my YouTube channel or the Tutorial.
– How cool is this: The BLHeliBox is now available also with a graphical display! And how small it is. Also nice, a stepup converter is not needed anymore. It consists of a Arduino Nano or Arduino Uno, and a LCD4884 shield. Manuals are available in the Tutorial.


– Copperclad has made a BLHeliBox from an Arduino Uno + LCD Shield. Flash firmware, plug things together, solder 3 cables… done… see here. Missing is a Hobbyking step-up converter (Turnigy Voltage Booster), then it would be a 1000% perfect! Here a photo of Copperclad’s setup:

photo by copperclad @ helifreak
– Nimic has realized a BLHeliBox from an Arduino Uno + LCD Shield + HobbyKing Turnigy Voltage Booster. Flash firmware, install voltage booster, plug things together, solder cables… and finished is the 1000% perfect BLHeliBox… see here, or the Tutorial. A video of Nimic’s setup:
video by nimic @ helifreak
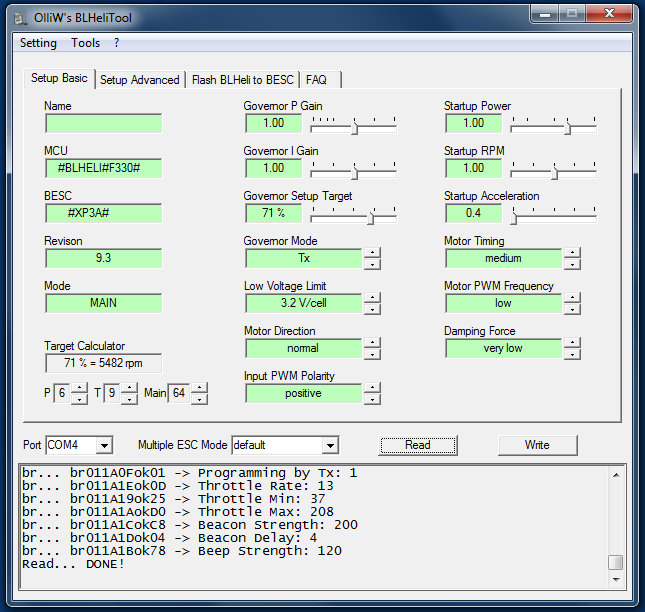
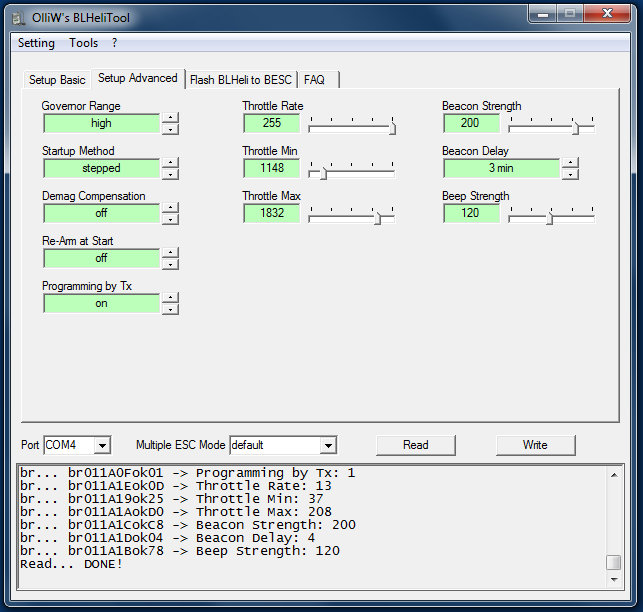
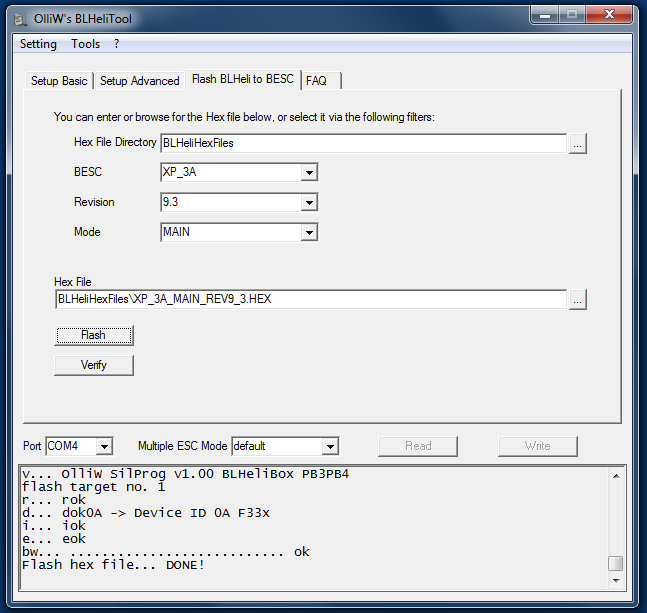
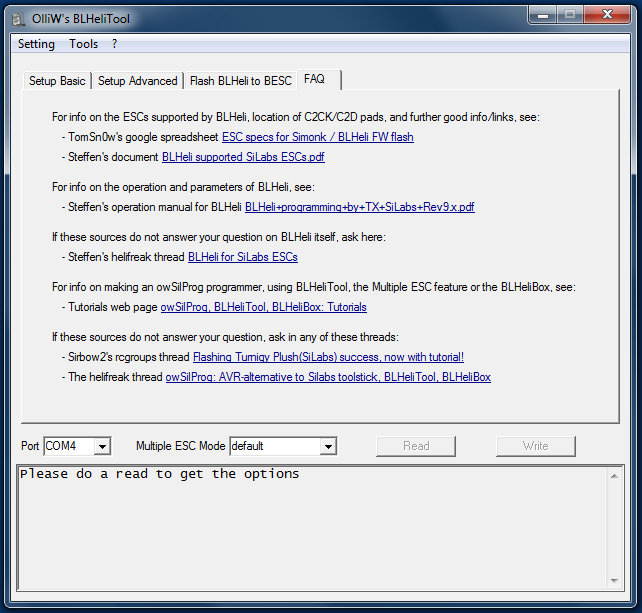
– Windows GUI BLHeliTool for Configuring and Flashing BLHeli BESCs (screenshots of version v1.00).
– Copperclad’s detailed instructions, same application for BLHeli as above, but with an Arduino Pro Mini with 328p, 5.0 V, 16 MHz. Very detailed instructions with many pictures. In this post an Arduino UNO was used.
– Sirbow2’s detailed instructions at rcgroups, for Arduino boards in general (outdated, please follow the „official“ Tutorials)
– Wilsonn1996 demonstrated the use of an Arduino Mega 2560 as owSilProg programmer for flashing, see here.
– Dehas was inventive and uses the Emartuino, see here
– Fnodado was also inventive and used his CRIUS MultiWII for flashing his Turnigy 25 AEs, see here.

photo by fnodado @ rcgroups
– Eric had the fantastic idea to use a Cheapduino for building a multiple-ESC-mode capable owSilProg programmer for his quadcopter! Awesome! (see also here)
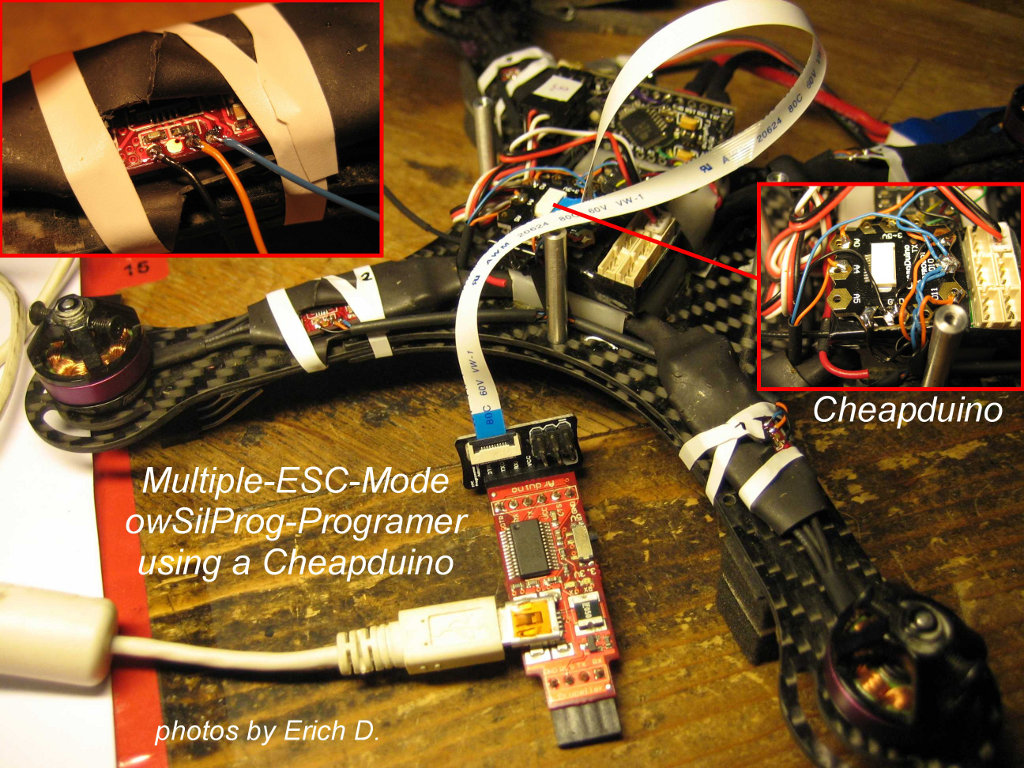
adapted from photos by Eric
– That’s how it started, my test and development setup. Arduino Pro Mini with 328p, 3.3 V, 8 MHz and USB-TTL FT2323RL adapter for flashing a BESC with the BLHeli firmware of sskaug. Plus, there’s the Windows GUI BLHeliTool to adjust the parameters of the BESC. This was, as I said, just my test rig; the story did continue: The easiest and cheapest solution so far uses an Arduino Nano, as described above. Also, the currently available software makes the conversion of any Arduino to an owSilProg programmer a piece of cake (see this Tutorial).

Latest Firm- and Software
1. Okt. 2013, release v20131027
Firmware owSilProg v1.20,1.21:
– for ATmega328p @ 16MHz: owsilprog_v120_m328p_16mhz_pb3pb4.hex
– for ATmega328p @ 8MHz: owsilprog_v120_m328p_8mhz_pb3pb4.hex
– for ATmega168 @ 16MHz: owsilprog_v120_m168_16mhz_pb3pb4.hex
– for ATmega1280 @ 16MHz: owsilprog_v120_m1280_16mhz_pb2pb3.hex
– for ATmega2560 @ 16MHz: owsilprog_v120_m2560_16mhz_pb2pb3.hex
– for ATmega8 @ 16MHz: owsilprog_v121_m8_16mhz_pb3pb4.hex
– for ATmega8 @ 8MHz: owsilprog_v120_m8_8mhz_pb3pb4.hex
– for ArduFlyer (Mega2560): owsilprog_v120_m2560_16mhz_pf1pf0_arduflyer.hex
– for Cheapduino (Mega8): owsilprog_v121_m8_16mhz_pb3pb2_cheapduino.hex
Windows GUI BLHeliTool v1.22:
– BLHeliTool_v122.exe, BLHeliTool.ini, BLHeliTool.dev
Firmware BLHeliBox v1.20:
– for ATmega328p @ 16MHz: BLHeliBox_v120_m328p_16MHz_pb3pb4.hex,
BLHeliBox_v120_lcd4884_m328p_16MHz_pb3pb4.hex,
BLHeliBox_v120_lcd4884_no5_m328p_16MHz_pb3pb4.hex
Windows GUI AvrBurnTool v1.01:
– AvrBurnTool_v101.exe, AvrBurnTool.ini, AvrBurnTool4owSilProg.dev
Avrdude 5.11.1:
– avrdude.exe, avrdude.conf (modified to handle Arduino Mega boards)
Arduino 1.0.1:
– libusb0.dll, boards.txt, drivers folder
BLHeli:
– all Hex files Rev8.0 to Rev10.4 (Thanks Steffen alias sskaug!)
Everything together as zip file: owSilProg BLHeliTool BLHeliBox v20131027 [.zip] (11.7 MB)
Manuals and tutorials for the owSilProg project, BLHeliTool and the BLHeliBox you find here.
Terms of usage: The softwares/firmwares are NOT FREE. You may use it gratis and freely for private purposes only. You may not distribute it publicly or include it in distributions; use links to this page. It is strictly forbidden to use the work in full or in parts in any manner that is intended for or directed toward commercial advantage or private monetary compensation, except you have a written agreement by the author.
Acknowledgements: The BLHeli firmware is due to Steffen/sskaug. Thx to him for this great work. The Target calculator in BLHeliTool was inspired by 4712’s BLHeli-Setup program. Thx to him for this great idea.
Note: Since Rev9.0 some of the default values do depend not only on the mode (main, tail, multi) but also the type of the ESC… this is not (yet) accounted for in BLHeliTool, i.e. executing ‚Default‘ does not reset the parameter values to the actual default values for some ESCs. All other functions work however as intended.
“Features” in v20130320 – v20131027
Changes in owSilProg v1.20,v1.21:
– none
Changes in BLHeliTool v1.20,v1.21,v1.22:
– support of BLHeli 10.1, 10.2, 10.3, 10.4
Changes in BLHeliBox v1.20:
– none
Changes in AvrburnTool v1.01:
– none
“Features” in v20130222b
Changes in owSilProg v1.20:
– implementation of the 1/13 update of the AN127 of Silabs
– support of 14 C8051F families: F30x-F39x, F41x, F50x-F53x, F80x-F83x, F91x/92x
Changes in BLHeliTool v1.20:
– support of BLHeli 10.0
– support of 14 C8051F families: F30x-F39x, F41x, F50x-F53x, F80x-F83x, F91x/92x
Changes in BLHeliBox v1.20:
– support of BLHeli 10.0
Changes in AvrburnTool v1.01:
– bug removed
86 Kommentare